

There’s a particular magic to street food—the irresistible aroma, the promise of a hot, crispy bite, and the simple joy of eating with your hands. For me, that magic is perfectly captured in a batch of freshly fried Akara. These golden, fluffy fritters made from black-eyed peas are a cornerstone of West African breakfasts and snacks, and mastering them at home is deeply rewarding.
When done right, they have a shatteringly crisp exterior that gives way to a soft, savory, and incredibly light interior. Forget dense, greasy bean patties; we’re aiming for cloud-like fritters that are surprisingly simple once you know the key techniques. Let’s make some magic.
This recipe demystifies a beloved classic, turning simple ingredients into something extraordinary.
- Authentic & Crispy Texture: Achieve the perfect contrast of a crunchy shell and a fluffy, airy center that defines great akara.
- Naturally Gluten-Free: Made from just beans, vegetables, and seasoning, it’s a fantastic option for those avoiding gluten.
- Protein-Packed Snack: Black-eyed peas are a fantastic source of plant-based protein and fiber, making these fritters surprisingly satisfying.
- Customizable Heat: You control the spice level by adjusting the quantity and seeds of the scotch bonnet peppers.
- Versatile for Any Meal: Perfect as a hearty breakfast with pap (ogi), a party appetizer with dip, or a savory snack any time of day.
- A Culinary Adventure: It’s a rewarding process that connects you to a beautiful culinary tradition right in your own kitchen.
Ingredients You’ll Need
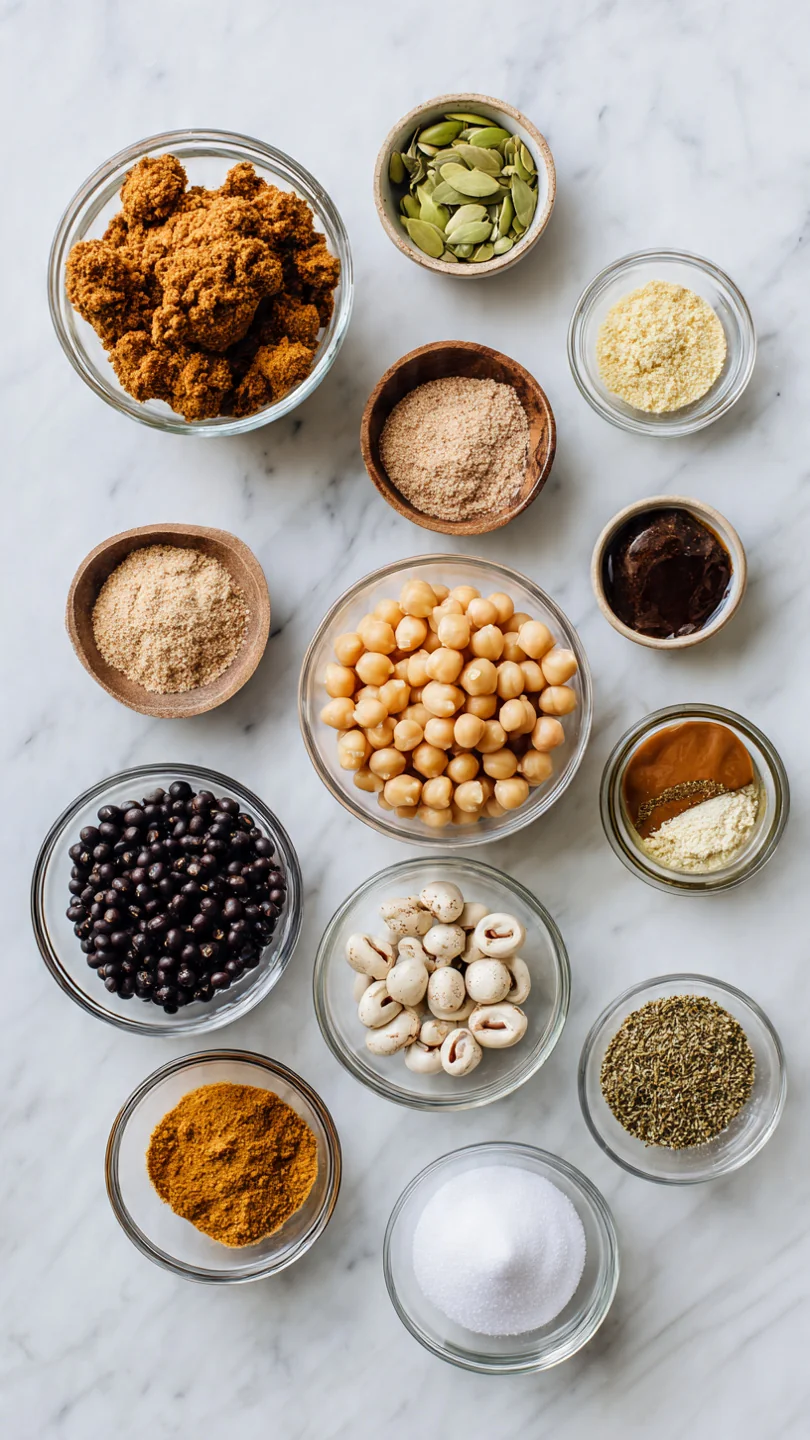
- Let’s gather our ingredients—the list is beautifully short, but each element plays a crucial role. Using dried black-eyed peas (not canned) is non-negotiable for the right texture and ability to peel them.
- Dried Black-Eyed Peas: You’ll need 2 cups. We must peel them, and starting with dried beans is the only way. The peeling process is therapeutic and key for a smooth batter.
- Red Onion: One medium onion, roughly chopped. It sweetens as it cooks inside the fritter.
- Habanero Pepper: 1-2 peppers, seeds removed to control heat. This provides the authentic, fruity heat. Believe me, you can adjust this to your family’s preference.
- Bouillon Powder: 1 teaspoon. This is the primary seasoning. I prefer Knorr chicken or vegetable for depth of flavor.
- Salt: 1 teaspoon, to enhance all the other flavors.
- Neutral Oil: About 1 quart for deep frying. Use an oil with a high smoke point like vegetable, canola, or peanut oil.
Note: You’ll find the complete list of ingredients, along with their exact measurements, in the printable recipe card at the bottom of this post.
Kitchen Equipment Needed
You don’t need specialized equipment, but a few key tools will make the process smoother. A high-powered blender is essential for getting the batter silky smooth. A heavy-bottomed pot (like a Dutch oven) maintains a steady frying temperature, and a deep-fry thermometer takes the guesswork out—this is one place I never recommend winging it.
A wire rack for draining is better than paper towels, as it keeps the underside of the akara crisp. A small cookie scoop or two tablespoons makes forming the fritters easy and consistent.
How to Make Akara Recipe
Step 1: Peel the Black-Eyed Peas
This is the most important prep step. Place the dried beans in a large bowl and cover with warm water. Now, get your hands in there and vigorously rub the beans together for a few minutes.
You’ll feel the skins loosening. Add more cool water, and watch the skins float to the top—skim them off and discard. Repeat this rinse-and-skim process 4-5 times until the water is mostly clear.
Tip from me: don’t strive for 100% perfection; getting most of the skins off is what matters. Finally, cover the peeled beans with fresh water and soak for at least 4 hours or overnight. They’ll double in size.
Step 2: Blend to Perfection
Drain your soaked beans thoroughly—excess water will make your batter thin. Add them to your blender with the onion, pepper, bouillon, and salt. Add about 1/4 cup of water to get things moving.
Blend on high until you have a completely smooth, thick, and airy paste. This can take 2-3 minutes. Stop and scrape down the sides as needed.
The consistency is crucial: it should be like a very thick, droppable pancake batter. If it’s too thick, add water a tablespoon at a time.
Step 3: Whip the Batter
Pour your smooth batter into a large mixing bowl. Now, take a whisk or wooden spoon and whip it. Whip it good!
Vigorously beat the batter for a full 3-5 minutes in one direction. Trust me, this incorporates air and is the secret to a fluffy interior, not a dense one. You’ll see the batter become paler and even fluffier.
It’s ready when a spoonful holds a soft shape for a second before melting back.
Step 4: Fry to Golden Brown
In your heavy pot, heat the oil over medium heat to a steady 350°F (175°C). A thermometer is your best friend here. The oil is ready when a tiny drop of batter sizzles and rises immediately to the top.
Using a tablespoon, gently scoop and drop portions of batter into the oil. Do not overcrowd—fry in batches of 5-6. They should sizzle actively but not violently.
Step 5: Drain and Serve Immediately
Fry for about 3-4 minutes per side, flipping once, until they are a deep, uniform golden brown and feel light when lifted. Remove them with a slotted spoon and let them drain on a wire rack. This keeps all sides crisp, unlike paper towels which can steam the bottom.
Step back and admire your beautiful, golden akara! Serve them piping hot for the ultimate crispy experience.
A few insights from the kitchen can make the difference between good and great akara.
- Batter Consistency is King: Your blended batter should be thick enough to slowly drop from a spoon. If it pours easily, it’s too thin and will absorb oil. If it’s too thick, the fritters will be dense.
- Temperature Control: Maintaining 350°F oil is non-negotiable. Too cool, and they become greasy sponges. Too hot, and they brown outside while staying raw inside. Let the oil reheat between batches.
- The Whipping Work: Don’t skip or shorten the whipping time. This mechanical aeration is what gives akara its characteristic lightness. Think of it as building the structure for your fritter.
- No Overcrowding: Adding too many fritters at once crashes the oil temperature. Fry in small, manageable batches for consistent results.
- Test One First: Before committing a whole batch, fry one test fritter. This lets you check seasoning and adjust batter thickness if needed.
Recipe Variations
- The basic akara is a perfect canvas for creativity. Here are some delicious ways to mix it up.
- Herb & Spinach Akara: Fold 1/2 cup of finely chopped fresh parsley, cilantro, or tender spinach leaves into the whipped batter for a colorful, herby twist.
- Shrimp or Fish Akara: Add 1/2 cup of finely chopped cooked shrimp or flaked smoked fish (like mackerel) to the batter for a luxurious, protein-boosted version.
- Akara Balls (Bean Balls): Form the batter into small, round balls and deep-fry them. These are perfect for party toothpicks and dipping.
- Baked “Healthier” Version: For a lighter take, drop spoonfuls onto a parchment-lined, well-oiled baking sheet. Brush the tops with oil and bake at 400°F for 20-25 minutes, flipping halfway, until firm and golden. They won’t be as crisp but are still delicious.
- Sweet Akara: For a surprising dessert, omit the pepper and bouillon. Add 2-3 tablespoons of sugar, a teaspoon of vanilla or nutmeg, and perhaps some raisins to the batter before frying. Dust with powdered sugar to serve.
What to Serve With This Recipe
Akara is wonderfully versatile. For a traditional Nigerian breakfast, serve it alongside a warm, smooth pap (ogi/akamu), which is a fermented corn pudding—the soft pap complements the crispy fritters perfectly. As an appetizer or snack, offer a side of spicy tomato and pepper sauce (ata dindin) or a creamy, herby yogurt dip.
They also pair beautifully with a simple, crisp side salad to balance the richness. For a hearty meal, serve with jollof rice or as part of a brunch spread with other savory items. A cold, non-alcoholic ginger beer or a light lager makes a fantastic beverage pairing.
Storage & Make-Ahead Instructions
- Akara is truly best eaten immediately after frying. However, if you have leftovers, let them cool completely on the wire rack, then store in a single layer in an airtight container in the refrigerator for up to 2 days.
- Reheating: To recrisp, avoid the microwave. Instead, reheat in an air fryer or toaster oven at 375°F for 3-5 minutes, or in a conventional oven on a baking sheet for about 8-10 minutes. They won’t be quite as perfect as fresh, but this method works well.
- Freezing: You can freeze cooled akara in a single layer on a baking sheet before transferring to a freezer bag for up to a month. Reheat from frozen in a 375°F oven for 10-15 minutes.
- Make-Ahead Batter: The batter can be made 1-2 hours in advance and kept covered in the refrigerator. You may need to whip it for another 30 seconds before frying to re-incorporate the air.
Frequently Asked Questions
Q: Can I use canned black-eyed peas?
A: Unfortunately, no. Canned beans are already cooked and soft, making it impossible to peel them and achieve the necessary thick, blendable paste. Starting with dried beans is essential for authentic texture.
Q: My batter is too thin/runny. How can I fix it?
A: A runny batter is often due to too much water during blending or insufficient soaking water being drained. The best fix is to add a small amount of chickpea flour (besan) or all-purpose flour (1-2 tbsp) to thicken it, though this alters the traditional recipe slightly.
Q: Why did my akara absorb so much oil and become dense?
A: This is almost always due to frying in oil that is not hot enough. The batter sinks and soaks up oil before a crust can form. Always use a thermometer and ensure the oil returns to 350°F between batches.
Q: Can I bake these instead of frying?
A: You can bake them as noted in the variations, but the texture will be more like a savory bean muffin—soft throughout without the signature crispy shell. It’s a different, but still tasty, result.
Q: How do I know when the oil is hot enough without a thermometer?
A: The traditional test is to drop a tiny bit of batter into the oil. If it sizzles immediately and rises to the top without browning right away, the oil is ready. If it sinks, it’s too cold.
If it immediately burns, it’s too hot.
Q: Are these vegan?
A: Yes, if you use vegetable bouillon powder instead of chicken bouillon, this recipe is completely vegan and plant-based.
Q: Can I make these in an air fryer?
A: For a lighter version, you can. Spray the basket well with oil, add spoonfuls of batter (they will spread), and air fry at 375°F for 10-12 minutes, flipping halfway. The texture is more uniform and cake-like, not as crisp as deep-frying.
Final Thoughts
Mastering akara is one of those kitchen accomplishments that fills you with pride. It’s a process that connects you to generations of cooks who have transformed humble beans into something celebratory and delicious. The effort put into peeling and whipping pays off with every light, crispy, flavorful bite.
This recipe gives you all the professional tips you need to succeed on your first try. I encourage you to embrace the process, trust the techniques, and most importantly, share the results. There’s nothing quite like serving a platter of hot, homemade akara to friends and family.
Give it a try, and don’t forget to come back and let me know how it went in the comments below. Happy cooking

Akara (Nigerian Black-Eyed Pea Fritters)
Equipment
- High-powered blender or food processor
- Large heavy-bottomed pot or Dutch oven (for frying)
- Deep-fry thermometer
- Wire rack and baking sheet (for draining)
- Slotted spoon
- Tablespoon or small cookie scoop
Ingredients
- 2 cups dried black-eyed peas NOT canned; you must start with dried beans
- 1 medium red onion roughly chopped
- 1-2 pieces habanero or scotch bonnet pepper seeds removed for less heat, adjust to taste
- 1 tsp bouillon powder or cube chicken or vegetable; I prefer Knorr
- 1 tsp salt or to taste
- 1/4 cup water approximately, for blending
- 1 qt neutral oil for deep frying; like vegetable, canola, or peanut oil
Instructions
- Place the dried black-eyed peas in a large bowl. Cover with 4-5 cups of warm water. Using your hands, vigorously rub the beans together for 2-3 minutes; this helps loosen the skins. Add more cool water, and the skins will float to the top. Skim them off and discard. Repeat this rinsing and skin-removal process 4-5 times until the water is mostly clear and most skins are gone. Soak the peeled beans in fresh water for at least 4 hours, or ideally overnight.
- Drain the soaked beans thoroughly. Add them to a high-powered blender along with the chopped onion, pepper, bouillon, and salt. Add about 1/4 cup of water to start. Blend on high until you achieve a completely smooth, thick, and airy paste, stopping to scrape down the sides as needed. The consistency should be like a very thick pancake batter. If it’s too thick to blend, add water one tablespoon at a time. Over-blending is better than under-blending here.
- Pour the batter into a large mixing bowl. Using a whisk or a wooden spoon, vigorously whip the batter for 3-5 minutes in one direction. Trust me, this is the secret step! You are incorporating air, which makes the akara light and fluffy. The batter will become lighter in color and even fluffier. It’s ready when you can drop a spoonful and it holds a soft peak briefly.
- In a deep, heavy-bottomed pot or Dutch oven, heat the oil over medium heat to 350°F (175°C). Use a thermometer for accuracy. The oil is ready when a tiny drop of batter sizzles and rises immediately to the top. Using a tablespoon or a small cookie scoop, gently drop portions of batter into the hot oil. Do not overcrowd the pot—fry in batches.
- Fry for 3-4 minutes per side, flipping once, until deeply golden brown and crispy all over. The akara should feel light when you lift it. Remove with a slotted spoon and drain on a wire rack set over a baking sheet (this keeps them crisp). Repeat with remaining batter. Serve immediately while hot and crispy.