

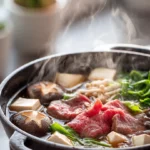
There’s something uniquely comforting about gathering around a steaming pot, watching ingredients gently simmer in a fragrant, savory-sweet broth. Beef Sukiyaki is more than just a meal; it’s a warm, interactive dining experience perfect for chilly evenings or bringing family to the table. As a chef, I love how this dish balances profound flavor with deceptively simple technique.
The magic lies in the harmony of thinly sliced beef, soft tofu, and fresh vegetables, all united by a rich, glossy sauce called tare. Trust me, once you experience the ritual of cooking and dipping each bite, you’ll understand why this hot pot is a beloved Japanese classic.
- Interactive & Social Dining: Cooking and eating directly from the pot makes for a fun, engaging meal perfect for gatherings.
- Big Flavor, Fast: The savory-sweet tare sauce comes together in minutes but delivers restaurant-quality depth.
- One-Pot Convenience: Minimal cleanup is a major win. Everything cooks in a single vessel.
- Endlessly Customizable: Easily adjust vegetables or protein based on preference or what’s in your fridge.
- Nutrient-Packed: You get a complete meal with protein, vegetables, and healthy fats in every bowl.
- Cozy Comfort Food: The warm, simmering broth and rich flavors are the ultimate in edible comfort.
Ingredients You’ll Need
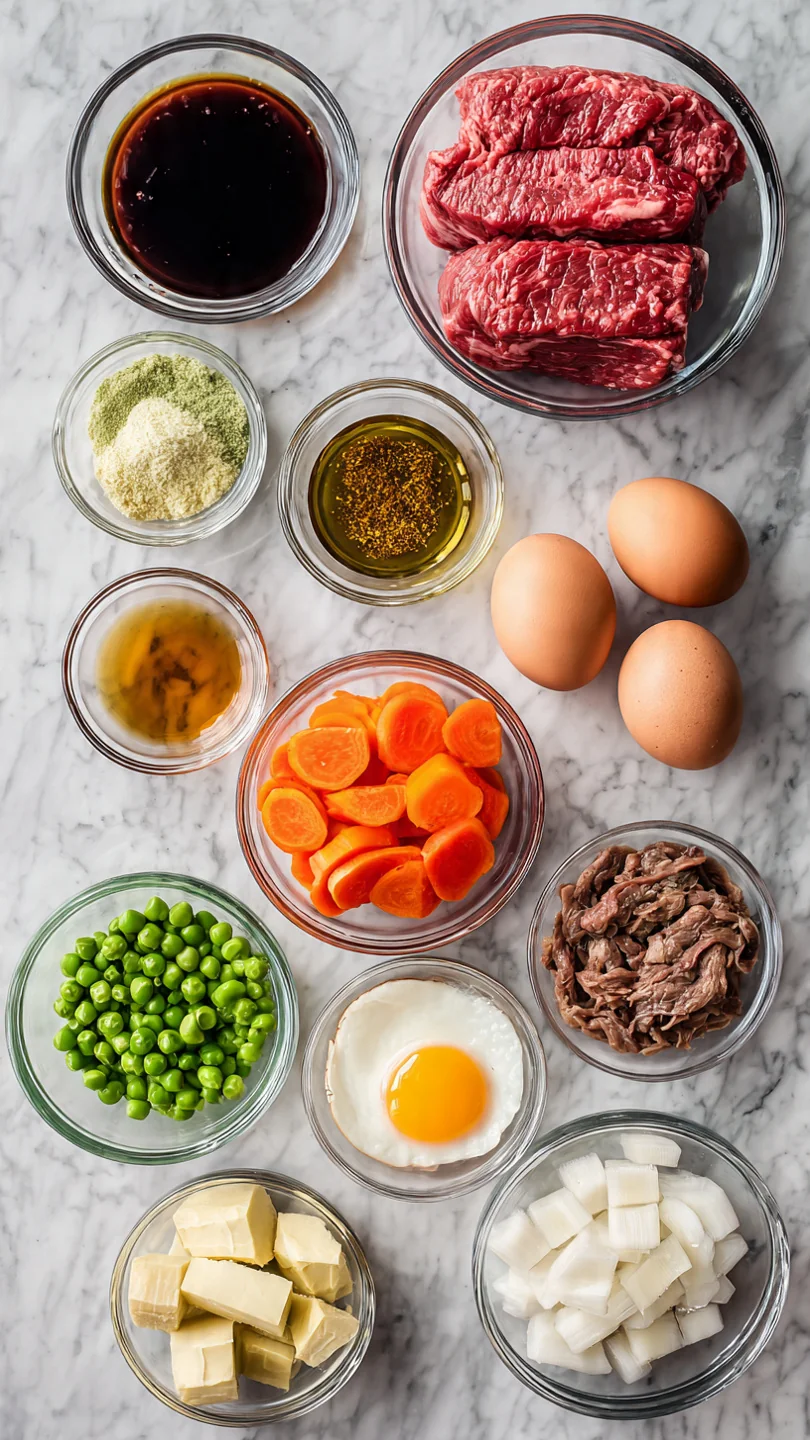
Let’s gather our ingredients—this is where the magic starts. Sukiyaki’s soul is its balance of sweet, salty, and savory, achieved with a few key pantry staples. Don’t be intimidated by the list; it’s mostly about assembly.
The star is, of course, the beef. For the most authentic result and tender bite, ask your butcher for sukiyaki-cut beef, or see my tip below for slicing it yourself.
For the Tare (Seasoning Sauce):
- Mirin: This sweet Japanese rice wine is non-negotiable for authentic flavor. It provides a gentle sweetness and gloss to the sauce.
- Soy Sauce: Use a regular Japanese soy sauce (koikuchi). I don’t recommend low-sodium here, as the sugar and other ingredients balance the saltiness.
- Granulated Sugar: Essential for creating the classic sweet-savory profile. We dissolve it directly into the sauce.
- Dashi Stock: The subtle umami backbone. Instant dashi powder mixed with water works perfectly.
For the Hot Pot:
- Ribeye or Sirloin Beef: Get it as thin as possible. Partially freeze a steak for 30-45 minutes to make paper-thin slicing at home much easier.
- Yellow Onion: Sliced into wedges, they sweeten beautifully as they simmer.
- Green Onion (Naganegi): Use the white and light green parts, cut on a diagonal for more surface area.
- Shirataki Noodles: These translucent, low-carb konjac noodles are traditional. Rinse them well under hot water to remove any aroma.
- Firm Tofu: Gently pat it dry before cubing so it soaks up the sauce without falling apart.
- Enoki & Shiitake Mushrooms: Enoki add delicate texture, while shiitake contribute a meaty, earthy flavor.
- Napa Cabbage: The sturdy leaves hold up well to simmering and add a lovely sweetness.
- Shungiku (Chrysanthemum Greens): These have a unique, slightly bitter flavor. Fresh spinach or watercress are excellent substitutes.
- Eggs: Provide one raw, beaten egg per person for dipping. It’s a classic part of the experience!
Note: You’ll find the complete list of ingredients, along with their exact measurements, in the printable recipe card at the bottom of this post.
Kitchen Equipment Needed
You don’t need specialized Japanese cookware to make great sukiyaki. A large, shallow cast-iron skillet or Dutch oven works wonderfully. The key is a wide cooking surface so ingredients aren’t piled too high.
An electric skillet or hot plate at the table is fantastic for keeping everything simmering while you eat. You’ll also need a good sharp knife for slicing, a medium saucepan for the sauce, and some tongs or cooking chopsticks for handling the ingredients in the pot.
How to Make Beef Sukiyaki Recipe
Step 1: Craft the Signature Tare Sauce
In your saucepan, combine the mirin, soy sauce, sugar, and dashi. Place it over medium heat. Your goal here is to gently warm the mixture while stirring until the sugar crystals completely disappear.
You should see small bubbles just starting to form at the edges—this is perfect. Never let it come to a rolling boil, as the sugar can caramelize too much and make the sauce bitter. Once smooth, take it off the heat.
This concentrated tare is the flavor engine of your entire dish.
Step 2: Prepare Your Mise en Place
This is the most important prep step. Arrange all your washed, cut vegetables, tofu, and noodles on a large platter. Pat your thinly sliced beef completely dry with paper towels; this ensures it will sear properly instead of steaming.
Having everything organized and within arm’s reach is non-negotiable. Believe me, when you start cooking at the table, you don’t want to be running back to the kitchen for the mushrooms.
Step 3: Sear the Beef for Foundation
Heat your pot over medium-high heat. Add a tiny bit of oil or a piece of beef fat. Working in batches, sear a few slices of beef for just 15-20 seconds per side.
You’re not cooking them through—just getting a bit of color and rendering some fat to flavor the pot. Transfer the seared beef to a clean plate. This quick step adds a deep, meaty dimension to the broth that you simply can’t get from boiling alone.
Step 4: Build and Simmer the Hot Pot
In the same pot with the beef fond, add a portion of your onion wedges. Let them cook for about a minute until they just start to soften. Now, carefully pour in about one cup of your prepared tare sauce.
It will sizzle and steam impressively. Immediately arrange a portion of the seared beef, tofu, mushrooms, cabbage, and noodles into the simmering liquid. Let everything cook together for 3-4 minutes, gently nudging ingredients into the broth.
Step 5: Add Greens, Serve, and Enjoy
In the last minute of cooking, add the green onions and the delicate shungiku or spinach. They wilt quickly. Now comes the fun part: serving directly from the pot.
Provide each person with a small bowl containing a raw, beaten egg. The ritual is to dip the hot, sauce-coated beef and vegetables into the egg before eating. The residual heat gently cooks the egg into a luxuriously creamy coating.
As you eat, simply add more ingredients and tare to the pot and continue simmering.
- The Beef is Key: For the most tender result, slice against the grain. If you’re doing it yourself, a partially frozen piece of meat is infinitely easier to slice paper-thin.
- Control the Sweetness: The tare is meant to be potent. If you find it too sweet on its own, trust the process. Once it dilutes with the vegetables’ juices in the pot, it balances perfectly.
- Don’t Overcrowd: Cook in batches if your pot is small. Ingredients should simmer in a single layer for even cooking and proper sauce coverage.
- Egg Safety: If you’re hesitant about raw eggs, use pasteurized eggs for the dipping sauce. The texture and experience are worth it.
- Broth Management: As you eat and the broth reduces, it will become saltier and sweeter. Add a splash of water or mild dashi to the pot to adjust the seasoning.
Recipe Variations
- Vegetarian Sukiyaki: Omit the beef. Use hearty mushrooms like king oyster and maitake, extra tofu, and add seitan or thick slices of roasted sweet potato for substance. Use a strong kombu dashi for the tare.
- Seafood Twist: Add large scallops, shrimp, or firm white fish fillets in the last few minutes of cooking. The delicate seafood cooks quickly in the flavorful broth.
- Spicy Sukiyaki: Add 1-2 teaspoons of rayu (chili oil) or a few sliced fresh Thai chilies to the tare sauce for a warming kick.
- Udon Finish: After you’ve eaten most of the ingredients, add cooked udon noodles to the remaining broth for a fantastic, flavorful noodle soup course.
- Low-Sugar Version: Replace the granulated sugar with 1/3 cup of erythritol or allulose, adding it at the end of making the tare off the heat to prevent graininess.
What to Serve With This Recipe
Sukiyaki is a complete meal in a pot, but it’s traditionally served with a bowl of steamed Japanese short-grain rice. The plain rice is essential for balancing the rich, salty-sweet flavors of the dish. A simple, crisp side salad with a ginger-sesame dressing can provide a refreshing contrast.
For beverages, consider green tea, a cold Japanese lager, or a light, fruity red wine like Pinot Noir. This meal is perfect for a cozy weekend dinner, a festive holiday gathering, or any time you want a dining experience that’s both delicious and interactive.
Storage & Make-Ahead Instructions
- Leftover Broth & Ingredients: Store cooked ingredients separately from the remaining tare broth in airtight containers in the refrigerator for up to 2 days.
- Reheating: Reheat the broth gently in a pot, then add the solid ingredients just to warm through. Avoid boiling, as it can toughen the beef and overcook the vegetables.
- Make-Ahead Tare: The tare sauce can be made up to 5 days in advance and stored in the refrigerator. This makes weeknight sukiyaki a breeze—just slice your ingredients and you’re ready to cook.
- Not for Freezing: I do not recommend freezing assembled sukiyaki, as the texture of the tofu and vegetables will become unpleasantly mushy upon thawing.
Frequently Asked Questions
Q: Can I use a different cut of beef?
A: Absolutely. While ribeye or sirloin are ideal for their marbling and tenderness, you can use flank steak or chuck roast if sliced extremely thinly against the grain. The key is the thinness, not just the cut.
Q: I can’t find mirin. What can I use?
A: Authentic mirin is best, but in a pinch, you can combine 3/4 cup of dry sherry or sake with 1/4 cup of simple syrup (equal parts sugar and water, dissolved). The flavor won’t be identical, but it will provide the necessary sweetness and alcohol content.
Q: Do I have to use the raw egg dip?
A: No, it’s optional but highly traditional. If you prefer, you can serve the sukiyaki over steamed rice without the egg, or provide a small dish of the tare sauce for dipping instead.
Q: My broth is getting too salty/sweet as we eat. What should I do?
A: This is normal as the liquid reduces. Simply add a splash of water, unsalted dashi, or even a little sake to the pot to dilute and re-balance the seasoning.
Q: Can I make this entirely ahead of time for a party?
A: You can prep all ingredients and make the tare ahead. I recommend cooking it fresh at the table for the best texture and experience. Pre-cooked vegetables will become soggy.
Q: What’s the difference between Sukiyaki and Shabu-Shabu?
A: Sukiyaki features a pre-mixed, flavorful cooking sauce (tare), while Shabu-Shabu involves swishing ingredients in plain, simmering water or kelp broth and then dipping them in separate sauces.
Q: Is there a gluten-free version?
A: Yes. Use tamari (gluten-free soy sauce) and ensure your mirin is gluten-free (some brands add wheat). Check that your dashi powder is also gluten-free.
Final Thoughts
Mastering Beef Sukiyaki at home is a rewarding culinary adventure that brings restaurant-quality warmth and flavor to your table. This recipe demystifies the process, focusing on the simple techniques that yield the most delicious results: a perfectly balanced broth, tender beef, and vegetables that soak up all that savory-sweet goodness. It’s a dish that invites conversation, slows down the meal, and creates lasting memories.
I encourage you to gather your ingredients, crack that egg for dipping, and dive into the wonderfully communal world of nabemono. Once you try it, I’m confident it will become a cherished ritual in your home kitchen. Don’t forget to share your sukiyaki creations with me—I love seeing how you make these recipes your own
Beef Sukiyaki (Japanese Hot Pot)
Equipment
- Large shallow cast iron pot, donabe (clay pot), or electric skillet
- Sharp chef’s knife
- Medium saucepan
- Tongs or cooking chopsticks
- Platters for ingredient prep
Ingredients
- 1 cup mirin Sweet Japanese rice wine; do not substitute with cooking sherry
- 1 cup soy sauce Use regular Japanese soy sauce (koikuchi), not low-sodium for authentic flavor
- 1/2 cup granulated sugar Essential for the signature sweet-savory balance
- 1 cup dashi stock Or substitute with 1 cup water + 1 tsp dashi powder
- 1.5 lbs ribeye or sirloin beef Thinly sliced for sukiyaki (ask your butcher or partially freeze for easier slicing)
- 1 large yellow onion Sliced into 1/2-inch thick wedges
- 4 stalks green onion (naganegi) Cut into 2-inch diagonal pieces
- 1 package shirataki noodles Konjac noodles, rinsed and drained; optional but traditional
- 1 package firm tofu Cut into 1-inch cubes
- 8 oz enoki mushrooms Trimmed and separated
- 4 oz shiitake mushrooms Stems removed, caps left whole or halved if large
- 1/2 head napa cabbage Cut into 2-inch pieces
- 1 bunch shungiku (chrysanthemum greens) Optional; substitute with spinach or watercress
- 4 large eggs For dipping, at room temperature
Instructions
- In a medium saucepan over medium heat, combine the mirin, soy sauce, sugar, and dashi stock. Bring to a gentle simmer, stirring until the sugar is completely dissolved. Remove from heat and set aside. This is your sukiyaki tare (seasoning sauce).
- Arrange all your prepared vegetables, tofu, and noodles on a large platter. Pat the thinly sliced beef dry with paper towels and arrange it separately. Having everything mise en place is crucial for the quick, interactive cooking process.
- Heat a large, shallow cast iron pot or electric skillet over medium-high heat. Add a small amount of beef fat or neutral oil. Working in batches, briefly sear a few slices of beef for just 15-20 seconds per side until they lose their raw color but are not cooked through. Transfer to a plate. This step builds foundational flavor.
- To the same pot, add about 1/3 of the onion wedges and cook for 1 minute. Pour in about 1 cup of the prepared tare sauce—it should sizzle and simmer immediately. Arrange a portion of the seared beef, tofu, mushrooms, cabbage, and noodles in the simmering broth.
- Let everything simmer for 3-4 minutes, gently pushing ingredients into the broth. Add the green onions and shungiku (or spinach) in the last minute. The meal is now ready to be enjoyed directly from the pot.
- Serve immediately. Provide each person with a small bowl containing a raw, beaten egg for dipping the hot ingredients. The residual heat gently cooks the egg into a rich, creamy coating. Replenish the pot with remaining ingredients and tare as you eat.