
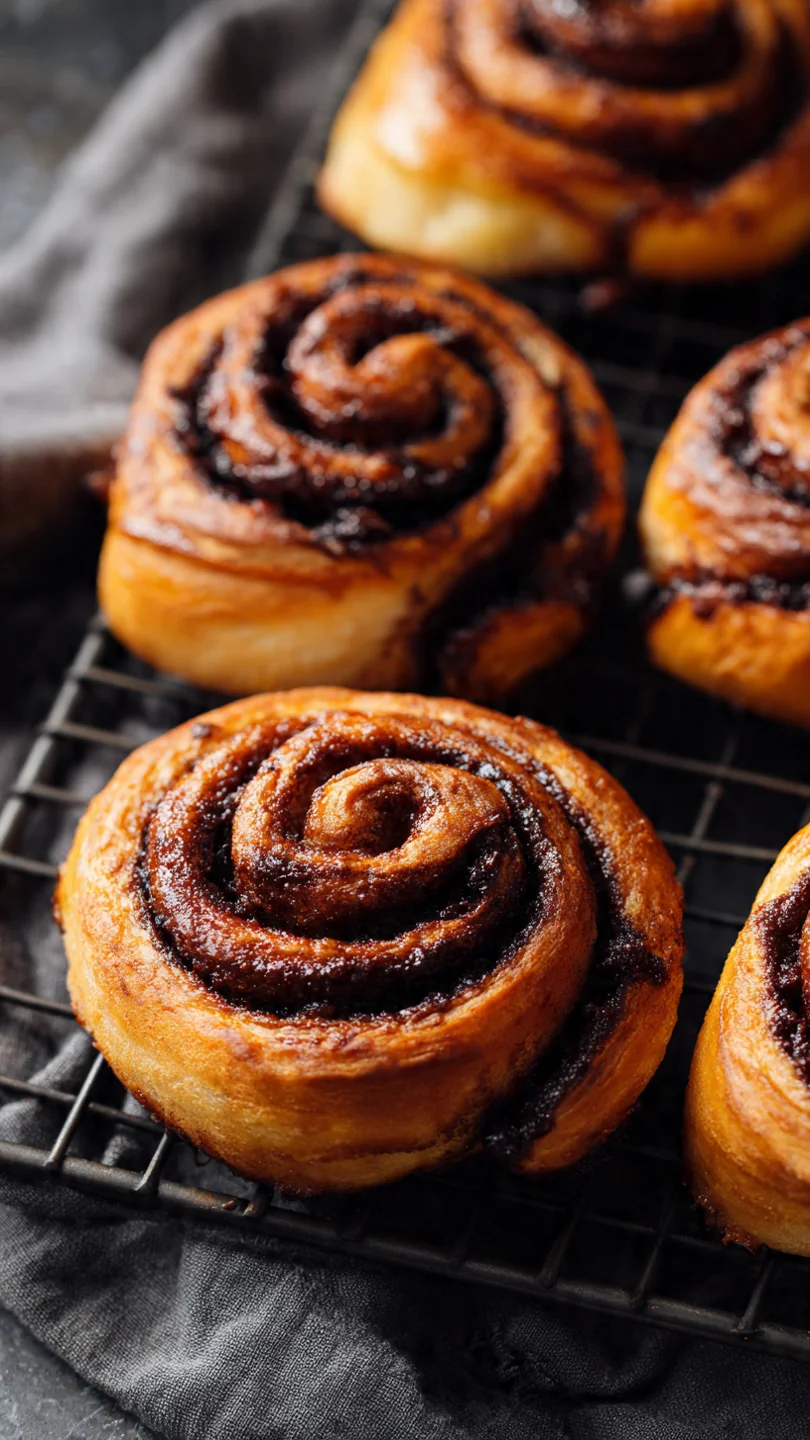
There’s something magical about the scent of cinnamon and chocolate wafting through your kitchen, promising a warm, gooey, and utterly indulgent treat. As a chef, I’ve always believed the best cinnamon rolls shouldn’t just be sweet—they should have depth, a tender crumb, and a filling that makes you close your eyes with every bite. This recipe is my perfected version, born from years of testing in both restaurant and home kitchens.
It combines the comforting spice of classic cinnamon rolls with the rich, decadent pleasure of chocolate, all wrapped in a soft, buttery dough that’s surprisingly straightforward to make. Get ready to bake a pan of pure joy.
- Decadent Chocolate Twist: We’re not just sprinkling chocolate chips; we’re blending rich cocoa powder right into the cinnamon sugar for a deeply flavorful, fudgy swirl in every bite.
- Pillowy Soft Dough: The secret is an “enriched” dough made with butter, eggs, and milk. Trust me, this creates a tender, bakery-soft texture that’s far superior to basic recipes.
- Make-Ahead Friendly: You can prepare the rolls the night before and let them do their final rise slowly in the fridge. Just pop them in the oven in the morning for a spectacular, fresh-baked breakfast.
- Gooey, Not Dry: The filling melts into a luxurious sauce during baking, ensuring every roll is moist and decadent, never dry or cakey.
- Crowd-Pleasing Dessert: Whether it’s a holiday brunch, a weekend treat, or a potluck, these rolls disappear fast and earn rave reviews every single time.
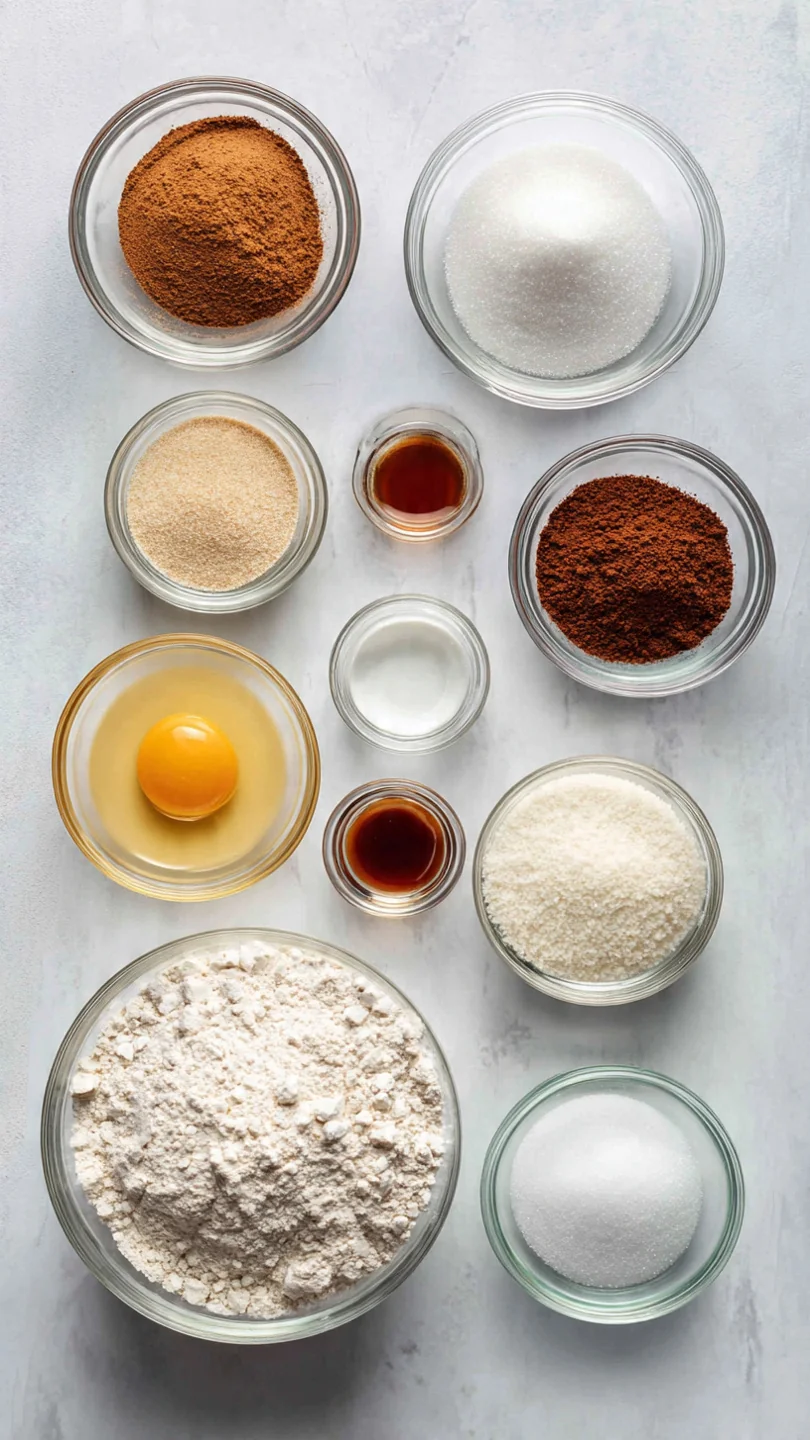
Ingredients You’ll Need
Let’s gather our ingredients—this is where simple pantry staples transform into something extraordinary. Using quality ingredients here makes a noticeable difference. For the chocolate filling, I highly recommend a Dutch-process cocoa powder if you have it; it has a smoother, less acidic chocolate flavor that pairs beautifully with cinnamon.
However, natural cocoa powder works perfectly well, too. The key is ensuring your dairy ingredients (milk, eggs, butter) are at the proper temperature to activate the yeast and create a smooth, elastic dough.
- Whole Milk: Warmed to about 110°F (43°C). This temperature is warm enough to activate the yeast but not so hot it kills it.
- Active Dry Yeast: One standard packet. Look for a recent expiration date to guarantee potency.
- Granulated Sugar: Divided between the dough and activating the yeast.
- Eggs: At room temperature. They incorporate more evenly into the dough.
- Unsalted Butter: You’ll need it for the dough, the filling, and the frosting. Using unsalted lets you control the salt level.
- Fine Sea Salt: Enhances all the flavors without being overtly salty.
- All-Purpose Flour: Spooned and leveled into your measuring cup for accuracy. Too much flour makes dense rolls.
- Light Brown Sugar: For the filling. Its molasses notes add wonderful moisture and caramel flavor.
- Unsweetened Cocoa Powder: The star of our chocolate twist. Sift it if it’s lumpy.
- Ground Cinnamon: Use a fresh, fragrant jar for the best aroma.
- Cream Cheese: The base for our tangy, creamy frosting that balances the sweetness.
- Powdered Sugar & Vanilla Extract: For finishing the classic frosting.
Note: You’ll find the complete list of ingredients, along with their exact measurements, in the printable recipe card at the bottom of this post.
Kitchen Equipment Needed
You don’t need professional bakery equipment, but a few key tools will make the process seamless. A stand mixer with a dough hook is a huge help for kneading this enriched dough, but you can absolutely use a large bowl and some elbow grease—just plan on kneading by hand for 8-10 minutes. A 9×13 inch baking dish is essential for fitting all 12 rolls snugly, which helps them rise upward and stay soft.
A sharp serrated knife or a piece of unflavored dental floss is the best tool for cutting the rolls cleanly without squashing the beautiful swirls.
How to Make Chocolate Cinnamon Rolls Recipe
Step 1: Activate the Yeast and Make the Dough
In your stand mixer bowl, combine the warm milk, yeast, and a spoonful of sugar. Let it sit for 5-7 minutes—you’re looking for a foamy, creamy layer on top. This “proofing” step is your guarantee the yeast is alive and ready to work.
Believe me, skipping this can lead to flat rolls. Once foamy, add the rest of the sugar, eggs, melted butter, salt, and most of the flour. Mix on low until it comes together into a shaggy mass.
Step 2: Knead and Let the Dough Rise
Now, with the mixer on low, add the remaining flour a little at a time until the dough pulls away from the bowl’s sides. Increase the speed to medium and knead for 5-6 minutes. The dough should be smooth, elastic, and still slightly tacky to the touch—this is perfect.
Tip from me: a slightly sticky dough makes for more tender rolls than an over-floured, stiff one. Place it in a greased bowl, cover with a clean towel, and let it rise in a warm, draft-free spot for about 1 hour, until doubled.
Step 3: Roll Out and Add the Filling
While the dough rises, whisk together the brown sugar, cocoa powder, and cinnamon for the filling, breaking up any lumps. Grease your 9×13 inch baking dish. On a lightly floured surface, roll the risen dough into a 16×20 inch rectangle.
Spread the very soft butter evenly over the entire surface, then sprinkle the chocolate-cinnamon sugar mixture over the butter, leaving a small border along one long edge.
Step 4: Roll, Cut, and Proof
Starting from the long edge opposite the clean border, tightly roll the dough into a log, using your fingers to keep it snug. Pinch the seam to seal. Now, using a sharp serrated knife or a piece of unflavored dental floss (slide it under, cross over the top, and pull), cut the log into 12 equal rolls.
Place them cut-side up in your prepared dish. Cover loosely and let them rise again for 30-45 minutes until puffy and nearly doubled.
Step 5: Bake, Frost, and Serve
Preheat your oven to 350°F (175°C). Bake the rolls for 22-25 minutes. You’ll know they’re done when they’re golden brown on top and the centers look set, not doughy.
Let them cool in the pan for just 10 minutes—this is crucial. While they cool, make the frosting by beating the cream cheese, butter, powdered sugar, vanilla, and milk until smooth and creamy. Spread or drizzle it generously over the warm rolls.
Step back and admire your work, then serve immediately for that unforgettable, warm, gooey experience.
- Temperature is Key: Use a digital thermometer to check your milk is between 105-110°F. Too hot kills yeast; too cold won’t activate it properly.
- The Butter Consistency: For the filling, your butter must be very soft (almost spreadable straight from the fridge) but not melted. This allows it to be spread thinly and helps the sugar mixture adhere without leaking out.
- Roll Tightly: A tight roll is essential for those beautiful, defined swirls that hold together when sliced. Use your fingers to gently tuck and roll as you go.
- The Second Rise: Don’t rush the second proof. The rolls should look puffy and fill the pan. If you gently poke one, the indentation should slowly spring back.
- Cutting Cleanly: A serrated knife used with a gentle sawing motion works, but unflavored dental floss is my professional secret for perfectly round, uncompressed rolls every time.
Recipe Variations
- Double Chocolate: Add 1/2 cup of semi-sweet chocolate chips or chopped dark chocolate to the filling along with the sugar mixture.
- Orange Zest: Add the zest of one large orange to the dough for a bright, citrusy note that complements the chocolate beautifully.
- Espresso Boost: Stir 1-2 teaspoons of instant espresso powder into the filling’s cocoa mixture for a mocha flavor that enhances the chocolate.
- Pecan Praline: Before the second rise, sprinkle 1 cup of chopped toasted pecans over the rolls in the pan. The nuts toast as they bake, adding fantastic crunch.
- Vegan Version: Use plant-based milk, a vegan butter stick, and a flax egg. For the frosting, use vegan cream cheese and butter alternatives.
- Gluten-Free: Substitute the all-purpose flour with a 1:1 gluten-free baking blend that contains xanthan gum. The dough may be stickier; handle it with lightly oiled hands.
What to Serve With This Recipe
These chocolate cinnamon rolls are a star all on their own, but they can anchor a fantastic brunch or dessert spread. For a special weekend breakfast, pair them with fresh berries and a pot of strong coffee to cut through the sweetness. If serving as a dessert, a scoop of vanilla bean ice cream or a dollop of lightly sweetened whipped cream takes them to another level.
For a brunch buffet, balance the richness with savory items like scrambled eggs, crispy bacon, or a simple green salad. They’re perfect for holidays, birthday mornings, or any occasion that calls for a touch of homemade decadence.
Storage & Make-Ahead Instructions
- Storage: Once frosted and completely cooled, cover the pan tightly with plastic wrap or transfer rolls to an airtight container. They will keep at room temperature for up to 2 days. For longer storage, refrigerate for up to 5 days.
- Freezing: Unfrosted rolls freeze exceptionally well. After the second rise, cover the pan tightly with plastic wrap and foil and freeze for up to 2 months. Thaw overnight in the refrigerator, then bake as directed. You can also freeze baked, unfrosted rolls. Thaw, warm in a 300°F oven for 10 minutes, then frost.
- Reheating: The best way to revive a roll is to warm it, uncovered, in a 300°F oven for 8-10 minutes until heated through. The microwave will work in a pinch but can make the frosting melt and the texture gummy.
- Make-Ahead: For overnight rolls, complete the recipe through cutting and placing them in the pan. Cover tightly and refrigerate immediately for 8-12 hours. In the morning, let them sit at room temperature for 30 minutes while the oven preheats, then bake as directed. This slow, cold rise often yields an even more flavorful roll.
Frequently Asked Questions
Q: Can I use instant yeast instead of active dry yeast?
A: Absolutely. You can add instant yeast directly to the dry flour without proofing in milk. Use the same amount.
The first rise time may be slightly shorter.
Q: My dough didn’t double in size. What happened?
A: The yeast may have been old, or the liquid was too hot and killed it. Your kitchen might also be too cool. Yeast thrives in a warm (not hot), draft-free environment.
Try placing the bowl in a turned-off oven with the light on.
Q: Can I make these without a stand mixer?
A: Yes. Mix the ingredients in a large bowl with a wooden spoon until combined, then turn out onto a floured surface and knead by hand for 8-10 minutes until smooth and elastic.
Q: The filling leaked out during baking. How can I prevent this?
A: This usually happens if the butter was melted instead of just softened, or if the rolls were under-proofed. Ensure your butter is spreadable but not liquid, and give the rolls a full second rise until puffy.
Q: How do I know when the rolls are fully baked?
A: The tops will be a deep golden brown. More reliably, the internal temperature at the center of a roll should read between 190-200°F (88-93°C) on an instant-read thermometer.
Q: Can I halve this recipe?
A: Yes, you can halve all ingredients. Use an 8×8 or 9×9 inch baking dish. The rise and bake times will be slightly shorter, so keep a close eye on them.
Q: My frosting is too thick/too thin. How do I fix it?
A: For thicker frosting, add more powdered sugar, 1 tablespoon at a time. For thinner, drizzle-able frosting, add more milk or cream, 1 teaspoon at a time, until it reaches your desired consistency.
Final Thoughts
This chocolate cinnamon roll recipe represents everything I love about baking: the transformation of simple ingredients, the anticipation of the rise, and the ultimate reward of a warm, gooey, shareable treat. The addition of cocoa powder to the classic cinnamon-sugar filling isn’t just a gimmick; it adds a layer of sophisticated richness that makes these truly special. I’ve tested this method countless times to ensure it’s reliable for home bakers of all levels.
So, gather your ingredients, trust the process, and get ready to fill your home with an incredible aroma. I’d love to hear how your rolls turn out—share your results and any creative twists you tried. Happy baking
Best Chocolate Cinnamon Rolls
Equipment
- Stand mixer with dough hook (or large bowl and wooden spoon)
- 9×13 inch baking dish
- Rolling Pin
- Sharp serrated knife or unflavored dental floss
- Parchment paper (optional, for easy cleanup)
Ingredients
- 1 cup whole milk warmed to about 110°F (43°C)
- 2 1/4 tsp active dry yeast one standard packet
- 1/2 cup granulated sugar divided
- 2 large eggs at room temperature
- 1/2 cup unsalted butter melted and cooled slightly
- 1 tsp fine sea salt
- 4 1/2 cups all-purpose flour plus more for dusting, spooned and leveled
- 1/2 cup unsalted butter very soft, for filling
- 1 cup packed light brown sugar
- 1/4 cup unsweetened cocoa powder Dutch-process or natural
- 2 tbsp ground cinnamon
- 4 oz cream cheese softened
- 1/4 cup unsalted butter softened
- 1 cup powdered sugar
- 1 tsp pure vanilla extract
- 2 tbsp whole milk or cream for frosting consistency
Instructions
- In the bowl of a stand mixer fitted with the dough hook, combine the warm milk, yeast, and 1 tablespoon of the granulated sugar. Let sit for 5-7 minutes until foamy. Add the remaining sugar, eggs, melted butter, salt, and 4 cups of flour. Mix on low until a shaggy dough forms, about 2 minutes.
- With the mixer on low, gradually add the remaining 1/2 cup of flour until the dough pulls away from the sides of the bowl. Knead on medium speed for 5-6 minutes until smooth and elastic. The dough will be slightly sticky. Place in a greased bowl, cover, and let rise in a warm place for 1 hour, or until doubled in size.
- While the dough rises, make the filling. In a medium bowl, mix the brown sugar, cocoa powder, and cinnamon until no lumps remain. Grease a 9×13 inch baking dish. On a lightly floured surface, roll the risen dough into a 16×20 inch rectangle. Spread the 1/2 cup of very soft butter evenly over the surface.
- Sprinkle the chocolate-cinnamon sugar mixture evenly over the butter, leaving a 1/2-inch border on one long edge. Starting with the opposite long edge, tightly roll the dough into a log, pinching the clean edge to seal. Using a sharp serrated knife or unflavored dental floss, cut the log into 12 equal rolls.
- Place the rolls cut-side up in the prepared baking dish. Cover loosely and let rise for 30-45 minutes until puffy. Preheat oven to 350°F (175°C). Bake the rolls for 22-25 minutes, until golden brown and the centers are set. Let cool in the pan for 10 minutes while you make the frosting.
- For the frosting, beat the softened cream cheese and butter together until smooth. Beat in the powdered sugar, vanilla, and milk until creamy. Spread or drizzle over the warm rolls. Serve immediately for the ultimate gooey experience.