

There’s something deeply comforting about a classic chocolate chip cookie, but what if you could enjoy that same chewy, sweet satisfaction with a wonderfully nutty, complex flavor and a gluten-free twist? Enter the buckwheat chocolate chip cookie. As a chef who has tested countless gluten-free baked goods, I can tell you that buckwheat flour is a secret weapon.
It’s not a grain, but a seed, related to rhubarb, and it brings a robust, earthy flavor that stands up beautifully to rich dark chocolate. This recipe delivers cookies with crisp edges, a soft and chewy center, and a taste that will make you forget they’re “alternative” in any way. Let’s bake a batch that might just become your new favorite.
This recipe is designed for success and maximum enjoyment. Here’s what makes it special:
- Gluten-Free & Wholesome: Made with 100% buckwheat flour, these cookies are naturally gluten-free without any complicated flour blends. Buckwheat is packed with nutrients, adding a wholesome element to your treat.
- Deep, Nutty Flavor: Buckwheat flour has a distinctive, almost malty flavor that is far more interesting than all-purpose flour. It creates a beautiful, sophisticated backdrop for the chocolate.
- Perfect Cookie Texture: We achieve the ideal balance—a slightly crisp edge giving way to a soft, tender, and chewy center. No dry or crumbly gluten-free cookies here.
- Simple & Straightforward: No unusual techniques or hard-to-find ingredients. If you can make a standard chocolate chip cookie, you can make these.
- Highly Customizable: This dough is a fantastic base. I’ll show you how to easily adapt it with different mix-ins, spices, and even make it dairy-free.
- Crowd-Pleasing: These cookies are so delicious that no one will guess they’re gluten-free. They’re perfect for parties, lunchboxes, or a well-deserved afternoon snack.
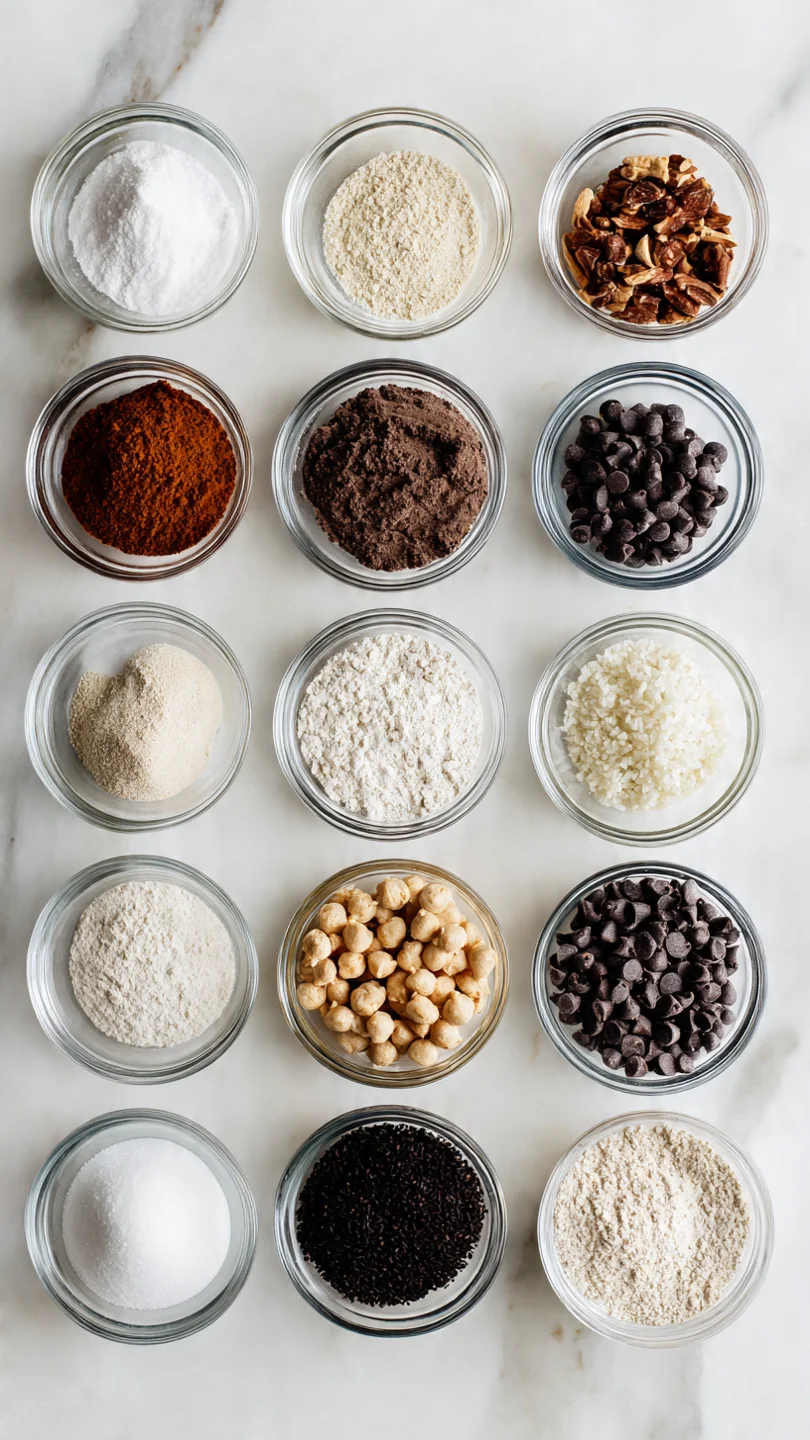
Ingredients You’ll Need
- Let’s gather our ingredients. The magic of this recipe lies in the simplicity and quality of what goes into the bowl. Buckwheat flour is the star, and its unique personality shines through.
- Buckwheat Flour: This is not a typo—we’re using 100% buckwheat flour. Look for a light-colored, finely ground flour for the best texture. A coarse grind can make the cookies gritty.
- Baking Soda & Salt: Baking soda gives our cookies their lift and spread. Fine sea salt balances the sweetness and enhances all the other flavors.
- Unsalted Butter: Use real butter, softened to true room temperature (about 65-68°F). It should yield to gentle pressure but not be oily or melted. This is crucial for proper creaming.
- Light Brown Sugar & Granulated Sugar: The combination is key. Brown sugar provides moisture and molasses notes for chewiness, while white sugar encourages spreading and crisp edges.
- Egg & Vanilla: One large egg binds everything together. Use pure vanilla extract for the best flavor—it complements the nuttiness of the buckwheat beautifully.
- Dark Chocolate: I highly recommend a good-quality dark chocolate chip or chunk (60-70% cacao). The slight bitterness perfectly offsets the sweet, earthy cookie base. Semi-sweet chips work great too.
Note: You’ll find the complete list of ingredients, along with their exact measurements, in the printable recipe card at the bottom of this post.
Kitchen Equipment Needed
You likely have everything you need already. Here’s the short list:
- Stand Mixer or Hand Mixer: While you can mix by hand, an electric mixer is best for properly creaming the butter and sugar to the right fluffy consistency.
- Mixing Bowls: One medium for dry ingredients, one large for wet if mixing by hand.
- Whisk & Spatula: For combining dry ingredients and scraping down the bowl.
- Cookie Scoop: A #40 scoop (about 1.5 tablespoons) ensures evenly sized cookies that bake uniformly. A tablespoon works too.
- Baking Sheets & Parchment Paper: Lining your sheets prevents sticking and makes cleanup a breeze. Silicone baking mats are also excellent.
- Wire Cooling Rack: Essential for letting cookies cool properly without getting soggy bottoms.
How to Make Buckwheat Chocolate Chip Cookies Recipe
Step 1: Prep and Combine Dry Ingredients
First, position your oven racks in the upper and lower thirds and preheat to 350°F (175°C). Line your baking sheets with parchment. In a medium bowl, take a moment to whisk together the buckwheat flour, baking soda, and salt.
Trust me, whisking does more than just mix—it aerates the flour and ensures the baking soda is evenly distributed, which is the foundation for consistent rise and texture in every single cookie. No one wants a bite that’s all leavener!
Step 2: Cream Butter and Sugars to Perfection
Now, in the bowl of your stand mixer fitted with the paddle (or using a hand mixer), combine the softened butter, brown sugar, and granulated sugar. Beat on medium speed for a full 2-3 minutes. You’re looking for the mixture to become noticeably paler in color, fluffy, and well-combined.
This step is non-negotiable. Creaming incorporates tiny air bubbles into the fat, which expand in the oven, giving you a lighter, more tender cookie rather than a dense one.
Step 3: Incorporate Egg and Vanilla
With the mixer on low, add the room-temperature egg and vanilla extract. Tip from me: a cold egg can cause the beautifully creamed butter to clump and break the emulsion. Mix just until the egg is fully absorbed and the mixture looks smooth and creamy, scraping down the sides of the bowl as needed.
This should take about a minute. You’ll see the texture become silky.
Step 4: Bring the Dough Together
Reduce the mixer speed to its lowest setting. Gradually add the whisked dry ingredients to the wet mixture. Mix only until the last traces of flour disappear.
The moment you don’t see any dry patches, stop! Overmixing buckwheat flour can activate more of its proteins, potentially leading to tougher cookies. Switch to a sturdy spatula and gently fold in the chocolate chips until they’re evenly distributed.
The dough will be thick and glorious.
Step 5: Scoop, Space, and Bake
Using your scoop or a tablespoon, portion the dough into mounds, placing them at least 2 inches apart on the prepared sheets. They need room to spread. For slightly thicker, puffier cookies, you can chill the scooped dough for 20 minutes, but it’s not essential.
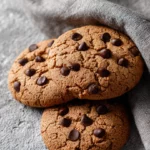
Bake for 10-12 minutes, rotating the pans top-to-bottom and front-to-back halfway through. Believe me, the cookies will look underdone when you take them out—the centers will be soft and puffy, with just set, golden edges. This is perfect.
Step 6: The Crucial Cool Down and Serve
This is the hardest part: patience. Let the cookies cool on the hot baking sheet for 5 full minutes. They are still setting up from residual heat.
Then, use a spatula to transfer them to a wire rack to cool completely. Step back and admire your work. The crackly tops, the melty chocolate peeking out… they’re ready.
Enjoy one slightly warm for the ultimate experience.
A few chef-level insights will guarantee your cookies are bakery-quality every time.
- Flour Power: Always spoon your buckwheat flour into the measuring cup and level it off with a knife. Scooping directly from the bag packs it down, leading to dry, dense cookies. For absolute precision, 1 1/4 cups of spooned-and-leveled buckwheat flour weighs about 150 grams.
- Butter Temperature is Key: Your butter should be cool to the touch but soft enough that you can leave an indent with your finger. If it’s too soft or melted, your cookies will spread too much and become greasy. If it’s too cold, they won’t cream properly and will be dense.
- The Underbake Rule: Buckwheat flour can dry out if overbaked. Remove the cookies from the oven when the edges are firm and the centers still look soft and moist. They will firm up perfectly as they cool on the sheet, resulting in that coveted chewy center.
- Batch Baking: If baking two sheets at once, rotate them halfway through. Ovens have hot spots, and this ensures even baking. The cookies on the top rack may bake a minute faster than those on the bottom.
- Dough Chilling for Control: If your kitchen is very warm or your butter was quite soft, chilling the scooped dough for 20-30 minutes before baking will prevent excessive spreading and yield a slightly thicker cookie.
Recipe Variations
- This dough is wonderfully adaptable. Here are some tested variations to make it your own.
- Salted Dark Chocolate & Hazelnut: Replace 1/2 cup of the chocolate chips with chopped toasted hazelnuts. Use a flaky sea salt like Maldon to sprinkle on top of the cookies right when they come out of the oven.
- Dairy-Free/Vegan: Use a high-quality vegan butter stick (like Miyoko’s or Country Crock Plant Butter) and a flax egg (1 tbsp ground flaxseed mixed with 2.5 tbsp water, rested for 5 mins). Ensure your chocolate chips are dairy-free.
- Buckwheat Blondies: Press the entire batch of dough into a parchment-lined 8×8 inch pan. Bake at 350°F for 22-25 minutes until golden and set. Cool completely before cutting into squares.
- Spiced Buckwheat: Add 1 tsp of ground cinnamon, 1/2 tsp ground ginger, and a pinch of nutmeg to the dry ingredients. This creates a wonderfully warm, almost gingerbread-like flavor profile.
- Mix-Ins Galore: Swap or complement the chocolate chips with an equal amount of dried cherries, chopped pecans or walnuts, toasted coconut flakes, or even chopped pretzel pieces for a sweet-salty crunch.
- Buckwheat Oatmeal Chocolate Chip: Replace 1/4 cup of the buckwheat flour with 1/4 cup of old-fashioned rolled oats (certified gluten-free if needed) for added texture and heartiness.
What to Serve With This Recipe
These cookies are fantastic on their own, but they also play well with others. For a simple dessert platter, pair them with a bowl of fresh berries or orange segments to cut through the richness. They are the perfect ending to a cozy soup night.
Beverage-wise, they are a match made in heaven with a glass of cold whole milk, a cup of black coffee, or even a glass of red wine like a Zinfandel or Port. For a special occasion, crumble a cookie over a scoop of vanilla bean ice cream for an instant, impressive sundae. They also make thoughtful, homemade gifts—simply stack them in a cellophane bag tied with a ribbon.
Storage & Make-Ahead Instructions
- Proper storage keeps these cookies tasting fresh.
- Room Temperature Storage: Once completely cooled, store the cookies in an airtight container at room temperature for up to 5 days. Place a piece of parchment between layers if stacking. They maintain their chewiness beautifully.
- Freezing Baked Cookies: Freeze fully cooled cookies in a single layer on a baking sheet, then transfer to a freezer bag or container. They will keep for up to 3 months. Thaw at room temperature or warm briefly in a 300°F oven.
- Freezing Cookie Dough: This is my favorite make-ahead trick. Scoop the dough onto a parchment-lined sheet and freeze solid. Transfer the frozen dough balls to a freezer bag. You can bake them directly from frozen, adding 1-2 minutes to the bake time. This means fresh, warm cookies anytime!
- Reviving Stale Cookies: If cookies lose their softness, place one on a microwave-safe plate and heat for 8-10 seconds. It will taste freshly baked.
Nutritional Benefits
- While these are certainly a treat, using buckwheat flour adds a nutritional boost compared to a standard cookie. Buckwheat is a good source of soluble fiber, which supports digestive health, and contains plant-based protein. It’s also rich in antioxidants like rutin and provides minerals like magnesium and manganese. Choosing a dark chocolate with a high cocoa percentage adds flavonoids. Remember, it’s all about balance and enjoying quality ingredients.
Frequently Asked Questions
Q: Can I substitute the buckwheat flour with all-purpose flour?
A: I don’t recommend a direct 1:1 swap. Buckwheat flour is gluten-free and absorbs moisture differently. For a standard chocolate chip cookie, use a trusted AP flour recipe.
This recipe is specifically formulated for buckwheat’s unique properties.
Q: My cookies spread too much. What happened?
A: This is almost always due to butter that was too warm or melted. Ensure your butter is just softened, not greasy. Chilling the scooped dough for 20-30 minutes before baking will also help control spread.
Q: Can I make these cookies vegan?
A: Yes! See the “Dairy-Free/Vegan” variation above. Use plant-based butter and a flax egg.
The texture will be slightly more cakey but still delicious.
Q: Why do my cookies taste bitter?
A: Buckwheat flour has a naturally earthy, robust flavor that some may perceive as slightly bitter, especially if using a very coarse flour. Using a finely ground, light buckwheat flour and balancing it with enough brown sugar and good-quality chocolate should prevent any unpleasant bitterness.
Q: How do I know the cookies are done if the center looks soft?
A: This is the trick! They are done when the edges are set and lightly golden, and the centers look puffy and soft. They will not look “dry.” They firm up as they cool on the hot baking sheet.
An overbaked buckwheat cookie becomes dry and crumbly.
Q: Can I use honey or maple syrup instead of granulated sugar?
A: I don’t recommend it for this recipe. Liquid sugars will change the moisture balance drastically, likely resulting in a cakey, spread-out cookie that doesn’t have the right chewy texture. The dry sugars are essential for structure.
Q: Where can I find buckwheat flour?
A: It’s widely available in the gluten-free or natural foods section of most major supermarkets, at health food stores, or online. Bob’s Red Mill is a common and reliable brand.
Final Thoughts
These Buckwheat Chocolate Chip Cookies are more than just a gluten-free alternative; they are a standout cookie in their own right. The deep, nutty flavor of the buckwheat creates a sophisticated treat that feels both wholesome and indulgent. I’ve poured my years of testing into this recipe to ensure it’s foolproof, delivering that perfect chewy texture we all crave.
Whether you’re baking for someone with dietary needs or simply looking to explore a new, delicious flavor, this recipe is a winner. I encourage you to bake a batch, savor that first warm bite, and see for yourself. Don’t forget to rate the recipe below and share your creations with me on social media—I love seeing your kitchen successes!
Happy baking
Buckwheat Chocolate Chip Cookies
Equipment
- Stand mixer or hand mixer
- Large and medium mixing bowls
- Whisk
- Rubber spatula
- Cookie scoop or tablespoon
- Baking sheets
- Parchment paper or silicone baking mats
- Wire cooling rack
Ingredients
- 1 1/4 cups buckwheat flour Use a light, finely ground flour for best texture
- 1/2 tsp baking soda
- 1/2 tsp fine sea salt
- 1/2 cup unsalted butter softened to room temperature (65-68°F)
- 3/4 cup packed light brown sugar
- 1/4 cup granulated sugar
- 1 large egg room temperature
- 1 1/2 tsp pure vanilla extract
- 1 1/4 cups dark chocolate chips or chunks or a mix of semi-sweet and dark
Instructions
- Preheat your oven to 350°F (175°C). Line two large baking sheets with parchment paper. In a medium bowl, whisk together the buckwheat flour, baking soda, and salt. This ensures even distribution of the leavening agent, which is crucial for the right cookie spread and texture.
- In the bowl of a stand mixer fitted with the paddle attachment, or using a hand mixer, cream the softened butter, brown sugar, and granulated sugar together on medium speed for 2-3 minutes. The mixture should be light, fluffy, and pale in color. This step incorporates air, which contributes to a tender cookie.
- Add the room-temperature egg and vanilla extract to the butter mixture. Mix on medium-low speed until fully combined, about 1 minute, scraping down the sides of the bowl as needed. Adding a cold egg can cause the butter to seize, so room temperature is key here.
- With the mixer on low speed, gradually add the dry flour mixture to the wet ingredients. Mix just until no dry streaks of flour remain. Overmixing at this stage can lead to tough cookies. Using a spatula, fold in the chocolate chips until evenly distributed.
- Using a cookie scoop or a tablespoon, portion the dough into 1.5-tablespoon mounds. Place them on the prepared baking sheets, spacing them at least 2 inches apart to allow for spreading. For thicker cookies, you can chill the scooped dough for 20 minutes, but it’s not strictly necessary.
- Bake for 10-12 minutes, rotating the pans halfway through. The cookies are done when the edges are set and lightly golden, but the centers still look soft and slightly underbaked. They will continue to set as they cool. Let them cool on the baking sheet for 5 minutes before transferring to a wire rack to cool completely.