
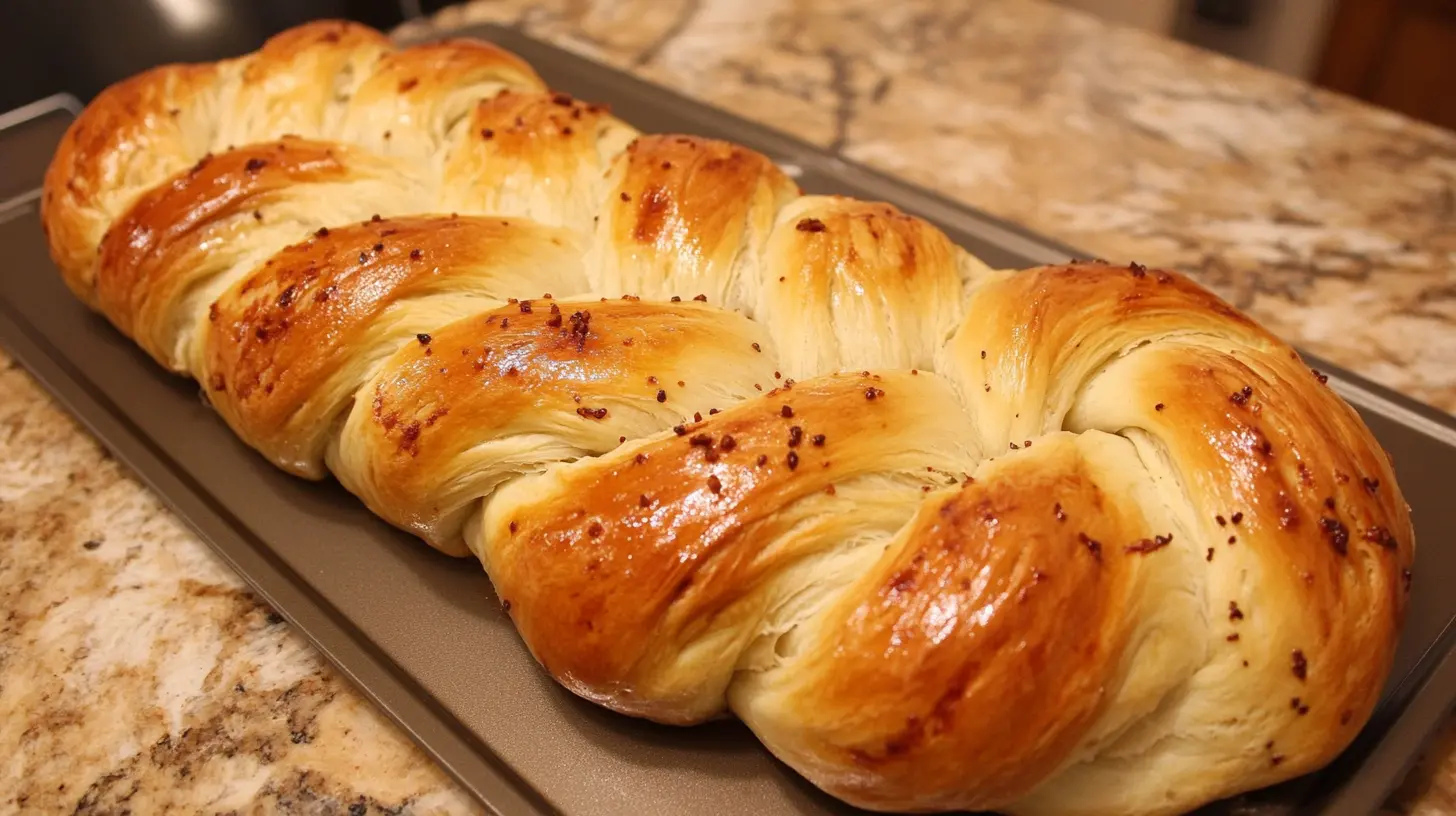
Basic 3-Strand Challah Braid
Step-by-Step Instructions
Crafting a challah braid begins with the simplest and most traditional method: the three-strand braid. If you’ve ever braided hair, you’re already on the right track! Let’s break it down:
- Divide the Dough: After your dough has risen and doubled in size, punch it down gently and turn it out onto a lightly floured surface. Divide the dough into three equal parts, rolling each into a long, even rope about 12 to 15 inches in length.
- Pinch and Braid: Pinch the top ends of the three strands together to secure them. Then, braid them by alternately crossing the right strand over the middle, then the left strand over the middle, continuing this pattern until you reach the end.
- Seal the Ends: Once you reach the end of your braid, pinch the strands together to seal them. This will ensure your loaf keeps its beautiful shape while baking.
Common Mistakes and How to Avoid Them
- Uneven Strands: Make sure your strands are of equal thickness and length to ensure an even braid.
- Overbaking: Keep an eye on your challah as it bakes. It should turn a deep golden brown, but too much time in the oven can dry it out.
As simple as it seems, mastering this technique requires a bit of practice but undoubtedly sets the foundation for more intricate designs. As you get comfortable with the process, you’ll find that this method not only makes for a visually appealing loaf but also enhances the texture and flavor of the bread, making every slice a delight.
For visual learners, check out Tori Avey’s Challah Tutorial for a detailed guide on creating the perfect three-strand challah braid. This resource is fantastic for beginners and seasoned bakers alike, providing additional tips and insights into the braiding process.
Advanced Braiding Techniques
Exploring More Complex Braids
Once you’re comfortable with the three-strand braid, why not challenge yourself with more complex patterns? These intricate braids can turn your challah into a stunning centerpiece for any gathering.
Four-Strand Braid
- Divide and Arrange: Split the dough into four equal ropes. Arrange them in a horizontal line, side by side.
- Weaving the Braid: Start from the left or right. Cross the outer strand over the strand next to it, then under the next one, and finally over the last strand. Repeat this pattern, always starting from the same side, until the entire loaf is braided.
Six-Strand Braid
- Preparing the Strands: Divide the dough into six ropes. Lay them out parallel to one another.
- Braiding Steps: The pattern here is more complex. Cross the rightmost strand over to the middle, then alternate with the leftmost strand, weaving it through the strands in a specific over-under pattern. Keep the tension even for a tight, consistent braid.
Round (Turban-Style) Challah
- Forming the Round Braid: Start with any number of strands, often three or four. Braid them as usual but gradually curve the braid into a circular shape as you go, tucking the ends underneath.
Tips for Perfect Braids
- Keep Strands Uniform: Ensure all strands are the same width and length for a symmetrical look.
- Tight Weaving: A tighter braid means a more defined pattern after baking.
- Practice: Don’t worry if it’s not perfect the first time. Practice makes perfect!
These advanced techniques not only enhance the aesthetic appeal of your challah but also invite creativity into your baking routine. Each braid type offers a unique texture and crumb to the bread, making the baking experience both rewarding and delicious.
Baking the Challah Braid
Oven Preparation and Settings
Getting the oven ready is crucial for perfect challah. First, preheat your oven to 375 degrees Fahrenheit. This ideal temperature helps the challah bake evenly, turning it beautifully golden.
Baking Time and Tips
Place the braided dough on a baking sheet lined with parchment paper. It prevents sticking and makes cleanup a breeze. Brush the top of the challah with an egg wash (a beaten egg mixed with a bit of water) to achieve that shiny, golden crust. Bake for about 25 to 30 minutes. Watch for the golden color—it’s your cue that the bread is baked to perfection.
Testing for Doneness
You can check if the challah is done by tapping the bottom of the loaf. If it sounds hollow, it’s ready to come out. Also, an instant-read thermometer inserted into the thickest part of the bread should read 190 degrees Fahrenheit.
Following these steps ensures your challah comes out just right—soft on the inside with a crisp outer crust. By paying attention to your oven and handling the dough with care, you turn a simple mixture of ingredients into a delicious, eye-catching loaf that’s sure to impress.
Baking and Serving
How to Slice and Serve Challah
Once your challah has cooled slightly, it’s ready to slice. Use a serrated knife for clean cuts, making sure each slice is even. This ensures everyone gets a taste of the soft, fluffy interior and the crisp crust.
Pairing with Meals and Occasions
Challah is versatile. Serve it during Sabbath meals or festive gatherings. It pairs wonderfully with spreads like honey or jam for a sweet touch, or you can opt for hummus or a savory dip for a different flavor. Challah also makes an excellent base for French toast, giving a luxurious twist to your breakfast.
Tips for Storing Challah Braid
If you have leftovers, wrap the challah in plastic wrap or store it in an airtight container. It keeps the bread fresh for a few days. For longer storage, freeze slices in airtight bags.
By serving challah freshly baked or utilizing it in various dishes, you celebrate not just a delicious bread but a piece of cultural heritage that has brought families together for generations. Whether for a special occasion or a simple family meal, challah adds a touch of special warmth to the table.
Tips for Perfect Challah Every Time
Achieving the perfect challah involves more than just following a recipe; it’s about mastering a few key techniques and tricks that ensure your bread turns out beautifully every time.
Consistent Ingredient Measurements
Accuracy is crucial in baking. Use a digital scale to measure your ingredients, especially flour and liquids, to ensure consistency in your dough’s texture and rise.
Dough Texture and Hydration
The texture of your challah dough should be smooth and slightly tacky but not sticky. Adjust the amount of flour or water slightly if necessary to achieve the right consistency.
Proofing Environment
Ensure your dough rises in a warm, draft-free area. A consistent temperature helps the yeast work effectively, leading to a better rise and a fluffier loaf.
Egg Wash Application
For that signature shiny, golden crust, apply an egg wash just before baking. A second application midway through baking can deepen the color and shine.
Cooling Before Slicing
Resist the temptation to slice into your challah right out of the oven. Letting it cool on a wire rack for at least an hour helps the structure set and makes slicing easier.
By incorporating these tips into your baking routine, you’ll enhance your skills and increase your chances of making perfect challah bread each time you bake. Enjoy the process and the delicious results of your efforts!
FAQs: Common Questions About Challah Braiding
How to 4 Strand Braid Challah?
A four-strand braid might seem daunting, but it’s really just a pattern to follow. Lay the strands out, and number them 1 to 4 from left to right. Cross strand 4 over strand 2, then strand 1 over strand 3, and finally strand 2 over strand 3. Repeat this sequence until you reach the end.
How Many Braids Should Challah Have?
Traditionally, challah can have three, four, six, or even eight strands. The number of braids often depends on personal preference or the occasion. Three and six are more common, with each configuration symbolizing different spiritual or historical meanings.
How to Roll Out Challah Strands?
To roll out strands for braiding, divide the risen dough into equal parts. Take each part and roll it between your hands or against the countertop. Move from the center outward, applying even pressure to create uniform ropes. Aim for strands that are even in thickness and length to ensure a consistent braid.
How to Do a 5 Strand Braid Challah?
A five-strand braid is like weaving a tapestry. Arrange the strands side by side. Starting from the right, weave each strand over and under the others. Specifically, take the outer right strand, cross it over two strands, under the next one, and then over the last. Continue this pattern, alternating from the right and left sides, until the braid is complete.
By mastering these techniques, you can enhance your challah’s appearance and enjoy the beauty of this traditional bread, making each baking session both a culinary and a creative endeavor.
Advanced Decorating Techniques for Challah
Elevate your challah with decorative techniques that add visual appeal and enhance the flavor. Here’s how to incorporate seeds, nuts, and other toppings for a festive and delicious loaf.
Adding Seeds and Nuts
- Preparation: Before applying any toppings, brush your braided challah with an egg wash to help them stick.
- Choices: Sesame seeds, poppy seeds, and sunflower seeds are popular. For a nuttier flavor, try sprinkling chopped almonds or walnuts on top.
- Application: Evenly distribute your choice of seeds or nuts over the egg-washed dough, pressing gently to adhere.
Sweet and Savory Options
- Sweet Toppings: Enhance your challah with a sprinkle of cinnamon sugar or drizzle with honey after baking for a sweet treat.
- Savory Twists: For a savory version, mix minced garlic and herbs into the dough or sprinkle on top before baking.
Making Stuffed Challah
- Filling Ideas: Stuff your challah strands with ingredients like chocolate chips, cinnamon sugar, or pesto before braiding for an unexpected flavor burst.
- Technique: Flatten each strand, spread the filling along the center, then pinch the dough closed around it before braiding as usual.
These advanced decorating tips not only add flavor and interest to your challah but also make it a standout dish at any meal. Experiment with different combinations to find your favorite and impress your guests with beautifully crafted bread.
Health and Dietary Adaptations for Challah
For those with specific dietary needs or health considerations, adapting challah recipes can ensure everyone enjoys this delicious bread without compromise.
Gluten-Free Challah Options
- Flour Substitutes: Swap traditional flour for a gluten-free blend that includes rice flour, tapioca flour, and xanthan gum to mimic the texture of regular challah.
- Hydration Adjustments: Gluten-free flours absorb moisture differently, so you might need to tweak the amount of water or oil to achieve the right dough consistency.
Vegan Challah Braid Variations
- Egg Alternatives: Use flaxseed meal mixed with water or commercial egg replacers to bind the dough without animal products.
- Dairy Substitutes: Opt for plant-based oils and non-dairy milks to enrich the dough while keeping it vegan.
Reducing Sugar
- Sweetener Options: Reduce the sugar content by substituting part of the sugar with natural sweeteners like apple sauce or mashed banana, which also add moisture and flavor.
By incorporating these adaptations, challah becomes accessible to a wider range of diets, ensuring that dietary restrictions don’t prevent anyone from enjoying this traditional bread. Each adaptation not only caters to health needs but also introduces new flavors and textures, making challah a versatile component of diverse meals.
Conclusion: Wrapping Up Challah Braid Making
As we conclude our journey through the art of making challah, it’s clear that this bread is more than just a culinary delight—it’s a symbol of tradition and togetherness. Each step, from mixing the dough to taking the final golden loaf out of the oven, offers a chance to create something truly special.
Recap of Key Points
- Begin with quality ingredients for the best results.
- Practice and patience are essential, especially with braiding techniques.
- Perfect the bake by keeping an eye on color and doneness.
Encouragement to Experiment
Now that you’ve learned the basics and some advanced techniques, don’t hesitate to experiment with different braids, toppings, or flavors. Making challah allows for creativity, making each loaf uniquely yours.
Final Thoughts
Remember, baking challah is about more than just following a recipe—it’s about the experience and the joy it brings to those who share in its creation and consumption. Keep baking, keep sharing, and let each loaf bring a bit of joy and connection to your table.