
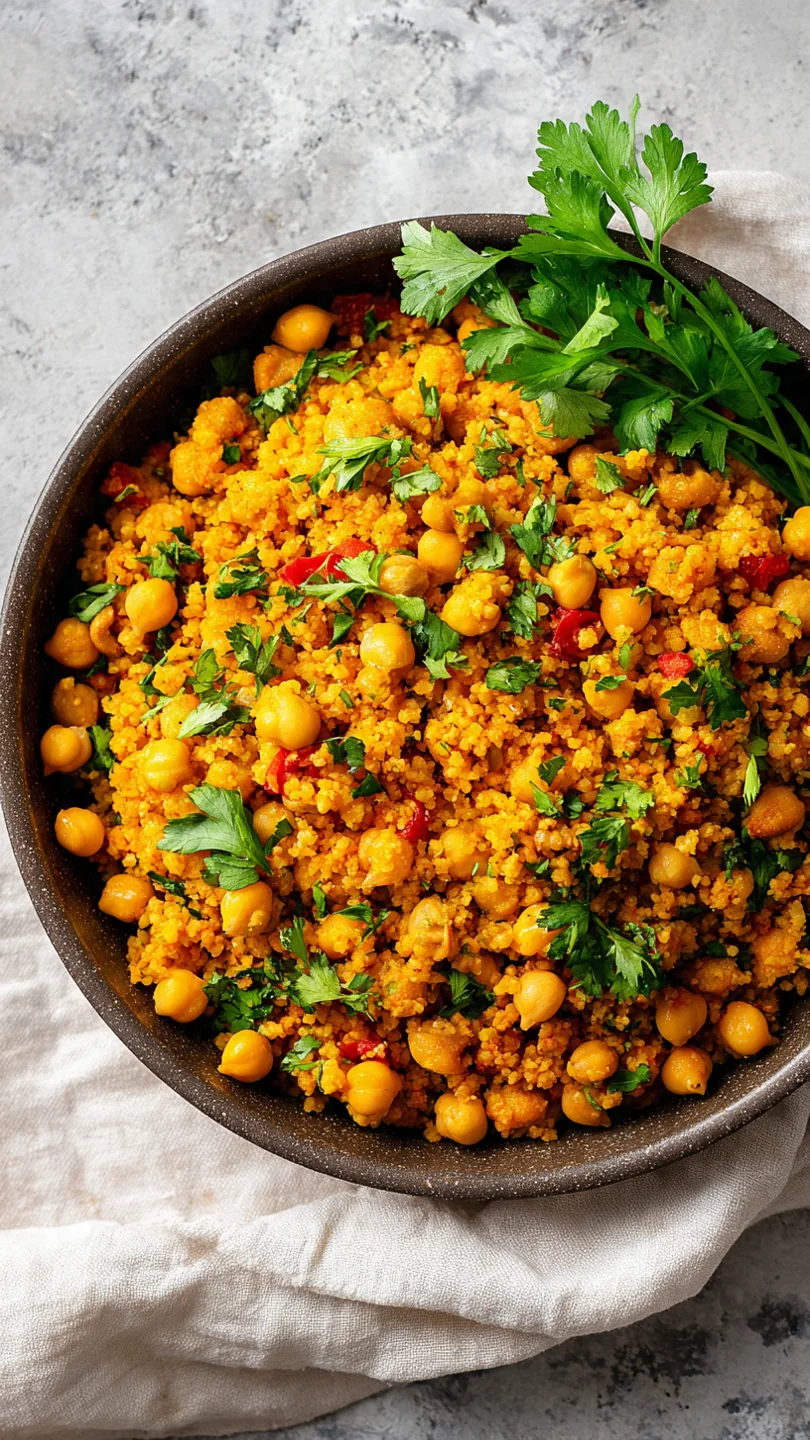
There’s a special kind of kitchen magic that happens when humble pantry staples come together to create something greater than the sum of its parts. This Chickpea Bulgur Pilaf is exactly that kind of magic. Imagine nutty, tender grains, perfectly fluffy and infused with warm spices, mingling with hearty chickpeas and brightened with a hit of lemon.
It’s a complete, satisfying meal that comes together in one pan with minimal fuss, yet delivers the complex flavors of something that simmered for hours. Whether you need a reliable weeknight dinner, a stellar meal-prep base, or a impressive potluck dish, this pilaf is your answer. Let’s make it.
This recipe is a weeknight warrior for several compelling reasons.
- One-pan convenience: From sautéing to steaming, everything happens in a single pot, meaning less cleanup and more flavor layered into the dish.
- Big flavor, fast: By toasting the bulgur and spices before adding liquid, we build a deep, aromatic foundation in minutes that tastes like it took far longer.
- Meal-prep champion: This pilaf holds beautifully in the fridge for days and can be served hot, cold, or at room temperature, making it incredibly versatile.
- Diet-flexible: It’s naturally vegetarian, easily made vegan, and packed with plant-based protein and fiber to keep you full and satisfied.
- Endlessly customizable: Think of this recipe as a template. The spices, herbs, and add-ins can be swapped to match your mood or what’s in your pantry.
- Texture perfection: The specific steam-and-rest method guarantees light, separate grains every time, never a gummy or mushy mess.
Ingredients You’ll Need
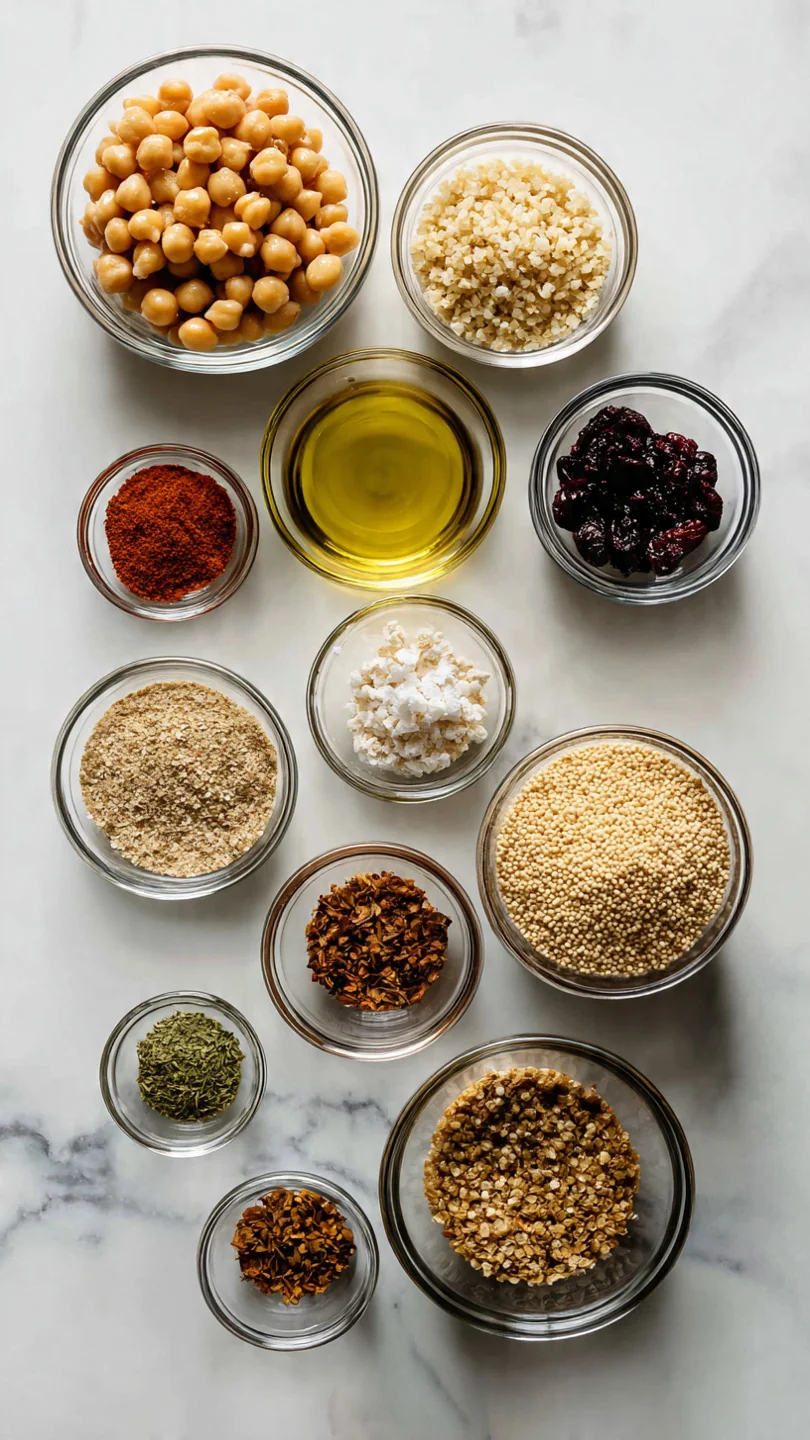
- Let’s gather our ingredients—this is where simple pantry staples create something truly special. The beauty of this pilaf lies in the synergy between the earthy bulgur, creamy chickpeas, and aromatic base.
- Extra virgin olive oil: We use it for sautéing and a final drizzle. Its fruity notes are important here.
- Yellow onion & garlic: The essential aromatic foundation. Finely dicing the onion ensures it melts into the pilaf.
- Ground cumin & smoked paprika: This spice duo adds warmth and a subtle smoky depth. Using fresh, high-quality spices makes a noticeable difference.
- Medium-coarse bulgur wheat: This is key. Medium-coarse bulgur has the perfect texture for pilaf—it stays distinct and fluffy. Fine bulgur will turn mushy.
- Canned chickpeas: A fantastic pantry protein. Be sure to rinse and drain them well to remove the excess sodium and that canned liquid taste.
- Vegetable broth: Using broth instead of water adds a layer of savory flavor. Low-sodium is best so you can control the salt.
- Fresh parsley & lemon juice: These are your “finishers” added off the heat. They provide the crucial burst of freshness and brightness that lifts the entire dish.
- Toasted pine nuts: An optional but highly recommended garnish for a delightful crunch and rich flavor contrast.
Note: You’ll find the complete list of ingredients, along with their exact measurements, in the printable recipe card at the bottom of this post.
Kitchen Equipment Needed
You don’t need any fancy gear for this recipe. The most important tool is a medium saucepan or deep skillet (about 3-quart capacity) with a tight-fitting lid. The lid is non-negotiable for the steaming process. A wooden spoon or spatula is ideal for stirring.
Beyond that, just a standard chef’s knife, cutting board, and measuring tools will see you through. If you want to toast the nuts for garnish, a small dry skillet is helpful.
How to Make Chickpea Bulgur Pilaf Recipe
Step 1: Build Your Flavor Base
In your saucepan, heat the olive oil over medium heat. Add the diced onion and cook, stirring occasionally, until it’s soft and translucent—about 5 minutes. You’re not looking for color here, just sweetness.
Then, add the minced garlic, cumin, and smoked paprika. Cook for just another minute until incredibly fragrant. Believe me, this step of cooking the spices in the oil, called “blooming,” unlocks their full potential and infuses the entire dish with flavor.
Step 2: Toast the Bulgur
Now, add the dry bulgur wheat directly to the pan with the onions and spices. Stir constantly for 1 to 2 minutes. You’ll hear a faint crackling and smell a wonderful, nutty aroma.
This toasting step coats each grain in the flavorful oil and creates a protective layer that helps the bulgur stay separate and fluffy after cooking, rather than becoming sticky.
Step 3: Combine and Bring to a Boil
Pour in the vegetable broth—it will sizzle nicely—and add the rinsed chickpeas, salt, and pepper. Give everything a good stir, making sure to scrape up any tasty bits stuck to the bottom of the pan. Increase the heat to medium-high and bring the liquid to a full, rolling boil.
This ensures even cooking from the start.
Step 4: The Crucial “No-Peek” Steam
As soon as it boils, immediately reduce the heat to the lowest possible setting. Cover the pan with the lid as tightly as you can. Let it simmer gently for exactly 15 minutes.
Tip from me: Set a timer and walk away. Do not lift the lid to check or stir. The steam trapped inside is doing all the work, gently cooking the bulgur and chickpeas to perfection.
Step 5: Rest, Fluff, and Finish
After 15 minutes, turn off the heat. Keep the lid on and let the pan sit, undisturbed, on the warm burner for 10 full minutes. This resting period is just as important as the cooking time; it allows the grains to finish absorbing any residual steam and moisture.
Now, uncover and use a fork to fluff the pilaf gently. Finally, fold in the fresh parsley and lemon juice. This is the fun part—watch the colors and aromas come alive.
Step 6: Serve and Enjoy
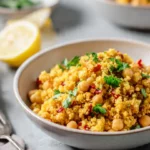
Taste and adjust with a pinch more salt or a squeeze of lemon if needed. Serve your pilaf warm, drizzled with a little extra olive oil and sprinkled with toasted nuts if you like. Step back and admire your vibrant, fragrant, and incredibly satisfying one-pan creation.
It’s ready to be the star of the table.
A few insights from the pro kitchen will guarantee your pilaf turns out perfectly every single time.
- Grain selection is key: For this pilaf method, you must use medium or coarse bulgur. Fine bulgur (#1 grind) is for tabbouleh and will turn to mush here. If in doubt, check the package.
- The lid matters: If your lid doesn’t fit snugly, place a piece of foil over the pan first, then put the lid on top. A tight seal is critical for proper steaming.
- Don’t stir while cooking: Once you add the broth and cover the pan, resist the urge to stir. Stirring breaks the grains and releases starch, leading to a gummy texture. Fluff only at the end.
- Resting is not optional: The 10-minute rest off the heat allows the grains to finish cooking evenly and absorb the last bit of moisture. Skipping it can leave you with a slightly wet or uneven pilaf.
- Brightness at the end: Always add fresh herbs and acidic elements like lemon juice after cooking. Adding them during cooking dulls their color and vibrant flavor.
Recipe Variations & Customizations
- This recipe is a fantastic canvas. Here are some tested variations to make it your own.
- Mediterranean Twist: Add 1/2 cup chopped sun-dried tomatoes and 1/4 cup chopped Kalamata olives when you add the chickpeas. Finish with fresh dill instead of parsley.
- Green Goddess: Stir in 2 cups of finely chopped fresh spinach or kale during the last 2 minutes of the resting period (the residual heat will wilt it perfectly). Finish with a tablespoon of chopped fresh mint.
- Spicy Harissa: Replace the cumin and paprika with 1-2 tablespoons of harissa paste, adding it with the garlic. Garnish with crumbled feta cheese.
- Lemony Herb: Double the lemon juice and add the zest of one lemon with the broth. Use a mix of soft herbs like parsley, mint, and chives for the finish.
- “Cheesy” Vegan: For a rich, umami note, stir in 2 tablespoons of nutritional yeast along with the parsley and lemon juice.
- Protein Boost: For a non-vegetarian version, sauté 8 oz of ground lamb or turkey with the onions until cooked through before proceeding.
What to Serve With This Recipe
While this pilaf is a complete meal on its own, it also plays wonderfully with others. For a simple, light meal, serve it with a crisp cucumber and tomato salad dressed in lemon and olive oil. To make it more substantial, pair it with grilled chicken skewers, lemon-herb baked fish, or roasted cauliflower steaks. It’s an excellent side dish for a larger Mediterranean feast alongside hummus, baba ganoush, and grilled vegetables.
For beverages, a dry rosé, a crisp lager, or simply sparkling water with lemon all complement the flavors beautifully.
Storage & Make-Ahead Instructions
- This pilaf is a meal-prep dream.
- Refrigerator: Store cooled pilaf in an airtight container for up to 4 days. The flavors often meld and improve on the second day.
- Freezer: Portion the cooled pilaf into freezer-safe containers or bags for up to 3 months. Thaw overnight in the refrigerator.
- Reheating: The best method is to reheat it gently in a skillet with a tiny splash of water or broth over medium-low heat, covered, until warmed through. You can also microwave single portions, covered, stirring once or twice.
- Make-Ahead: You can fully cook the pilaf 1-2 days ahead. Store it without the fresh parsley and lemon juice. Reheat as directed, then stir in the herbs and lemon just before serving to maintain their freshness.
- Avoid: Do not store the pilaf while it’s still warm, as this can create condensation and make it soggy. Let it cool to room temperature first (within 2 hours).
Frequently Asked Questions
Q: Can I use quinoa instead of bulgur?
A: Yes, but the method changes. Use 1 cup of rinsed quinoa and 2 cups of liquid. After bringing to a boil, cover and simmer for 15 minutes, then let rest for 10.
Quinoa will have a different texture but is a great gluten-free alternative.
Q: My pilaf is still wet/crunchy after the rest time. What happened?
A: If it’s wet, the heat was likely too high, causing rapid evaporation that condensed on the lid and dripped back in. If it’s crunchy, the heat was too low or the lid wasn’t tight, so the liquid didn’t fully absorb. Ensure a low simmer and a tight seal.
Q: Can I double this recipe?
A: Absolutely. Use a large pot or Dutch oven to ensure even cooking. You may need to add 1-2 extra minutes to the simmer time, but the resting time remains the same.
Q: Is bulgur gluten-free?
A: No, bulgur is a form of cracked wheat and contains gluten. For a gluten-free version, substitute with an equal amount of certified gluten-free coarse cornmeal (not polenta) or sorghum, adjusting liquid and cook time as needed.
Q: Can I use dried chickpeas?
A: Yes, but they must be fully cooked and drained first. You’ll need about 1.5 cups of cooked chickpeas to replace one 15-oz can.
Q: The bottom of my pilaf is sticking/burning.
A: This means your heat was too high during the simmering stage. Always use the lowest possible heat once the lid is on. If you have an electric stove, you may even need to use a diffuser.
Q: Can I add other vegetables?
A: Definitely! Diced carrots, bell peppers, or zucchini are great additions. Sauté them with the onions until just tender before adding the garlic and spices.
Final Thoughts
This Chickpea Bulgur Pilaf is more than just a recipe; it’s a reliable technique and a template for countless easy, nutritious meals. It embodies what I love most about cooking: transforming a handful of simple ingredients into something deeply nourishing and delicious with minimal effort. The method of toasting the grain and the disciplined steam-and-rest are professional tricks that deliver restaurant-quality results at home.
I hope this recipe becomes a trusted staple in your kitchen, as adaptable to your cravings as it is satisfying. Give it a try this week, and don’t forget to fluff with a fork! I’d love to hear how it turned out for you—share your creations and variations with me.
Happy cooking!
Chickpea Bulgur Pilaf
Equipment
- Medium saucepan or deep skillet (3-quart capacity) with a tight-fitting lid
- Wooden spoon or spatula
- Chef’s knife and cutting board
- Measuring cups and spoons
- Can opener
Ingredients
- 1 tbsp extra virgin olive oil plus more for finishing
- 1 medium yellow onion finely diced
- 2 cloves garlic minced
- 1 tsp ground cumin
- 1/2 tsp smoked paprika
- 1 cup medium-coarse bulgur wheat
- 1 15-oz can chickpeas rinsed and drained
- 1 3/4 cups vegetable broth or water
- 1 tsp fine sea salt or to taste
- 1/4 tsp black pepper freshly ground
- 1/4 cup fresh parsley finely chopped
- 2 tbsp fresh lemon juice from about 1/2 a lemon
- 2 tbsp toasted pine nuts or slivered almonds optional, for garnish
Instructions
- In a medium saucepan or deep skillet with a lid, heat the olive oil over medium heat. Add the diced onion and cook, stirring occasionally, until softened and translucent, about 5 minutes. Add the minced garlic, cumin, and smoked paprika, and cook for another minute until fragrant. This step builds the flavor foundation—don’t rush it.
- Add the dry bulgur wheat to the pan. Stir constantly for 1-2 minutes to toast the grains lightly in the oil and spices. You’ll notice a nutty aroma. This simple toasting step is a pro move that prevents the bulgur from becoming gummy and adds a deeper flavor dimension.
- Pour in the vegetable broth and add the rinsed chickpeas, salt, and pepper. Give everything a good stir, scraping up any bits from the bottom of the pan. Increase the heat to bring the liquid to a boil.
- Once boiling, immediately reduce the heat to the lowest setting. Cover the pan tightly with a lid. Let the pilaf simmer gently for 15 minutes. Trust me, do not peek! Keeping the lid on is crucial for the bulgur to steam properly and absorb all the liquid.
- After 15 minutes, remove the pan from the heat. Keep it covered and let it stand, undisturbed, for 10 minutes. This resting period is non-negotiable—it allows the grains to finish steaming to perfect tenderness and fluffiness. Then, uncover and fluff the pilaf with a fork.
- Gently fold in the chopped parsley and fresh lemon juice. Taste and adjust seasoning with more salt or lemon if needed. Serve warm, drizzled with a little extra olive oil and garnished with toasted nuts if using. Step back and admire your vibrant, fragrant, and complete one-pan meal.