
I can still remember the first time I tried to whip up a Classic Pumpkin Pie for Thanksgiving. I was a nervous wreck in my tiny apartment kitchen, surrounded by cans of pumpkin puree and a store-bought crust I wasn’t sure I trusted. My family loves a good pie, though, so I dove in, hoping for the best—and let me tell you, that first Classic Pumpkin Pie was a game-changer! It wasn’t perfect (oh, the cracks in the filling!), but the warm, spicy aroma filled the house, and my dad couldn’t stop raving about it.
Over the years, I’ve tweaked and perfected my recipe for Classic Pumpkin Pie, turning it into a fall staple in our home. I’m beyond excited to share this with you today because if I can nail a Classic Pumpkin Pie, so can you. Let’s get into why this recipe is a must-try, along with all the tips and tricks I’ve picked up along the messy, delicious way.
Why You’ll Love This Recipe
I’ve found that there’s something magical about a Classic Pumpkin Pie that just screams cozy autumn vibes. In my kitchen, this recipe has become the go-to for holiday gatherings because it’s not only easy to whip up but also delivers that rich, custardy texture with the perfect balance of spice. Honestly, who doesn’t love a slice that tastes like a hug on a chilly day?
And here’s the kicker: even if you’re not a baking pro, this Classic Pumpkin Pie comes together without much fuss. I’ve made it dozens of times, sometimes with kids “helping” (read: making a mess), and it still turns out great. You’ll adore how forgiving and crowd-pleasing it is!
Ingredients List
Let’s talk about what you’ll need to make a killer Classic Pumpkin Pie. I’m all about keeping things simple, but I do have a few preferences when it comes to ingredients—like using real pumpkin puree over the pre-spiced stuff for better control over flavor. Here’s the breakdown for a pie that’ll impress everyone at your table, whether it’s for Thanksgiving or just a random Tuesday craving for Classic Pumpkin Pie.
For the Crust
- 1 1/2 cups (180g) all-purpose flour, spooned and leveled for accuracy
- 1/2 teaspoon salt, to balance the sweetness
- 1/2 cup (115g) unsalted butter, cold and cubed (I keep mine in the freezer for 10 minutes before using)
- 4-6 tablespoons ice water, added slowly to get the right dough consistency
For the Filling
- 1 can (15oz or 425g) pumpkin puree, pure and unsweetened (Libby’s is my go-to)
- 3 large eggs, at room temperature for a smoother mix
- 1 cup (200g) granulated sugar, though I sometimes cut back a tad if I’m feeling health-conscious
- 1/2 cup (100g) brown sugar, packed, for that subtle molasses depth
- 1 tablespoon pumpkin pie spice, or mix your own if you’re fancy (I usually just grab the jar)
- 1/2 teaspoon salt, to enhance all those warm flavors
- 1 cup (240ml) heavy cream, for that luscious, creamy texture in your Classic Pumpkin Pie
I usually buy my spices in bulk because I’m obsessed with baking fall treats, but feel free to use whatever you’ve got on hand. Just make sure your pumpkin puree isn’t the pie filling kind—trust me, I’ve made that mistake before!
Variations
One of the things I love about a Classic Pumpkin Pie is how versatile it can be. I’ve played around with this recipe over the years, tweaking it based on mood, dietary needs, or just whatever’s in my pantry. Here are some fun twists on the Classic Pumpkin Pie that might inspire you to mix things up.
- Bourbon-Infused: Add a tablespoon of bourbon to the filling for a subtle, boozy warmth. I tried this once for a Friendsgiving, and let’s just say it was a hit!
- Ginger Snap Crust: Swap the traditional pie crust for crushed ginger snap cookies mixed with butter. It’s a game-changer for extra spice in your Classic Pumpkin Pie.
- Maple Sweetened: Replace half the granulated sugar with maple syrup for a deeper, earthier sweetness. My kids always ask for this version.
- Nutty Topping: Sprinkle chopped pecans or walnuts on top before baking for a bit of crunch. I’m obsessed with this for texture.
- Coconut Cream: Sub heavy cream with coconut cream for a dairy-free option with a tropical twist. I’ve done this for a vegan friend, and it worked surprisingly well.
- Extra Spiced: Bump up the cinnamon and add a pinch of cloves for an even bolder flavor in your Classic Pumpkin Pie. It’s my go-to when I want something punchy.
- Chocolate Swirl: Drizzle melted dark chocolate into the filling and swirl before baking. I did this on a whim once, and my husband hasn’t stopped talking about it.
- Mini Pies: Make individual servings in a muffin tin for cute, personal portions of Classic Pumpkin Pie. Perfect for portion control (or so I tell myself).
Servings and Timing
When I’m baking a Classic Pumpkin Pie, I like to plan ahead because timing can sneak up on you. In my experience, this recipe comes together pretty smoothly if you’ve got everything prepped. Here’s the breakdown for making one 9-inch pie, perfect for a small gathering or a family dessert with leftovers of Classic Pumpkin Pie to enjoy.
- Prep Time: 25 minutes (longer if you’re making the crust from scratch)
- Cook Time: 55-60 minutes
- Total Time: About 1 hour 25 minutes, plus cooling time
- Servings: 8-10 slices, depending on how generous you’re feeling
Step-by-Step Instructions
Alright, let’s get down to business and make a Classic Pumpkin Pie that’ll have everyone asking for seconds. I’m gonna walk you through this like we’re chatting over coffee in my kitchen. I’ve got some little tricks up my sleeve to make this as easy as pie (pun intended!).
Step 1: Make the Crust
Start by mixing your flour and salt, then cut in that ice-cold butter until it’s crumbly—like wet sand. Add ice water a tablespoon at a time until the dough just holds together. Roll it out on a floured surface, fit it into a 9-inch pie dish, crimp the edges, and chill it in the fridge for 30 minutes while you work on the filling for your Classic Pumpkin Pie.
Step 2: Prepare the Filling
In a big bowl, whisk together the pumpkin puree, eggs, both sugars, pumpkin pie spice, and salt until smooth. Slowly pour in the heavy cream, mixing until it’s all blended. I’ve learned to do this by hand to avoid overmixing—keeps the texture just right for a Classic Pumpkin Pie.
Step 3: Assemble and Bake
Preheat your oven to 375°F (190°C). Pour the filling into your chilled crust, smoothing the top with a spatula. Bake for 55-60 minutes until the center is set but still has a slight jiggle (my little secret to avoid cracks in a Classic Pumpkin Pie). If the edges brown too fast, tent them with foil after 30 minutes—I’ve burned a crust or two before figuring that out!
Step 4: Cool and Serve
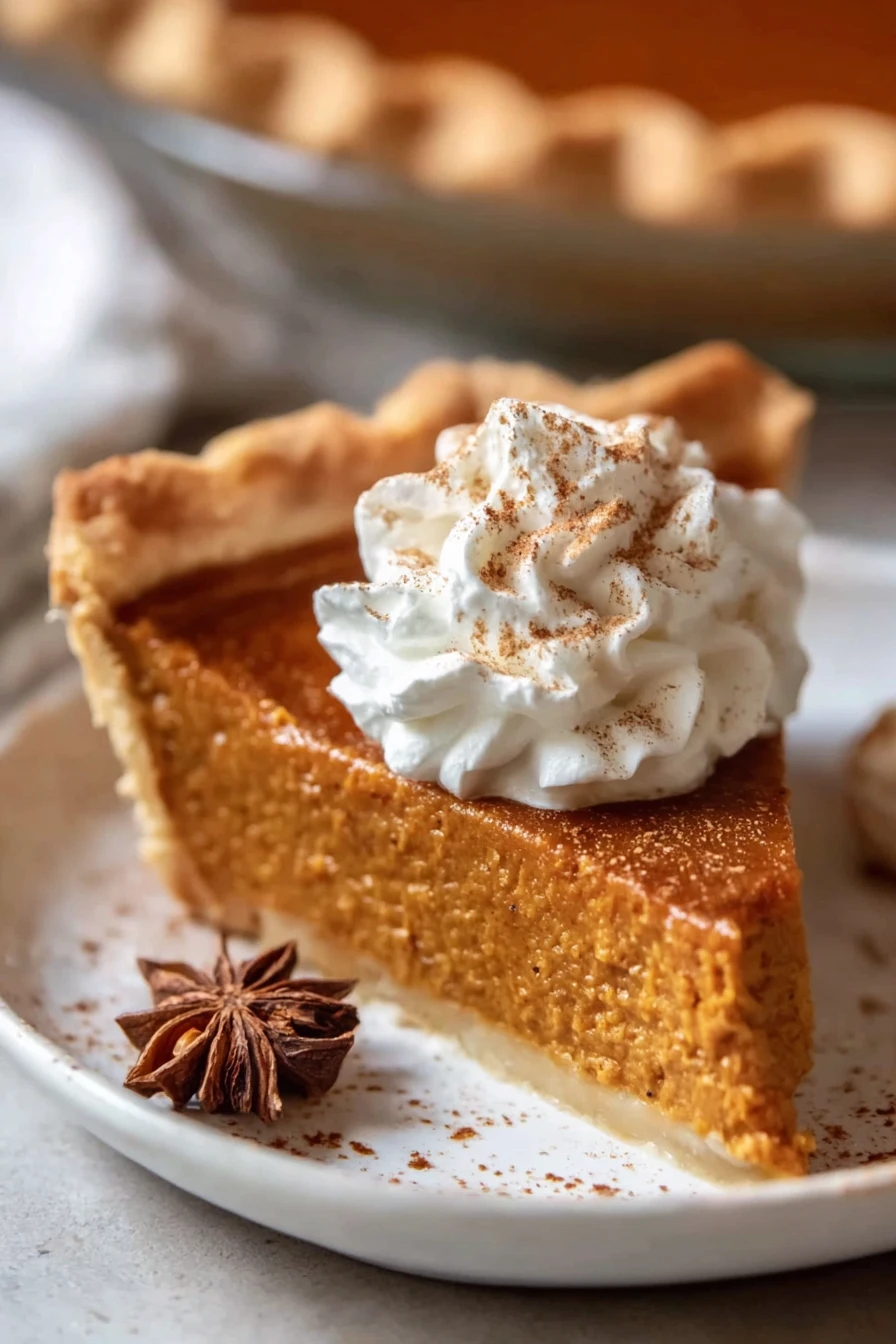
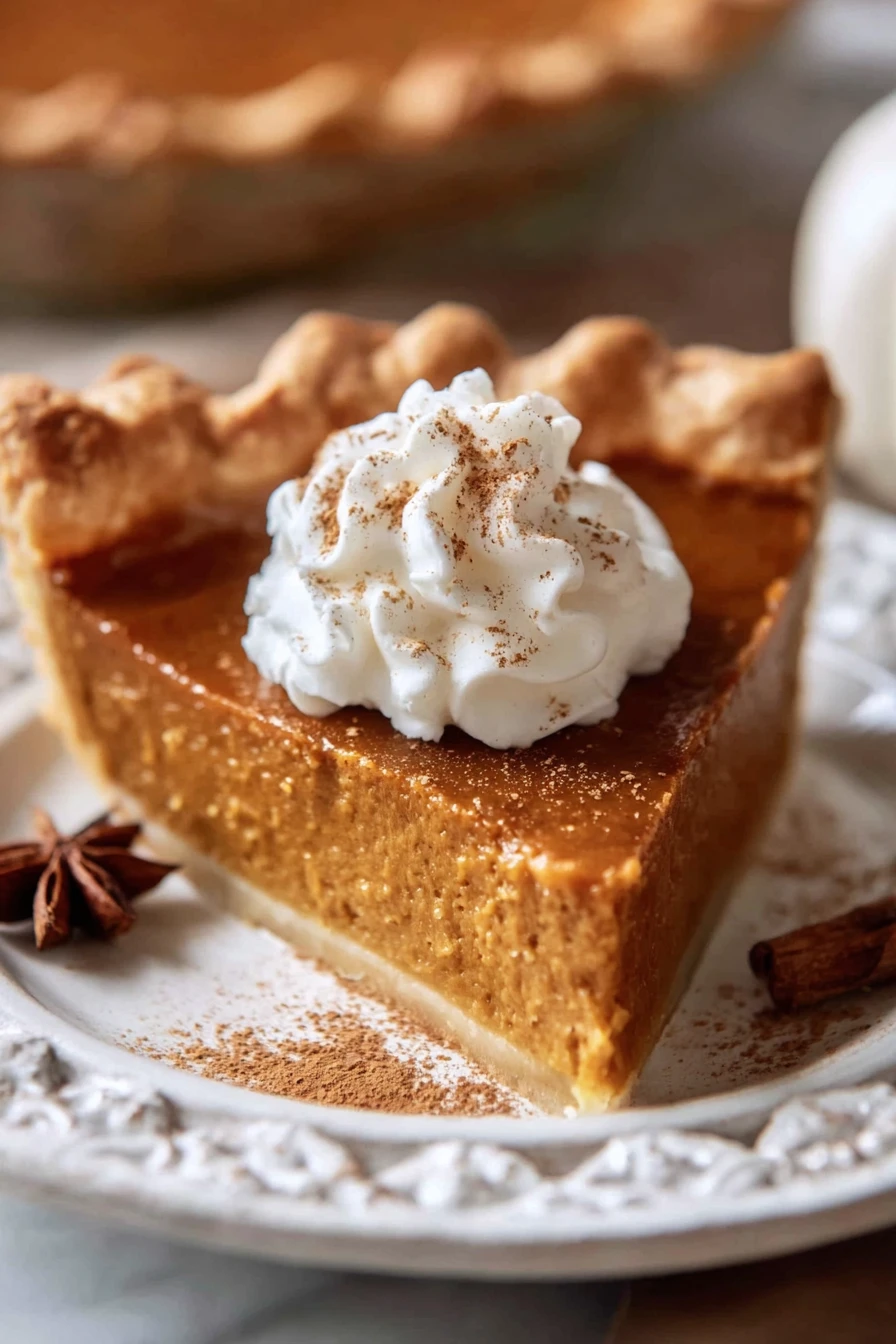
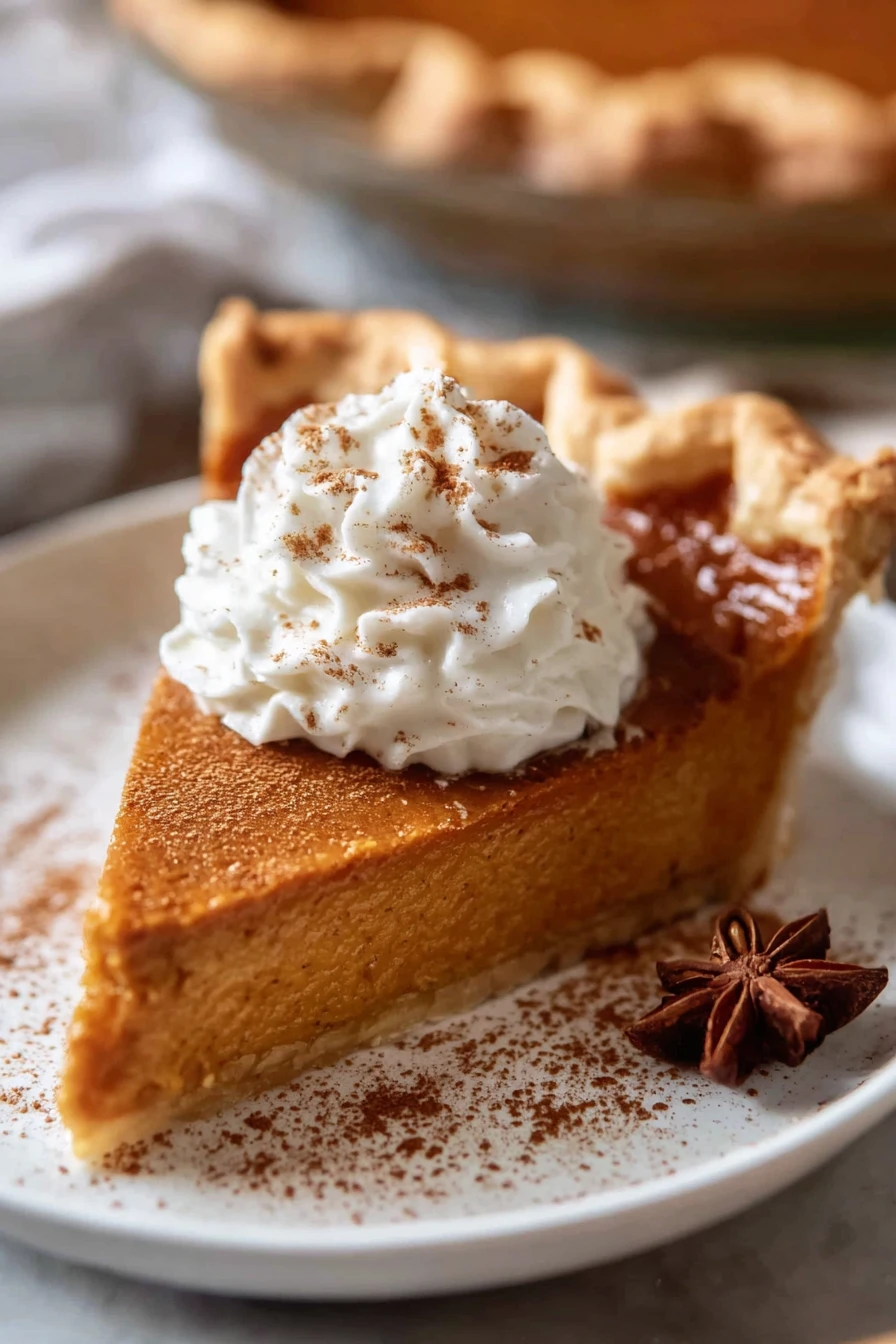
Let your Classic Pumpkin Pie cool completely on a wire rack for at least 2 hours. I know, waiting is torture with that amazing smell, but it helps the filling firm up. Slice it up and serve with whipped cream if you’re feeling fancy like I usually do.
Nutritional Information
I’m no dietitian, but I think it’s helpful to know what’s in a slice of Classic Pumpkin Pie, especially if you’re watching your intake. This is based on a 9-inch pie cut into 8 slices, and honestly, I usually sneak a little piece before calculating anyway! Here’s the rough breakdown for a serving of Classic Pumpkin Pie.
- Calories: 320 per slice
- Fat: 18g
- Protein: 5g
- Carbohydrates: 35g
- Sodium: 300mg
Healthier Alternatives
If I’m trying to lighten up a Classic Pumpkin Pie, there are a few swaps I’ve tested that don’t skimp on flavor. I’m not gonna lie, I love the full-fat version, but these tweaks work when I’m watching calories or baking for health-conscious friends. Give these a shot for a guilt-free take on Classic Pumpkin Pie.
- Evaporated Milk Swap: Use evaporated skim milk instead of heavy cream to cut down on fat. I’ve done this and still got a creamy texture.
- Sugar Reduction: Replace half the sugar with a natural sweetener like stevia or monk fruit. It’s not my fave, but it works for a lighter Classic Pumpkin Pie.
- Gluten-Free Crust: Use almond flour or a gluten-free blend for the crust. I’ve made this for a friend with allergies, and it held up fine.
- Egg Substitute: Swap eggs for flaxseed meal (1 tbsp flax + 3 tbsp water per egg) for a vegan option. It’s a bit denser, but still tasty in my experience with Classic Pumpkin Pie.
Serving Suggestions
I’ve got some go-to ways to serve a Classic Pumpkin Pie that make it feel extra special. Whether it’s a holiday feast or a cozy night in, these ideas elevate the experience. Try these out with your next Classic Pumpkin Pie!
- With Whipped Cream: Dollop on some homemade whipped cream with a sprinkle of cinnamon. I love how it melts into the warm pie.
- Ice Cream Pairing: Serve with a scoop of vanilla or caramel ice cream for a decadent treat. My family goes nuts for this with Classic Pumpkin Pie.
- Coffee Companion: Pair a slice with a hot cup of coffee or spiced chai. It’s my favorite afternoon pick-me-up.
- Thanksgiving Finale: Present your Classic Pumpkin Pie as the star of the dessert table with a dusting of powdered sugar. It’s always a showstopper at my house!
Common Mistakes to Avoid
I’ve flubbed my share of Classic Pumpkin Pie attempts over the years, so let me save you some heartbreak with mistakes I’ve learned the hard way. These pitfalls can turn your pie from dreamy to disastrous. Trust me, I’ve been there with a sad-looking Classic Pumpkin Pie!
- Overbaking: Baking too long leads to cracks and a dry filling. I’ve pulled a pie out too late and regretted it—check for that slight jiggle!
- Undermixing Filling: Not blending well can leave lumps. I rushed once, and the texture was off in my Classic Pumpkin Pie.
- Ignoring Crust Chill: Skipping the chill time makes a soggy bottom. Learned this after a mushy mess of a pie.
- Wrong Pumpkin: Using pie mix instead of puree throws off the balance. I did this early on, and my Classic Pumpkin Pie was way too sweet.
Storing Tips
I’ve found that a Classic Pumpkin Pie keeps pretty well if you store it right, which is great for making ahead. In my experience, it’s best to plan storage before the pie’s even cool. Here’s how to keep your Classic Pumpkin Pie fresh for days.
- Refrigerator: Store in the fridge, covered with plastic wrap, for up to 4 days.
- Freezer: Freeze individual slices wrapped in plastic and foil for up to 2 months.
- Room Temperature: Only leave out for a day max if it’s cool in your kitchen.
Frequently Asked Questions
I get a lot of questions about making a Classic Pumpkin Pie, so I’ve rounded up the most common ones. Let’s dive into these so you can bake with confidence. I’ve got answers based on my own trial and error with Classic Pumpkin Pie!
Can I make Classic Pumpkin Pie ahead of time?
Absolutely, and I often do! Bake it up to 2 days in advance, cool completely, and store it in the fridge. Just bring it to room temp or warm it slightly before serving for that fresh-baked feel.
Why did my pie crack?
Ugh, I’ve been there. Cracks usually happen from overbaking or cooling too fast. Pull it out when the center jiggles a bit, and let it cool slowly on the counter.
Can I use fresh pumpkin instead of canned?
Yep, you can! Roast and puree your own pumpkin, but make sure to drain excess liquid. I’ve done it once, and it’s more work but super flavorful.
Is a water bath necessary?
Not in my opinion. I skip it for simplicity, and my Classic Pumpkin Pie still sets nicely. But if you’re worried about cracks, go for it!
Can I freeze the pie?
Yes, it freezes well. Wrap slices tightly and thaw in the fridge overnight. I’ve frozen leftovers with no issues.
What if I don’t have pumpkin pie spice?
No worries! Mix cinnamon, nutmeg, ginger, and a pinch of cloves. I’ve improvised like this plenty of times.
How do I know when it’s done?
Look for a set edge with a slightly wobbly center—around 55-60 minutes at 375°F. That’s my foolproof check after years of baking.
Can I make it dairy-free?
Totally. Swap heavy cream for coconut cream or milk. I’ve tried it, and it’s still creamy and delicious.
Conclusion
I hope you’re as pumped as I am to bake up a Classic Pumpkin Pie that’ll steal the show at your next gathering. There’s nothing quite like pulling a warm, spiced pie out of the oven, and I can’t wait for you to experience it. So grab your apron, give this Classic Pumpkin Pie a shot, and let me know how it turns out—I’m all ears for your stories!
Conclusion
I hope you enjoyed this recipe for Classic Pumpkin Pie ! It’s truly one of my favorites, and I’m confident you’ll love it too.
Remember to follow the steps carefully for the best results. Don’t hesitate to experiment with your own variations and make this recipe your own. Happy cooking!