
There’s something incredibly satisfying about transforming a humble head of cabbage into a crispy, savory, meal-sized pancake. As a chef, I love dishes that are greater than the sum of their parts, and this crispy cabbage pancake is a perfect example. Inspired by the Japanese street food okonomiyaki (which means “grilled as you like it”), this recipe is your canvas.
It comes together in one pan in under 30 minutes, delivering a textural masterpiece with a golden, lacy crust giving way to a tender, flavorful interior. Whether you need a quick weeknight dinner or a impressive brunch item, this pancake is a reliable, delicious solution.
This crispy cabbage pancake earns a permanent spot in your recipe rotation for so many practical reasons.
- One-pan convenience: From bowl to plate using a single skillet, cleanup is a breeze.
- Big flavor, fast: It’s savory, slightly sweet, umami-rich, and ready in under 30 minutes.
- Diet-flexible: Easily adaptable to be gluten-free, dairy-free, or packed with extra protein.
- Clever way to use veggies: It’s a delicious vehicle for using up cabbage, carrots, scallions, or other stragglers in your crisper drawer.
- Textural heaven: The contrast between the shatteringly crisp exterior and the soft, savory interior is utterly addictive.
- Endlessly customizable: The base recipe is a launchpad for your creativity—add shrimp, bacon, different veggies, or change up the sauces.
Ingredients You’ll Need
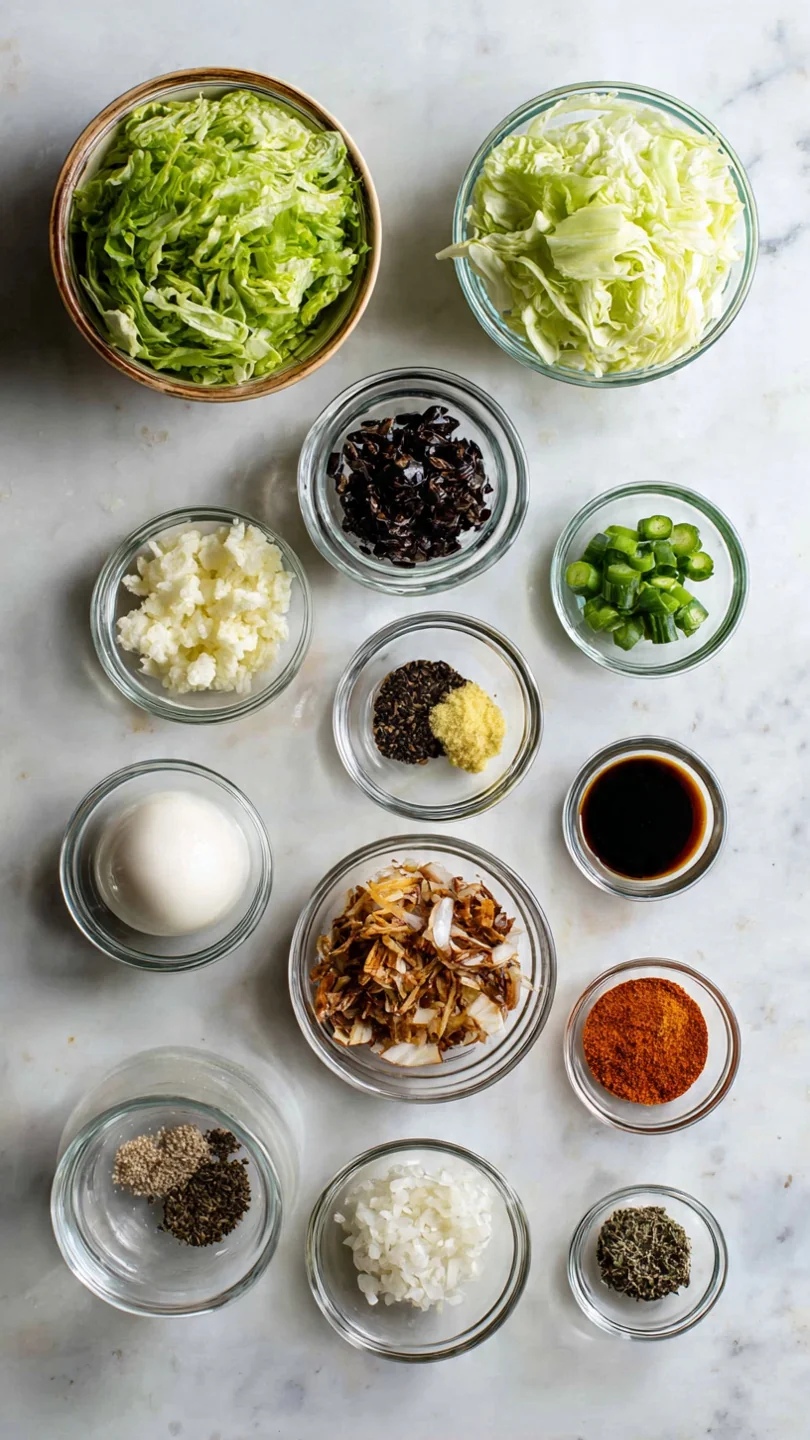
- Let’s gather our ingredients—this is where simple pantry staples create some serious magic. The beauty here is in the balance: the cabbage provides bulk and sweetness, the eggs and flour bind it all, and the sauces on top deliver the iconic sweet, tangy, and creamy flavors.
- Green cabbage: You’ll need about 1/4 of a medium head. Finely shredding it is key for a cohesive pancake that cooks evenly.
- Carrot and green onions: These add color, sweetness, and a fresh bite. Julienne the carrot or use the large holes of a box grater.
- Eggs and flour: Our simple binder. All-purpose flour works perfectly, but a 1:1 gluten-free blend is a seamless swap.
- Soy sauce & sesame oil: These are your flavor powerhouses, adding deep umami and nutty aroma right into the batter.
- Neutral oil: A high-smoke point oil like avocado or canola is essential for achieving that deep, golden, crispy crust without burning.
- Kewpie mayo & Okonomiyaki sauce: The classic finishing duo. Kewpie mayo is richer and tangier than American mayo. Okonomiyaki sauce is a thick, sweet, and tangy Worcestershire-style sauce. Find both in the Asian aisle of most supermarkets.
- Bonito flakes & Ao-nori: These traditional garnishes (thinly shaved dried tuna and green seaweed flakes) add an incredible layer of savory, oceanic flavor and visual appeal. They’re optional but highly recommended.
Note: You’ll find the complete list of ingredients, along with their exact measurements, in the printable recipe card at the bottom of this post.
Kitchen Equipment Needed
You don’t need any special gear for this recipe. A 10-inch non-stick or well-seasoned cast iron skillet is the MVP—it gives you the surface area needed for crispiness and makes flipping easier. A large mixing bowl, a flexible spatula (a fish spatula is ideal for sliding under the pancake), and a large plate for the flip are all you need.
If you have a mandoline for shredding the cabbage, it will save you a minute, but a sharp knife works just fine.
How to Make Crispy Cabbage Pancake Recipe
Step 1: Prep and Massage the Veggies
In your large bowl, combine the shredded cabbage, carrot, and the white parts of the green onions. Sprinkle the salt over the top and then get in there with your hands. Gently massage and squeeze the vegetables for about 30 seconds.
You’ll feel them start to soften and become slightly damp. This step is a chef’s secret—it breaks down the cabbage’s rigid structure just enough, helping it release moisture that will later bind with the flour and egg to create a cohesive batter. Believe me, it makes all the difference.
Step 2: Make the Batter
Crack the eggs into the bowl with the veggies, then add the flour, soy sauce, sesame oil, and black pepper. Now, use a fork or your hands again to mix everything thoroughly. You want every strand of cabbage to be lightly coated in the flour and egg mixture.
It will look messy and seem too loose to form a pancake, but that’s okay. Let this mixture sit for 5 minutes. This rest allows the flour to hydrate fully, which helps the pancake hold together beautifully when it hits the hot pan.
Step 3: Pan-Fry the First Side
Place your skillet over medium-high heat and let it get properly hot. Add 2 tablespoons of oil and swirl to coat. Carefully dump the entire cabbage mixture into the center of the pan.
Use your spatula to quickly press and shape it into a round, even layer about 1/2-inch thick. Press down firmly—this ensures good contact with the pan for maximum crispiness. Now, the hardest part: walk away.
Let it cook undisturbed for a full 6-7 minutes. Peek at the edges; you’re waiting for a deep, golden-brown crust to form.
Step 4: The Confident Flip
This is the moment that feels like a culinary magic trick. Slide the pancake out of the skillet and onto your large plate. Invert the hot skillet over the plate.
With confidence (and oven mitts!), flip the plate and skillet together in one smooth motion so the pancake drops back into the pan, crispy side up. Tip from me: a deep breath helps! Add another tablespoon or two of oil around the edges of the pancake and let the second side cook for 5-6 minutes until equally golden and crispy.
Step 5: Garnish and Serve
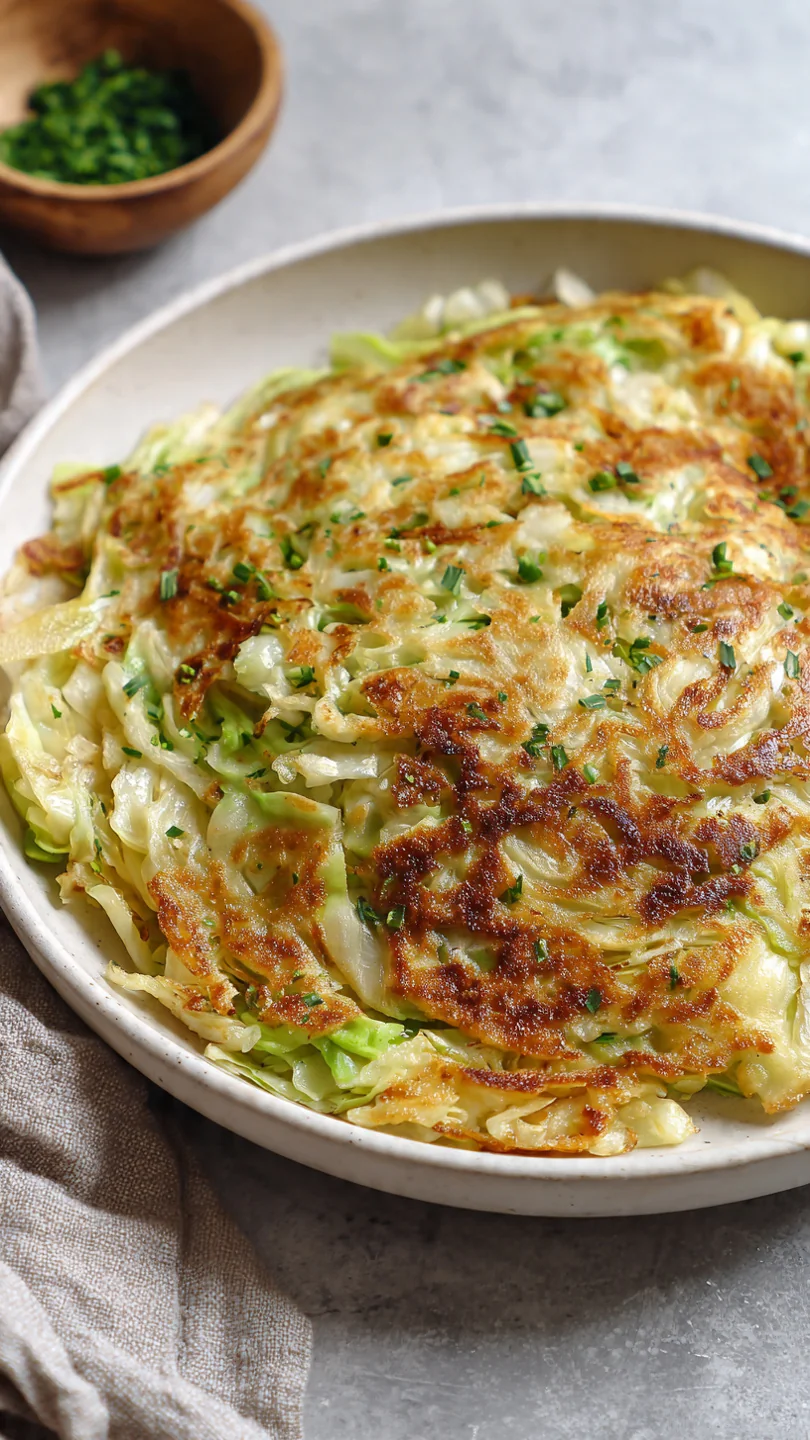
Slide your masterpiece onto a cutting board. Now for the fun part: the toppings. Drizzle the okonomiyaki sauce and mayo in zig-zags or swirls over the top.
Sprinkle generously with the reserved green onion tops, then watch the bonito flakes (if using) dance and wave from the heat. A final dusting of ao-nori seaweed adds color and flavor. Slice it into wedges and serve it immediately.
Step back and admire that gorgeous, crispy cross-section before you take the first, delicious bite.
A few insights from the pro kitchen will guarantee your success every time.
- The Pan Matters: A heavy-bottomed skillet (cast iron or clad stainless) retains heat best, preventing the pancake from steaming and ensuring an even, crispy sear. Non-stick is very forgiving for the flip.
- Don’t Skimp on the Oil: This is a pan-fry, not a sauté. Adequate oil is non-negotiable for creating that lacy, fried-crisp exterior. It also helps conduct heat evenly.
- The Sound of Doneness: Listen closely. When the first side is done, the sizzle will become quieter and less frantic. This is a great auditory cue to check for browning.
- Flipping Alternatives: If the plate flip feels daunting, you can slide the pancake onto the plate, then place a second plate on top, invert, and slide it back into the pan. Or, finish it under a broiler for 2-3 minutes to crisp the top instead of flipping.
- Test for Doneness: The pancake is ready when the edges are deeply browned and the center feels firm to the touch, not soggy. An instant-read thermometer inserted into the center should read at least 160°F (71°C) to ensure the eggs are cooked.
Recipe Variations
- The “as you like it” spirit of this dish means you should make it your own. Here are some of my favorite tested variations.
- Protein-Packed: Add 1/2 cup of chopped cooked shrimp, shredded chicken, or crumbled cooked bacon to the batter. For a classic okonomiyaki touch, sprinkle tenkasu (tempura bits) into the mix.
- Seafood Delight: Mix in a small handful of chopped squid or scallops. Top with a drizzle of spicy mayo (mix sriracha into mayo) instead of the classic toppings.
- Vegetable Garden: Add 1/2 cup of thinly sliced mushrooms, bell peppers, or corn kernels. Squeeze out any excess moisture from watery veggies like zucchini before adding.
- Gluten-Free & Vegan: Use a gluten-free 1:1 flour blend and tamari. For vegan, replace eggs with a “flax egg” (1 tbsp ground flax + 2.5 tbsp water per egg) and use vegan mayo. The texture will be softer but still delicious.
- DIY Sauce: No okonomiyaki sauce? Make a quick version by mixing 2 tbsp ketchup, 1.5 tbsp Worcestershire sauce, and 1 tsp honey or sugar.
- Kimchi Kick: Replace 1 cup of the cabbage with chopped kimchi for a spicy, fermented tang. Reduce or omit the added salt.
- Cheesy Twist: Sprinkle 1/4 cup of grated mozzarella or cheddar cheese over the pancake right after you flip it, letting it melt into the crispy surface.
What to Serve With This Recipe
This crispy cabbage pancake is substantial enough to be a meal on its own, but it also plays well with others. For a light, balanced dinner, pair it with a simple miso soup or a cucumber sunomono salad. If you’re serving a crowd, it makes a fantastic shareable appetizer alongside yakitori chicken skewers or edamame.
Beverage-wise, a crisp lager, a dry riesling, or even a glass of iced green tea complements its savory richness perfectly. It’s ideal for brunch (serve with a fried egg on top!), a quick lunch, or a casual “breakfast-for-dinner” situation.
Storage & Make-Ahead Instructions
- This pancake is truly best enjoyed immediately, but leftovers can be saved.
- Refrigeration: Store cooled leftovers in an airtight container in the refrigerator for up to 2 days.
- Reheating: To recapture crispiness, reheat in a skillet over medium heat with a tiny bit of oil. The microwave will make it soggy. You can also reheat in a 375°F (190°C) oven or toaster oven for 8-10 minutes.
- Freezing: I don’t recommend freezing the cooked pancake, as the cabbage becomes watery and the texture suffers upon thawing.
- Make-Ahead: You can prep the vegetable mixture (through the massaging step) and store it in a container in the fridge for up to 24 hours. When ready to cook, add the eggs, flour, and seasonings and proceed.
Frequently Asked Questions
Q: Can I use a different type of cabbage?
A: Absolutely. Savoy cabbage works beautifully and is even more tender. Red cabbage will dye your batter a purple hue but tastes great.
Avoid very tough cabbages like Napa for this specific recipe, as they release too much water.
Q: My pancake fell apart when I tried to flip it. What went wrong?
A: This usually means the first side wasn’t cooked long enough to form a solid, cohesive crust. Next time, let it cook undisturbed for the full time, and ensure you’re pressing it firmly into an even layer in the pan. Using enough flour and egg is also crucial for binding.
Q: Can I bake this instead of pan-frying?
A: For crispiness, pan-frying is superior. Baking will steam the pancake more, resulting in a softer texture. If you must bake, spread the mixture on a parchment-lined, oiled sheet pan at 425°F (220°C) for 20-25 minutes, flipping halfway.
Q: Is there a low-carb alternative to the flour?
A: Yes, you can use 2 tablespoons of almond flour or coconut flour. Note that these are more absorbent, so your batter may be drier. The binding power won’t be as strong, so handle the pancake gently.
Q: How do I know the pancake is cooked through in the center?
A: The edges will be very brown, and the top will look set, not wet or jiggly. Press the center gently with your spatula; it should feel firm. Using an instant-read thermometer is the surest method—aim for 160°F (71°C).
Q: Can I make mini pancakes instead of one large one?
A: Definitely! Drop 1/4-cup portions of batter into the skillet to make fritters. Cook for 3-4 minutes per side.
They’re perfect for parties or as a side dish.
Q: What can I use if I don’t have okonomiyaki sauce or Kewpie mayo?
A: For the sauce, a mix of BBQ sauce and a dash of soy sauce can work in a pinch. For the mayo, regular mayonnaise with a tiny squeeze of lemon juice will provide a similar creamy tang.
Final Thoughts
This crispy cabbage pancake is more than just a recipe; it’s a lesson in how simple ingredients, treated with a bit of know-how, can become something extraordinary. It embodies what I love most about cooking: approachable technique, big payoff, and total flexibility to suit your taste. That perfect crunch giving way to a savory, satisfying interior is a experience every home cook deserves to master.
I’ve tested this method repeatedly to ensure it works for you, so gather your cabbage and fire up that skillet. I’m confident it will become a new favorite. When you make it, I’d love to hear how it turned out and see your creative variations—tag me on social media!
And if you’re looking for more one-pan wonders, explore the other recipes on the blog. Happy cooking

Crispy Cabbage Pancake (Okonomiyaki-Style)
Equipment
- 10-inch non-stick or cast iron skillet
- Large mixing bowl
- Spatula (a flexible fish spatula works best for flipping)
- Large plate (for flipping)
Ingredients
- 4 cups green cabbage finely shredded (about 1/4 of a medium head)
- 1 large carrot julienned or grated
- 3 green onions thinly sliced, whites and greens separated
- 2 large eggs
- 1/4 cup all-purpose flour or use a gluten-free 1:1 blend
- 1 tbsp soy sauce or tamari for gluten-free
- 1 tsp toasted sesame oil
- 1/4 tsp salt
- 1/4 tsp black pepper freshly ground
- 3-4 tbsp neutral oil like avocado or canola, for frying
- 2 tbsp kewpie mayo or regular mayonnaise
- 2 tbsp okonomiyaki sauce or tonkatsu sauce or make your own (see variations)
- 1 tsp bonito flakes optional, for garnish
- 1 tsp ao-nori seaweed flakes optional, for garnish
Instructions
- In a large mixing bowl, combine the shredded cabbage, carrot, and the white parts of the green onions. Sprinkle with the salt and gently massage the vegetables with your hands for about 30 seconds. This softens the cabbage slightly and helps it release a bit of moisture, which is key for binding. Trust me, don’t skip this step.
- Add the eggs, flour, soy sauce, sesame oil, and black pepper to the bowl. Using a fork or your hands, mix everything thoroughly until the flour is fully incorporated and the vegetables are evenly coated. The mixture will seem loose, but it will hold together when pressed. Let it rest for 5 minutes while you heat your pan.
- Heat a 10-inch non-stick or well-seasoned cast iron skillet over medium-high heat. Add 2 tablespoons of the neutral oil and swirl to coat. Carefully transfer the entire cabbage mixture to the pan, spreading it out into an even circle about 1/2-inch thick. Press down firmly with a spatula. Cook undisturbed for 6-7 minutes, until the bottom is deeply golden brown and crispy.
- Here’s the tricky part: the flip. Slide the pancake onto a large plate. Place the inverted skillet over the plate, then, using oven mitts, carefully flip the plate and skillet together so the pancake falls back into the pan, crispy side up. Add the remaining 1-2 tablespoons of oil around the edges. Cook for another 5-6 minutes until the second side is golden and crispy.
- Slide the finished pancake onto a cutting board. Drizzle generously with the okonomiyaki sauce and mayo in a zig-zag pattern. Sprinkle with the reserved green onion tops, bonito flakes, and ao-nori if using. Slice into wedges and serve immediately while hot and crispy. Step back and admire your creation!