
There’s a particular magic to a great plate of Mongolian Beef—the kind that makes you pause after the first bite. It’s the symphony of textures: shatteringly crisp beef giving way to tender meat, all enveloped in a sauce that’s the perfect balance of sweet, salty, and savory. As a chef, I’ve always been fascinated by recreating restaurant classics with reliable, home-kitchen techniques.
This recipe is the result of that mission. Forget soggy, greasy takeout imitations. Here, you’ll learn the simple secrets to achieving that iconic crispy exterior and sticky glaze, all in less time than it takes for delivery to arrive.
Let’s make a version that will become your new favorite weeknight hero.
This isn’t just another stir-fry. I’ve refined this method through rigorous testing to guarantee success and maximum flavor every single time.
- Restaurant-Quality Crisp: The double-coating technique with cornstarch creates a crackly, golden shell that stands up to the sauce, ensuring no sogginess.
- Faster Than Takeout: From fridge to table in under 30 minutes, this recipe is a lifesaver on busy nights when cravings strike.
- Big Flavor, Fast: The sauce comes together in one bowl and transforms in minutes into a glossy, complex glaze that clings perfectly to the beef.
- Simple Technique: No deep fryer needed. We use a shallow fry in a regular skillet or wok, a method that’s manageable for any home cook.
- Endlessly Customizable: Easily adjust the heat, swap proteins, or tweak the sauce to make it your own. I’ll show you how.
- Crowd-Pleasing Favorite: This dish is universally loved, making it perfect for family dinners or when you need to impress guests without stress.
Ingredients You’ll Need
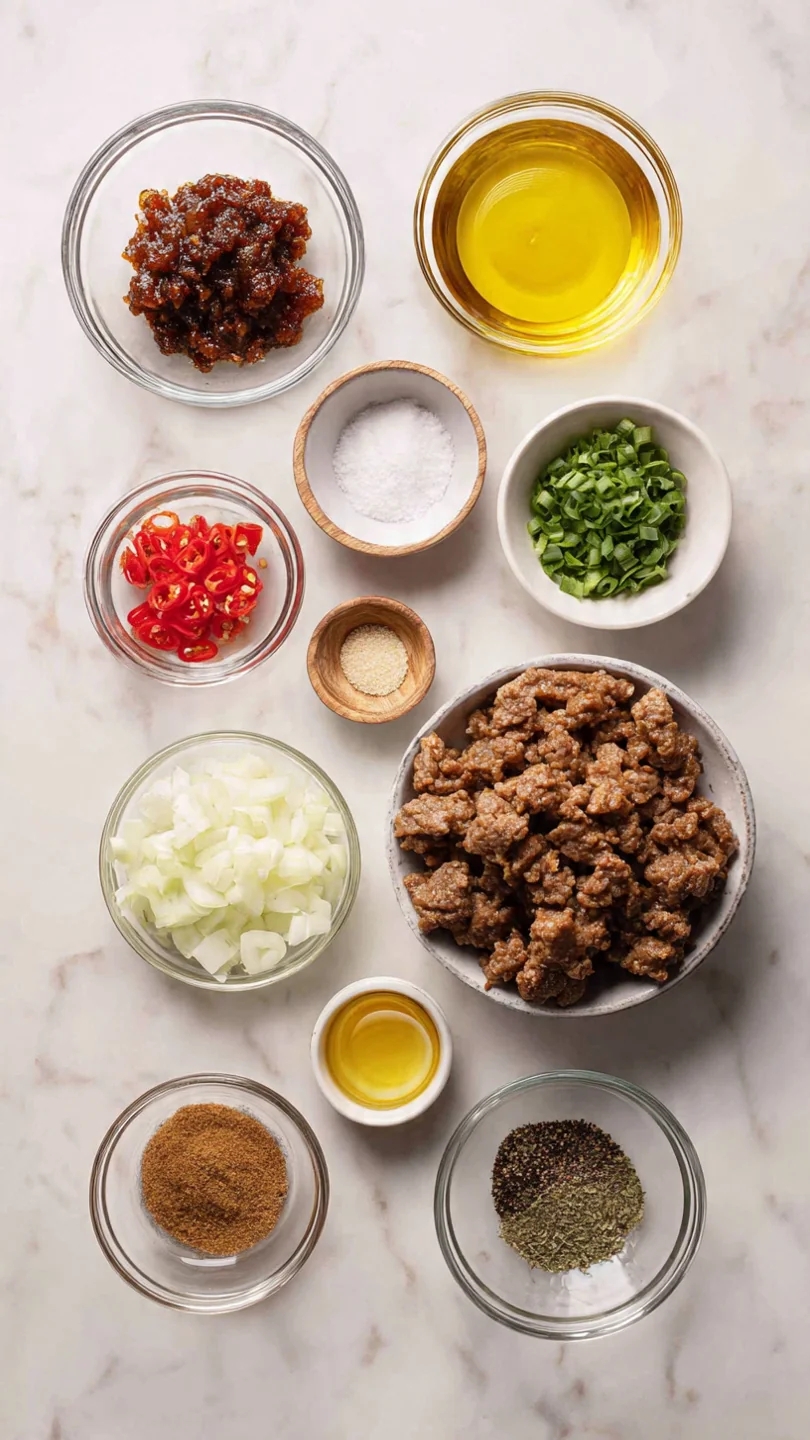
- Let’s gather our ingredients—this is where simple pantry staples combine to create something truly spectacular. The beauty of this recipe lies in the quality and preparation of a few key components.
The star is, of course, the flank steak. Slicing it thinly against the grain is non-negotiable for tenderness. Cornstarch is our crispy-making hero, creating a delicate, fry-able crust.
For the sauce, low-sodium soy sauce allows us to control the salt level, while brown sugar and hoisin sauce build that deep, caramelized sweetness and body. Fresh ginger and garlic provide the essential aromatic punch—please use fresh here, as dried won’t deliver the same bright flavor. Green onions add a fresh, sharp finish, and a drizzle of toasted sesame oil at the end ties everything together with its nutty fragrance.
A quick pro tip on the oil: use a neutral, high-smoke-point oil like vegetable or peanut oil for frying. You’ll need enough to shallow fry, about ½ inch in your pan. Now, let’s get everything prepped and ready to go for our fast-paced cooking session.
Note: You’ll find the complete list of ingredients, along with their exact measurements, in the printable recipe card at the bottom of this post.
Kitchen Equipment Needed
You don’t need specialized equipment to nail this recipe. A large wok or a 12-inch heavy-bottomed skillet is ideal for its high sides and even heat distribution. A sharp chef’s knife is crucial for slicing the flank steak thinly and easily against the grain.
You’ll want tongs or a spider strainer for safely flipping and removing the beef from the hot oil. Have two medium mixing bowls ready—one for coating the beef and one for whisking the sauce. Finally, set a plate lined with paper towels nearby to drain the fried beef.
That’s it! With these basic tools, you’re fully equipped to create a restaurant-worthy dish.
How to Make Crispy Mongolian Beef Recipe
Step 1: Prep the Beef and Coat
Start by placing your flank steak in the freezer for 15 minutes; this firms it up and makes slicing much easier. Using your sharp knife, slice the steak as thinly as you can, always cutting perpendicular to the long muscle fibers (against the grain). Trust me, this is the single most important step for tender beef.
Place the slices in a bowl and toss thoroughly with the ¼ cup of cornstarch. You want every surface lightly dusted and dry. Let it sit for 10 minutes—this allows the cornstarch to form a paste that will fry up extra crispy.
Step 2: Whisk the Magic Sauce
While the beef rests, make your sauce. In a separate bowl, whisk together the soy sauce, brown sugar, water, hoisin, the remaining tablespoon of cornstarch, minced ginger, garlic, and red pepper flakes. Tip from me: whisk until the brown sugar is completely dissolved and no cornstarch lumps remain.
This ensures your sauce will thicken smoothly and evenly later. Set this bowl right next to your stove for easy access during the fast-paced cooking.
Step 3: Fry to Golden Crispiness
Now, heat about ½ inch of vegetable oil in your wok or skillet over medium-high heat. To test if it’s ready, dip a corner of a beef piece in; it should sizzle vigorously. Believe me, the key here is patience and batches.
Add a single layer of coated beef, making sure the pieces aren’t touching. Fry for 2-3 minutes until deeply golden and crisp, then flip and fry the other side. Transfer to your paper towel-lined plate.
Repeat with all the beef. This step creates the foundational texture, so don’t rush it or crowd the pan.
Step 4: Sauté and Thicken the Sauce
Carefully pour the hot oil out of the wok, leaving just about 1 tablespoon behind. Return the wok to medium heat. Add the white parts of your green onions and stir-fry for just 30 seconds until you smell their fragrance.
Give your sauce mixture one final whisk and pour it in. Now, cook this sauce, stirring constantly, for 2-3 minutes. You’ll see it go from thin and cloudy to thick, glossy, and bubbling.
This is the transformation into that iconic sticky glaze.
Step 5: The Grand Toss and Serve
Here comes the fun part! Return all the crispy beef to the wok with the thickened sauce. Add the green parts of the onions and the toasted sesame oil.
Using your tongs, toss and fold everything together vigorously for 1-2 minutes. You want every single piece of beef to be luxuriously coated. Step back and admire that glossy, sticky perfection.
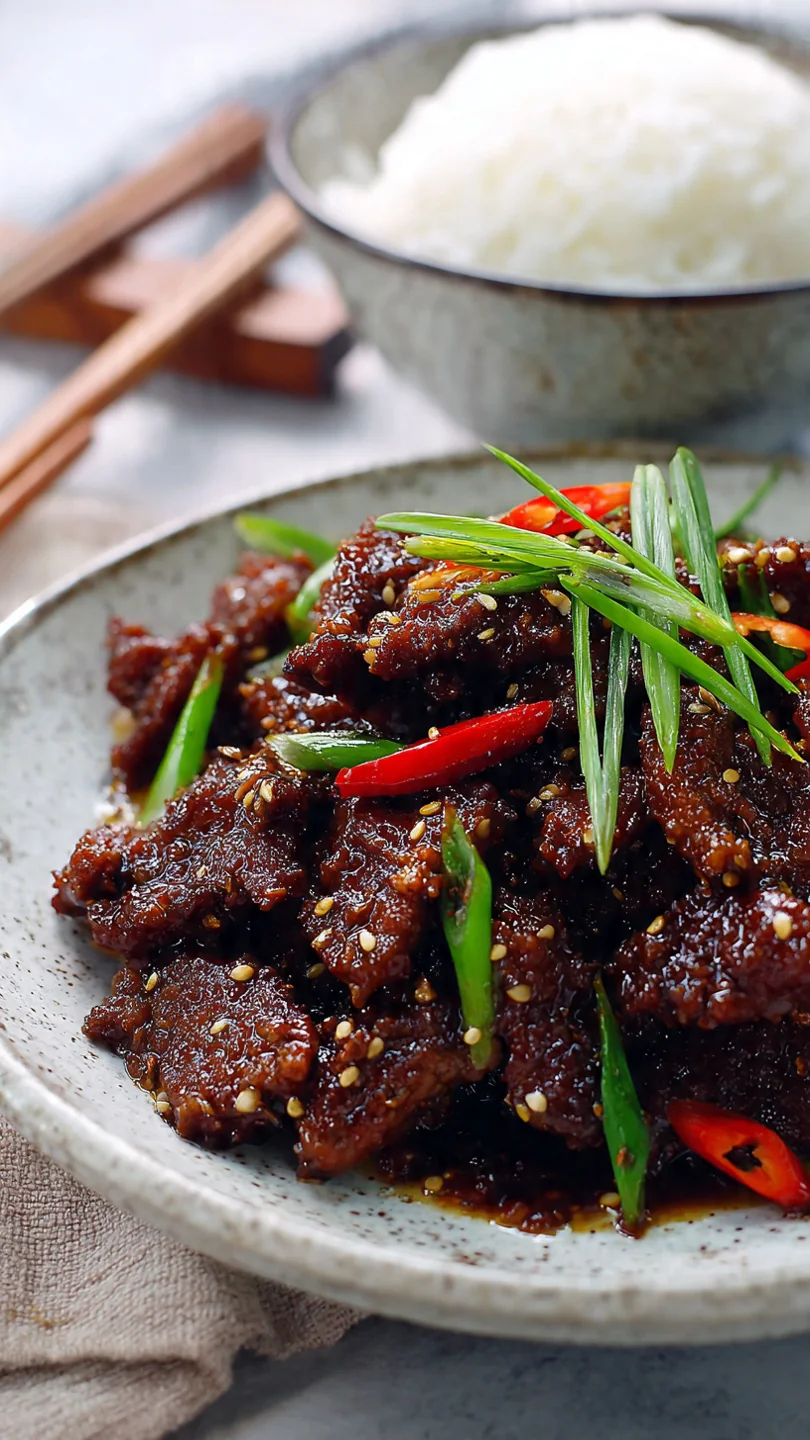
Garnish with a sprinkle of toasted sesame seeds and serve immediately over a bed of steamed jasmine rice.
My years in professional kitchens have taught me that small details make a monumental difference in a recipe like this. Here are the insights that will elevate your dish from good to exceptional.
- The Slice is Everything: Always slice flank steak against the grain. Look for the long lines running through the meat and cut perpendicular to them. This shortens the muscle fibers, guaranteeing a tender bite instead of a chewy one.
- Cornstarch Patience: Letting the cornstarch-coated beef sit for 10 minutes is not optional. It gives the moisture from the meat time to hydrate the starch, forming a paste that fries into a sturdier, crispier shell that holds up against the sauce.
- Oil Temperature is Key: If the oil isn’t hot enough (around 350°F), the beef will absorb oil and become greasy. If it’s too hot, the coating will burn before the inside cooks. A steady, vigorous sizzle when you add the beef is your visual and audio cue.
- The Final Toss: Add the toasted sesame oil only at the very end, off the heat or during the final toss. Toasted sesame oil has a low smoke point and a delicate flavor that diminishes with prolonged cooking. This preserves its wonderful nutty aroma.
- Sauce Consistency: If your sauce thickens too much before you add the beef, simply splash in a tablespoon or two of warm water and stir. It will loosen right up to the perfect coating consistency.
Recipe Variations
- One of the joys of mastering a base recipe is making it your own. Here are several tested variations that work beautifully with this formula.
- Spicy Mongolian Beef: For a real kick, add 1-2 sliced fresh Thai chilies or a tablespoon of chili-garlic sauce (like Sambal Oelek) to the sauce mixture.
- Mongolian Chicken or Tofu: Substitute thinly sliced chicken breast or extra-firm tofu (pressed and cubed) for the beef. The cooking method remains the same.
- Vegetable-Packed Version: Add texture and nutrition by stir-frying bell peppers, broccoli florets, or snap peas in the wok after removing the beef. Remove them, then proceed with the sauce.
- Pineapple Twist: Add ½ cup of fresh pineapple chunks with the beef during the final toss. The sweet-tart fruit complements the savory sauce wonderfully.
- Gluten-Free/Dairy-Free: This recipe is naturally dairy-free. For gluten-free, use tamari instead of soy sauce and a certified gluten-free hoisin sauce.
- Less Sweet: Reduce the brown sugar to ⅓ cup for a more savory-forward profile that highlights the soy and garlic.
- Extra Garlic & Ginger: If you’re a fan of bold aromatics, double the amount of minced ginger and garlic for an incredibly fragrant dish.
What to Serve With This Recipe
Crispy Mongolian Beef is rich and flavorful, so it pairs beautifully with simple, clean sides that balance the meal. The classic and perfect partner is steamed jasmine or white rice, which soaks up the extra sauce delightfully. For a lighter option, try cauliflower rice.
To round out the plate, a quick cucumber salad with rice vinegar or a simple steamed vegetable, like broccoli or bok choy, adds freshness and crunch. For a full takeout-style feast, serve it alongside vegetable spring rolls or edamame sprinkled with sea salt. Beverage-wise, a crisp lager, a dry Riesling, or even iced green tea makes for a refreshing contrast to the savory-sweet dish.
Storage & Make-Ahead Instructions
- This dish is best enjoyed immediately to preserve the crispy texture. However, with the right techniques, you can manage leftovers or get a head start.
- Refrigerator Storage: Store leftovers in an airtight container in the refrigerator for up to 3 days. The sauce will continue to soak into the beef, softening the crispness.
- Reheating Method: To reheat, spread the beef in a single layer on a baking sheet and warm in a 375°F oven for 10-15 minutes, or until hot. This method will help re-crisp the beef better than microwaving, which will make it soggy.
- Freezing Not Recommended: I do not recommend freezing this recipe, as the crispy coating will become very soggy upon thawing and reheating.
- Make-Ahead Strategy: You can slice the beef and coat it in cornstarch, then store it covered in the fridge for up to 4 hours. Whisk the sauce ingredients together and refrigerate separately. This cuts your active cooking time in half when you’re ready to cook.
Frequently Asked Questions
Q: Can I use a different cut of beef?
A: Flank steak is ideal for its flavor and lean texture. You can also use skirt steak or sirloin, sliced thinly against the grain. Avoid stew meats or chuck roast, as they require long, slow cooking to become tender.
Q: My sauce didn’t thicken. What happened?
A: This usually means the cornstarch wasn’t properly activated. Ensure you’re using the full tablespoon of cornstarch in the sauce and that you bring the mixture to a vigorous bubble, stirring constantly, for the full 2-3 minutes. Cornstarch needs to reach a near-boil to thicken effectively.
Q: How can I make this less greasy?
A: Guarantee your oil is hot enough (350°F) before adding the beef, and fry in small, uncrowded batches. Crowding lowers the oil temperature, causing the food to absorb oil instead of sealing. Also, let the fried beef drain well on paper towels.
Q: Is there a way to make it without deep frying?
A: For a lighter version, you can pan-sear the coated beef in just 2 tablespoons of oil over high heat. You won’t get the same all-over crispiness, but you’ll still get good color and flavor. Bake the coated beef on a wire rack at 425°F for 15-20 minutes for a no-fry option, though the texture will be different.
Q: Can I double this recipe?
A: Absolutely. I recommend using two skillets or cooking in more batches to avoid overcrowding. Doubling the sauce in the same pan may require an extra minute or two to reach proper thickness.
Q: What’s the best way to slice the meat so thin?
A: Partially freezing the steak for 15-20 minutes firms it up, making it much easier to slice thinly and evenly. Always use a very sharp knife for clean cuts.
Q: My beef turned out chewy. Why?
A: Chewiness almost always stems from not slicing against the grain. Find the direction of the muscle fibers and cut perpendicular to them. Also, avoid overcooking; the beef cooks quickly in the hot oil.
Final Thoughts
Mastering this Crispy Mongolian Beef recipe is about more than just following steps—it’s about understanding the simple techniques that create extraordinary results. The contrast of the crackling crust with the sticky, savory-sweet sauce is a texture experience that never gets old. I’ve poured all my testing and professional experience into this guide to ensure your success, demystifying the process so you can recreate a takeout favorite with confidence, and frankly, with even better flavor.
Now that you have the blueprint, don’t be afraid to make it your own. Adjust the heat, toss in your favorite veggies, or serve it over noodles instead of rice. The most important step is to try it.
Gather your ingredients, heat up that wok, and get ready for the compliments. When you make it, I’d love to hear how it turned out! Share your results and any creative twists you tried.
Happy cooking
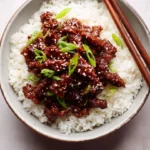
Crispy Mongolian Beef
Equipment
- Large wok or 12-inch heavy-bottomed skillet
- Sharp chef’s knife
- Tongs or a spider strainer
- Two medium mixing bowls
Ingredients
- 1.5 lb Flank steak sliced thinly against the grain
- 0.25 cup Cornstarch plus 1 tablespoon
- 0.33 cup Low-sodium soy sauce or tamari for gluten-free
- 0.5 cup Brown sugar lightly packed
- 0.25 cup Water
- 2 tbsp Hoisin sauce
- 1 tbsp Fresh ginger minced
- 4 cloves Garlic minced
- 0.5 tsp Red pepper flakes or to taste
- 4 Green onions sliced, whites and greens separated
- 1 tbsp Toasted sesame oil
- Vegetable oil for frying
- Toasted sesame seeds for garnish
Instructions
- Slice the flank steak thinly against the grain (about ¼-inch thick). Place in a bowl and toss thoroughly with ¼ cup cornstarch until every piece is evenly coated. Let it sit for 10 minutes while you prepare the sauce.
- In a medium bowl, whisk together the soy sauce, brown sugar, water, hoisin sauce, the remaining 1 tablespoon of cornstarch, ginger, garlic, and red pepper flakes. Set this sauce mixture aside near your stove.
- Heat ½ inch of vegetable oil in a large wok or heavy-bottomed skillet over medium-high heat until shimmering (about 350°F). Working in batches to avoid crowding, fry the coated beef for 2-3 minutes per batch until crispy and golden brown. Transfer to a paper towel-lined plate.
- Carefully pour out all but 1 tablespoon of the hot oil from the wok. Return to medium heat. Add the white parts of the green onions and stir-fry for 30 seconds until fragrant.
- Give the reserved sauce a quick whisk, then pour it into the wok. Cook, stirring constantly, for 2-3 minutes until the sauce thickens, becomes glossy, and bubbles vigorously.
- Return all the crispy beef to the wok. Add the green parts of the onions and the toasted sesame oil. Toss vigorously for 1-2 minutes until every piece is beautifully coated in the sticky sauce. Garnish with sesame seeds and serve immediately.