
There’s a moment of pure kitchen magic that happens not with fancy equipment, but with simple ingredients combining in just the right way. For me, that moment often comes when I pour a bottle of beer into a bowl of flour. The immediate fizz and the promise of flavor it brings to a humble pizza dough is one of my favorite professional secrets to share.
This Easy Beer Pizza Dough is my go-to when I want incredible homemade pizza without the wait for yeast to proof. The beer acts as the leavening agent, carbonation creating those desirable air pockets, while the malt and hops bake into a complex, subtly sweet, and wonderfully chewy crust. You’re about to make a pizza that tastes like it came from a wood-fired oven, with a crust that’s crisp on the bottom, tender inside, and packed with more character than any store-bought dough could ever offer.
- No Yeast, No Problem: Skip the proofing time and the worry about activating yeast. The beer provides all the lift you need, making this recipe incredibly forgiving and fast.
- Deep, Complex Flavor: The malt and hops in the beer bake into a crust with a nuanced, slightly sweet, and savory flavor profile that plain dough can’t match.
- Remarkably Chewy Texture: Using bread flour and a proper knead develops strong gluten, yielding that satisfying, professional-style chew with a beautiful open crumb.
- Fast & Flexible: From bowl to oven in about 75 minutes. It’s perfect for a weeknight dinner or a last-minute pizza party.
- Endlessly Customizable: The neutral yet flavorful base pairs perfectly with any topping combination, from classic Margherita to bold barbecue chicken.
Ingredients You’ll Need
Let’s gather our ingredients—this is where the simplicity becomes brilliance. With just four core components, each one plays a starring role. The magic is in their quality and how they work together.
- Bread Flour: This is non-negotiable for the best structure. Its higher protein content (12-14%) creates more gluten, which gives the crust its essential chew and ability to trap the beer’s bubbles. All-purpose flour will work in a pinch but yields a softer, less robust crust.
- Lager or Pale Ale: Your beer choice is the flavor engine. A standard American lager or pilsner will give a clean, bready sweetness. A pale ale introduces a pleasant, hoppy bitterness that stands up to robust toppings. Avoid dark stouts or porters for your first try, as their strong flavors can dominate. The beer must be at room temperature for optimal gluten development.
- Fine Sea Salt: This does more than season; it tightens the gluten network, strengthening the dough. I prefer fine sea salt for its even distribution and clean taste.
- Olive Oil: A simple coating for the bowl prevents sticking and gives the dough a faint richness.

Note: You’ll find the complete list of ingredients, along with their exact measurements, in the printable recipe card at the bottom of this post.
Kitchen Equipment Needed
You likely have everything you need already. The only specialized item I highly recommend is a pizza stone or steel. Preheating this in your oven mimics the intense, direct heat of a pizza oven, creating that blistered, crisp bottom crust.
If you don’t have one, an inverted heavy-duty baking sheet preheated in the oven is a good substitute. You’ll also need a large mixing bowl, a piece of parchment paper (for easy transfer), and a bench scraper which is incredibly helpful for handling the initially sticky dough.
How to Make Easy Beer Pizza Dough Recipe
Step 1: Mix the Dough
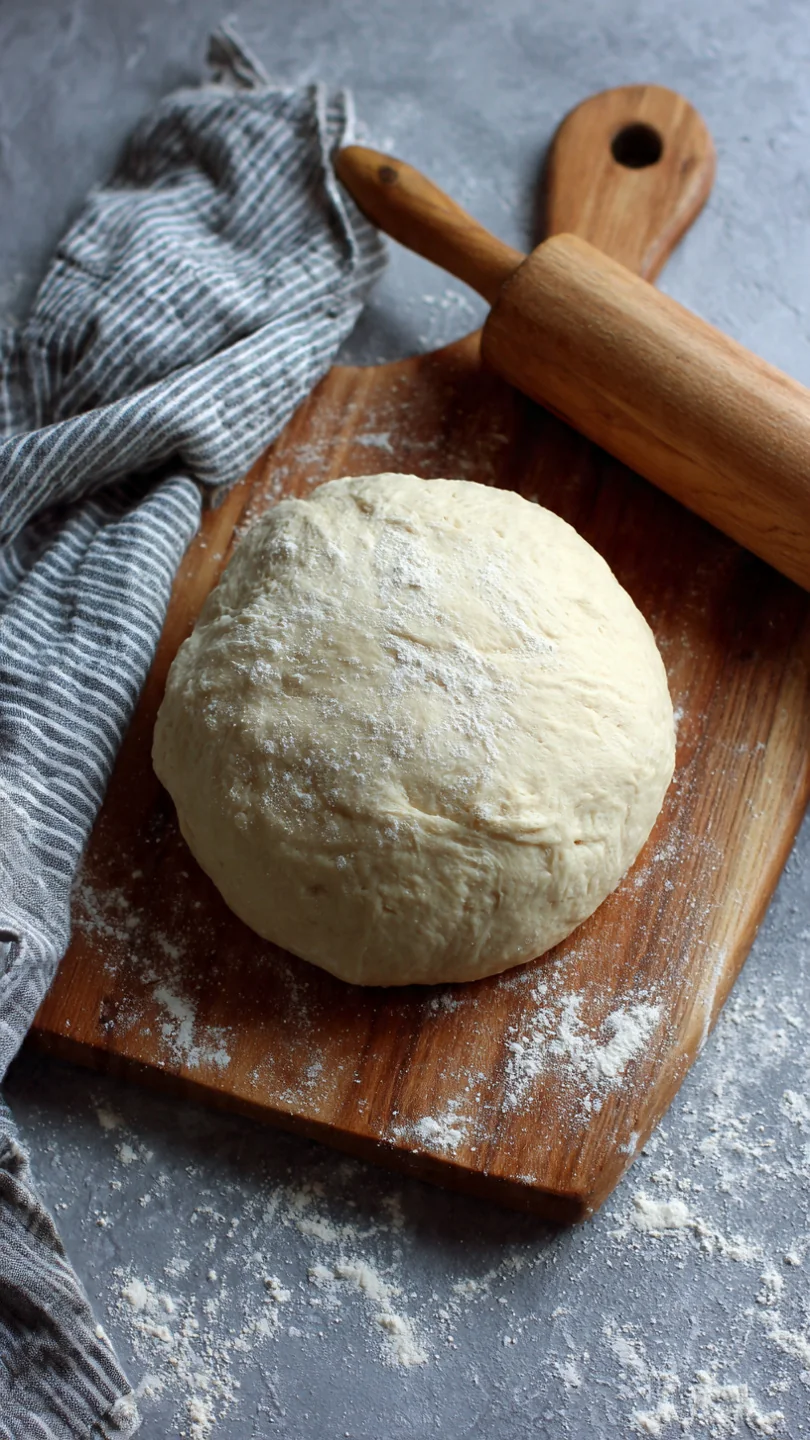
In your large bowl, whisk the bread flour and salt together thoroughly. Make a well in the center and pour in all the room-temperature beer. Trust me, using a wooden spoon or your hands here is best—a mixer can overwork it too quickly.
Stir from the center outward until a shaggy, sticky dough ball forms and no dry flour remains. It will look rough and feel very tacky; this is exactly right.
Step 2: Knead to Perfection
Turn the dough out onto a very lightly floured surface. Here’s my pro tip: resist the urge to add too much flour. Use a bench scraper to help fold and turn the dough if it sticks.
Knead by pushing the dough away with the heel of your hand, then folding it back over itself. Do this for 5-7 minutes. You’ll feel the transformation—it will go from sticky and shaggy to smooth, elastic, and only slightly tacky.
This kneading develops the gluten network that will give your crust its signature chew.
Step 3: The Resting Period
Lightly coat a clean bowl with the olive oil. Place your smooth dough ball in, turning it once to coat. Cover the bowl tightly with plastic wrap.
Now, let it rest at room temperature for 1 hour. Believe me, this patience pays off. Unlike yeast dough, it won’t double, but the gluten will relax, making the dough incredibly easy to shape and stretch without snapping back.
Step 4: Preheat and Shape
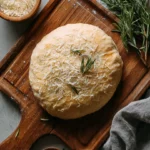
About 30 minutes into the dough’s rest, place your pizza stone or inverted baking sheet on a middle rack and preheat your oven to its absolute highest setting (500°F/260°C or higher). This intense, preheated surface is the secret to oven spring and a crisp base. When the dough is rested, divide it in half.
On a floured surface, gently press and stretch each piece into a 10-12 inch round. Use your knuckles and let gravity help—avoid a rolling pin, which can crush the beautiful bubbles we’ve created.
Step 5: Top, Bake, and Serve
Transfer your shaped dough to a piece of parchment paper (this is your “pizza peel”). Add your toppings with a light hand. Slide the pizza, parchment and all, directly onto the screaming-hot stone.
Bake for 12-15 minutes until the crust is puffed, deeply golden, and the bottom is crisp. Tip from me: let it cool on a rack for just 2 minutes before slicing. This brief wait allows the crust to set, preventing a soggy bottom.
Step back and admire your work, then dig in.
- Beer Temperature is Key: Using room-temperature beer, not cold, is crucial. Cold liquid inhibits gluten development, leading to a weaker dough that’s harder to knead and shape.
- The Windowpane Test: To know if you’ve kneaded enough, do the windowpane test. Take a small piece of dough and gently stretch it. If you can stretch it thin enough to see light through it without it tearing, your gluten is perfectly developed.
- Shaping Without Tears: If the dough keeps shrinking back as you try to shape it, it needs more rest. Cover it with a towel and walk away for 5-10 minutes. The relaxed gluten will then cooperate beautifully.
- Maximize Crispness: For an extra-crisp bottom, carefully slide the parchment paper out from under the pizza halfway through the bake. This allows direct contact with the hot stone for the final few minutes.
Recipe Variations
- Herb-Infused Crust: Add 2 tablespoons of finely chopped fresh rosemary or thyme to the dry ingredients before adding the beer for a fragrant, savory base.
- Whole Wheat Blend: Substitute 1 cup of the bread flour with whole wheat flour for a nuttier flavor and extra fiber. You may need a tablespoon or two more beer, as whole wheat absorbs more liquid.
- Everything Spice Crust: After shaping the dough, brush the outer crust lightly with water and sprinkle generously with everything bagel seasoning before adding toppings.
- Cheese-Stuffed Edge: Roll a string of low-moisture mozzarella cheese into the very edge of your shaped dough before adding toppings, creating a decadent, cheesy stuffed crust.
- Spicy Kick: Add 1 teaspoon of crushed red pepper flakes to the dry ingredients for a dough with a subtle, built-in heat that pairs wonderfully with pepperoni or sausage.
What to Serve With This Recipe
This pizza is a complete meal on its own, but it shines as part of a casual spread. For a classic Italian trattoria night, start with a simple Arugula and Parmesan Salad with lemon vinaigrette to cut through the richness. If you’re serving a crowd, a platter of Garlic Knots made from extra dough and a bowl of Marinated Olives and Antipasti are perfect accompaniments.
Beverage-wise, you can’t go wrong finishing the bottle of beer you used in the dough, or opt for a bright, acidic red wine like Chianti or a chilled Sangiovese. For a non-alcoholic option, sparkling water with lemon or a ginger-based soda works beautifully.
Storage & Make-Ahead Instructions
- Refrigerating Dough: The shaped, unbaked dough rounds can be placed on parchment, wrapped tightly in plastic, and refrigerated for up to 24 hours. Let them sit at room temperature for 20 minutes before topping and baking.
- Freezing for Later: After the 1-hour rest, divide and shape the dough into rounds. Place each on parchment paper, stack with parchment in between, and seal in a freezer bag. Freeze for up to 3 months. Thaw overnight in the refrigerator before using.
- Storing Leftover Pizza: Cooled slices can be stored in an airtight container in the refrigerator for 3-4 days. Reheat directly on the rack of a 375°F (190°C) oven for 8-10 minutes to restore crispness. The microwave will make the crust soggy.
Frequently Asked Questions
Q: Can I use all-purpose flour instead of bread flour?
Yes, but expect a different texture. Bread flour’s higher protein creates more gluten for a chewier crust. With all-purpose, the crust will be softer and more tender, with less of the characteristic chew.
Q: What if I don’t drink alcohol? Does the alcohol bake out?
The alcohol does bake off during the high-heat cooking, leaving behind the flavor compounds. For a completely non-alcoholic version, you can use a non-alcoholic beer with good results, as it still contains carbonation.
Q: My dough is too sticky to handle. What did I do wrong?
You likely just need to knead a bit longer. The dough starts very sticky. Keep kneading, using a bench scraper to help, and only add the tiniest dusting of flour if absolutely necessary.
It will become smooth with time and motion.
Q: Can I make this dough in a stand mixer?
Absolutely. Use the dough hook on low speed to mix until combined, then increase to medium speed and knead for 4-5 minutes. Watch it closely, as it’s easy to over-knead in a machine.
Q: Why didn’t my crust get very brown or puffy?
This almost always means your oven wasn’t hot enough. Oven thermostats can be inaccurate. Invest in an inexpensive oven thermometer and ensure you’re preheating for a full 30 minutes, preferably with the stone inside.
Q: Is the type of beer really that important?
It is for flavor, but not for function. Any carbonated beer will provide lift. A light lager gives a mild, bready flavor.
An IPA adds bitterness. A malty amber ale lends sweetness. Experiment to find your favorite!
Q: Can I make one large pizza instead of two mediums?
I don’t recommend it. A single, large round of this dough is very difficult to transfer and may not cook evenly in a home oven. Two smaller pizzas give you better control and a superior crust.
Final Thoughts
This Easy Beer Pizza Dough recipe represents everything I love about cooking: transforming a few humble ingredients into something extraordinary through simple, sound technique. It demystifies the pizza-making process, giving you a chewy, flavorful, professional-quality crust that will make you wonder why you ever settled for delivery. The beauty of this dough is in its simplicity and its reliability.
Whether it’s a Friday night family ritual or the centerpiece of a game-day spread, it delivers incredible results every single time. I encourage you to try it, play with different beers and toppings, and make it your own. Once you taste that first slice of your own homemade pizza, with its crisp base and complex, malty crust, you’ll be hooked.
Don’t forget to share your creations online and tag me—I love seeing your kitchen triumphs! Now, go preheat that oven. Your best pizza night yet is waiting.
Easy 4-Ingredient Beer Pizza Dough
Equipment
- Large mixing bowl
- Pizza stone or inverted heavy baking sheet
- Parchment paper
- Bench scraper (helpful for handling sticky dough)
Ingredients
- 3 cups bread flour plus extra for dusting
- 1 12 oz bottle lager or pale ale room temperature
- 1 tsp fine sea salt
- 1 tbsp olive oil for the bowl
Instructions
- In a large mixing bowl, whisk together the bread flour and salt. Make a well in the center and pour in the room temperature beer. Using a wooden spoon or your hands, mix until a shaggy dough forms and no dry flour remains. The dough will be sticky.
- Turn the dough out onto a lightly floured surface. Knead for 5-7 minutes, adding only small amounts of flour if it’s unbearably sticky, until it becomes smooth and elastic. You’ll feel the texture change as the gluten develops.
- Lightly coat a clean bowl with the olive oil. Place the dough ball in the bowl, turning to coat it in oil. Cover the bowl tightly with plastic wrap and let it rest at room temperature for 1 hour. It won’t double in size like yeast dough, but it will relax and become easier to shape.
- Preheat your oven to its highest temperature (500°F/260°C or higher) for at least 30 minutes with your pizza stone or baking sheet inside. Divide the rested dough in half. On a floured surface, gently stretch and shape each piece into a 10-12 inch round, being careful not to tear it.
- Transfer the shaped dough to a piece of parchment paper. Add your desired toppings lightly. Slide the pizza (on the parchment) onto the preheated stone or sheet. Bake for 12-15 minutes until the crust is puffed and deeply golden. Let cool for 2 minutes before slicing.