

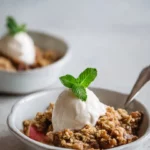
Imagine the aroma of warm cinnamon and apples filling your kitchen as you prepare a delicious Gluten-Free Apple Crisp. This dessert is perfect for those cozy fall evenings or any time you crave a comforting treat. With its crispy, golden topping and tender, juicy apples, this apple crisp is a delight that everyone can enjoy, regardless of dietary restrictions.
Let’s dive into this easy-to-make recipe that promises a mouthwatering result.
- Gluten-Free Delight: Perfect for those with gluten sensitivities, this crisp maintains the classic taste without the gluten.
- Easy to Make: Simple ingredients and straightforward steps make this a go-to dessert for any occasion.
- Versatile: Serve it warm with ice cream, or enjoy it chilled as a snack.
- Flavorful and Comforting: The combination of cinnamon, nutmeg, and apples creates a comforting, homey flavor.
- Customizable: Easily adjust the sweetness or add different spices to suit your taste.
Ingredients You’ll Need
Let’s gather our ingredients—these simple pantry staples create magic together, resulting in a dessert that’s both comforting and delicious.
For the Apple Filling:- Apples: Choose firm varieties like Granny Smith or Honeycrisp for the best texture.
- Lemon Juice: Helps prevent the apples from browning.
- Granulated Sugar: Sweetens the apples and balances their tartness.
- Ground Cinnamon: Adds warmth and depth of flavor.
- Ground Nutmeg: A subtle spice that complements the cinnamon.
- Gluten-Free Rolled Oats: Provides a hearty, crisp texture.
- Gluten-Free All-Purpose Flour: Binds the topping together.
- Brown Sugar: Adds a rich, caramel-like sweetness.
- Baking Powder: Helps the topping achieve a light, crisp texture.
- Salt: Enhances the overall flavor.
- Cold Unsalted Butter: Creates a crumbly, delicious topping.
When selecting your ingredients, opt for high-quality gluten-free flour and oats to ensure the best results. If you’re looking for a dairy-free option, you can substitute the butter with a vegan alternative like coconut oil or a plant-based butter.

Note: You’ll find the complete list of ingredients, along with their exact measurements, in the printable recipe card at the bottom of this post.
Kitchen Equipment Needed
To make this Gluten-Free Apple Crisp, you’ll need a few basic kitchen tools:
- 9×9 inch baking dish: Essential for evenly baking the crisp.
- Large mixing bowl: For tossing the apples and mixing the topping.
- Pastry cutter or fork: To blend the butter into the topping mixture.
If you don’t have a pastry cutter, a fork works well, though it may take a bit more effort to achieve the desired texture.
How to Make Gluten-Free Apple Crisp Recipe
Step 1: Prepare the Apple Filling
Start by preheating your oven to 350°F (175°C). In a large bowl, combine the sliced apples with lemon juice, granulated sugar, cinnamon, and nutmeg. Toss until the apples are evenly coated.
Trust me, this step ensures every bite is packed with flavor. Transfer the apple mixture to a 9×9 inch baking dish, spreading it out evenly.
Step 2: Mix the Topping
In another bowl, mix the gluten-free oats, gluten-free flour, brown sugar, baking powder, and salt. Add the cold butter pieces and use a pastry cutter or your fingers to blend until the mixture resembles coarse crumbs. Believe me, this is the secret to a perfect, crumbly topping.
Step 3: Assemble the Crisp
Spread the oat mixture evenly over the apples in the baking dish. Press down gently to ensure the topping covers the apples completely. This step is crucial for achieving that golden, crispy finish.
Step 4: Bake to Perfection
Bake in the preheated oven for 45-50 minutes, or until the topping is golden brown and the apples are bubbling. Now comes the fun part—watching your crisp transform into a delicious dessert. Tip from me: if the topping browns too quickly, cover it loosely with foil.
Step 5: Cool and Serve
Remove the crisp from the oven and let it cool for about 15 minutes. Step back and admire your creation before serving it warm with a scoop of vanilla ice cream or a dollop of whipped cream. Enjoy the perfect balance of textures and flavors in every bite.
Pro tip: To ensure the apples cook evenly, slice them uniformly. This helps in achieving a consistent texture throughout the crisp. Temperature matters: Use room temperature butter for easier blending into the topping mixture. Cold butter is essential for a crumbly texture, but letting it sit out for a few minutes can make the process smoother. Visual cues: Look for a golden brown topping and bubbling apple juices as signs that your crisp is done. If the topping isn’t browning enough, you can broil it for the last few minutes, but keep a close eye on it to prevent burning.Recipe Variations & Customizations
- Seasonal Twist: Add a handful of fresh cranberries to the apple filling for a tart, festive flavor perfect for the holidays.
What to Serve With This Recipe
This Gluten-Free Apple Crisp pairs wonderfully with a variety of dishes and beverages. Serve it warm with a scoop of vanilla ice cream for a classic dessert combo. For a lighter option, try it with a dollop of Greek yogurt or a drizzle of honey.
If you’re hosting a dinner party, consider pairing it with a rich, full-bodied coffee or a glass of dessert wine like Moscato. This crisp is versatile enough for casual family dinners or more formal gatherings.
Storage & Make-Ahead Instructions
- Store any leftovers in an airtight container in the refrigerator for up to 5 days. To reheat, place individual portions in the oven at 350°F (175°C) for about 10 minutes or until warmed through. You can also make this crisp ahead of time; assemble it up to a day in advance and store it covered in the refrigerator. When ready to bake, let it sit at room temperature for 30 minutes before placing it in the oven. To freeze, wrap the unbaked crisp tightly and freeze for up to 3 months. Bake from frozen, adding an extra 10-15 minutes to the baking time.
Nutritional Benefits
- Apples are a great source of fiber and antioxidants, which support digestive health and overall wellness. The gluten-free oats in this recipe contribute to heart health by helping to lower cholesterol levels. If you’re looking to reduce sugar intake, consider using a natural sweetener like maple syrup or reducing the amount of sugar in the recipe.
Frequently Asked Questions
Q: Can I make this ahead of time?
Yes, you can assemble the crisp up to a day in advance and store it in the refrigerator. Bake it when ready, adding a few extra minutes if it’s cold.
Q: What apples are best for this recipe?
Firm apples like Granny Smith or Honeycrisp work best as they hold their shape during baking.
Q: Can I use other fruits instead of apples?
Absolutely! Try pears, peaches, or a mix of berries for a different twist.
Q: How do I know when the crisp is done?
Look for a golden brown topping and bubbling apple juices around the edges.
Q: Can I freeze this apple crisp?
Yes, wrap the unbaked crisp tightly and freeze for up to 3 months. Bake from frozen, adding extra time.
Q: What can I substitute for butter?
Coconut oil or a vegan butter alternative works well for a dairy-free version.
Q: Can I adjust the sweetness?
Yes, reduce the sugar in both the filling and topping to suit your taste.
Final Thoughts
This Gluten-Free Apple Crisp is a delightful dessert that brings comfort and joy with every bite. Its easy preparation and delicious results make it a go-to recipe for any occasion. Whether you’re catering to dietary needs or simply looking for a tasty treat, this crisp delivers on all fronts.
Give it a try, and let us know how it turned out! Don’t forget to share your creation on social media and explore more of our recipes for endless culinary inspiration. Enjoy!
Gluten-Free Apple Crisp
Equipment
- 9×9-inch baking dish
- Large mixing bowl
- Pastry cutter or fork
Ingredients
- 6 cups apples peeled, cored, and sliced
- 1 tablespoon lemon juice
- 1/3 cup granulated sugar
- 1 teaspoon ground cinnamon
- 1/4 teaspoon ground nutmeg
- 1 cup gluten-free rolled oats
- 1/2 cup gluten-free all-purpose flour
- 1/2 cup brown sugar
- 1/2 teaspoon baking powder
- 1/4 teaspoon salt
- 1/2 cup cold unsalted butter cut into small pieces
Instructions
- Preheat your oven to 350°F (175°C). In a large bowl, toss the sliced apples with lemon juice, granulated sugar, cinnamon, and nutmeg until well coated. Transfer the apple mixture to a 9×9 inch baking dish.
- In another bowl, combine the gluten-free oats, gluten-free flour, brown sugar, baking powder, and salt. Add the cold butter pieces and use your fingers or a pastry cutter to blend until the mixture resembles coarse crumbs.
- Spread the oat mixture evenly over the apples in the baking dish. Press down gently to ensure the topping covers the apples.
- Bake in the preheated oven for 45-50 minutes, or until the topping is golden brown and the apples are bubbling.
- Remove from the oven and let it cool for about 15 minutes before serving. Serve warm with a scoop of vanilla ice cream or a dollop of whipped cream.