
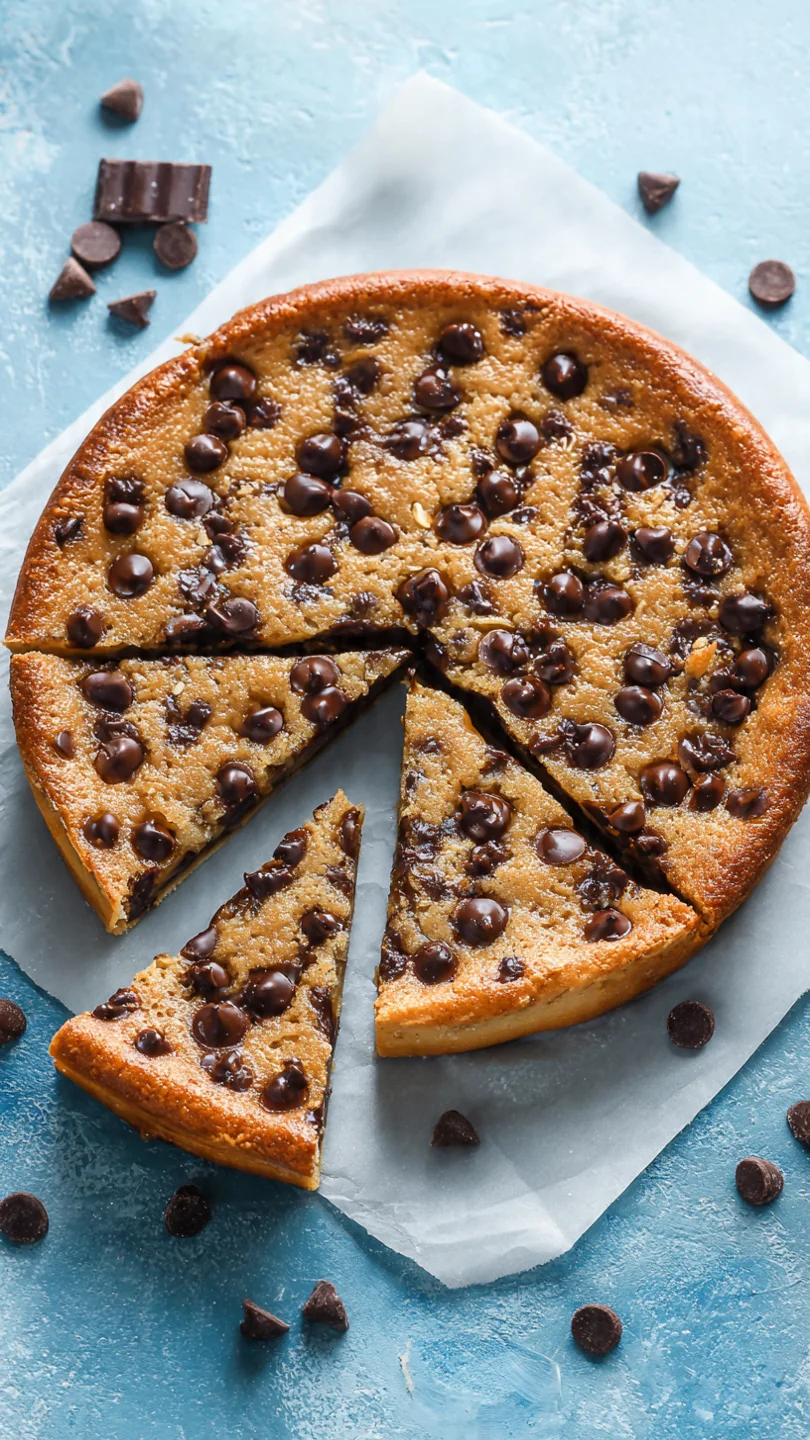
Imagine pulling a warm, fragrant pizza from the oven, but instead of tomato sauce and cheese, it’s brimming with pools of melted chocolate and a soft, cookie-like crust that’s perfectly gooey in the center. This Chocolate Chip Dessert Pizza is that magical cross between a giant, shareable cookie and a fun, customizable treat. It’s the ultimate solution for feeding a sweet tooth crowd, whether it’s for a birthday party, a casual game night, or just because Tuesday deserves a little celebration.
Having tested this in professional settings and countless home kitchens, I can tell you its success lies in a few simple techniques that guarantee a soft, chewy base every time. Let’s make a dessert that’s as fun to create as it is to eat.
This dessert pizza isn’t just another cookie recipe. It’s engineered for maximum enjoyment and ease, drawing on professional kitchen tricks to ensure your home version is flawless.
- Shareable & Fun Presentation: Slicing into wedges like a pizza makes serving a crowd effortless and adds a playful element that both kids and adults adore.
- Perfect Gooey-Chewy Texture: By slightly underbaking the center, we achieve that coveted soft, gooey middle with lightly crisp edges—the hallmark of a perfect chocolate chip cookie, magnified.
- Incredibly Simple to Make: No rolling pins or cookie scoops needed. You simply mix the dough and press it into a pan. It’s a one-bowl recipe (plus one for dry ingredients) that comes together in minutes.
- Endlessly Customizable: Think of the baked crust as a blank canvas. Top it with different chocolates, candies, nuts, or a drizzle after baking to match any holiday or preference.
- Better Than Delivery: Fresh from your own oven in about 30 minutes, the warm, melty chocolate and vanilla-scented crust far surpass any store-bought dessert.
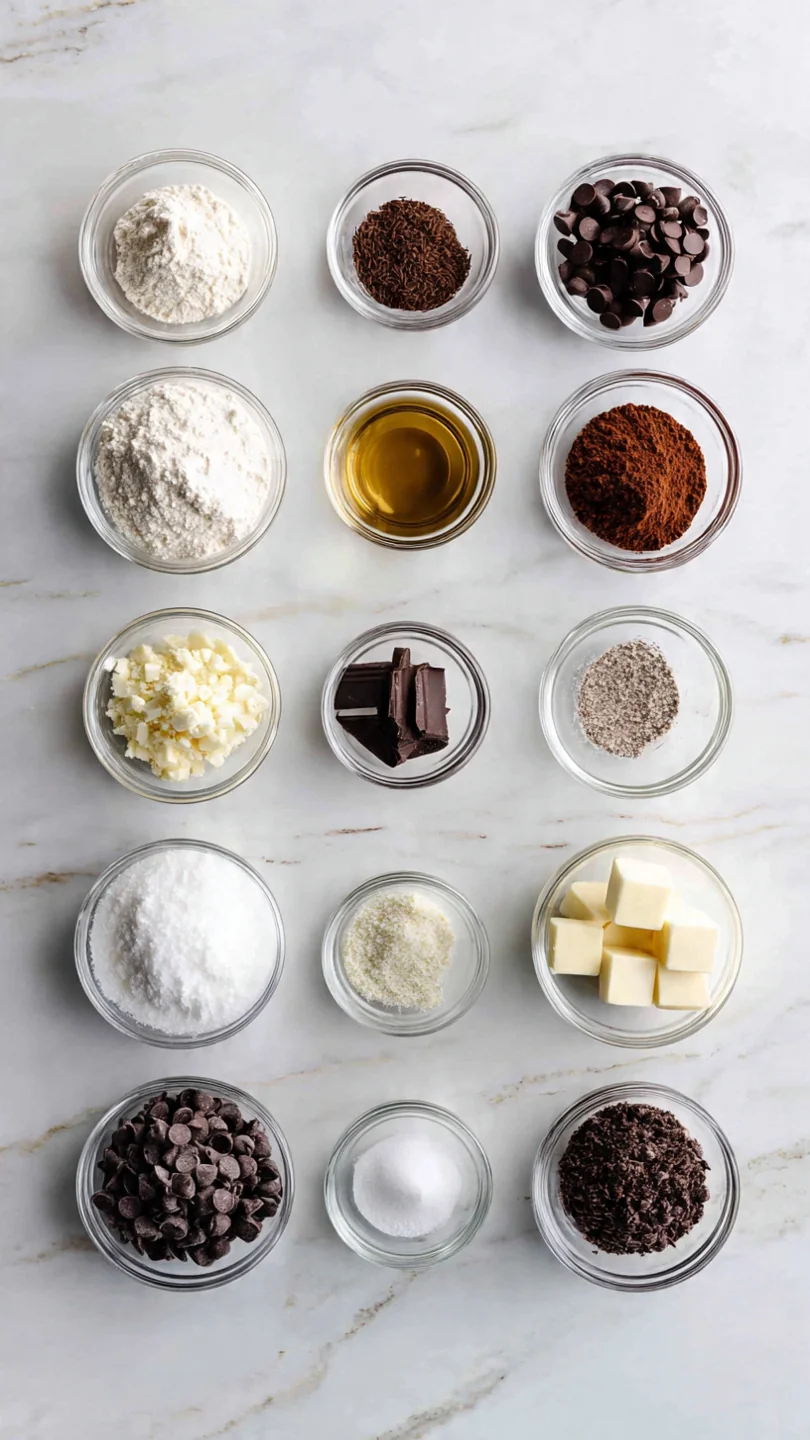
Ingredients You’ll Need
- Let’s gather our ingredients—this is where simple pantry staples transform into something spectacular. Using quality components here makes a noticeable difference in flavor and texture.
For the Cookie Crust:
- Unsalted butter: Softened to room temperature. This allows it to cream properly with the sugars, creating a light texture. I prefer unsalted to control the salt level.
- Granulated sugar & Light brown sugar: The white sugar encourages spread and crispness, while the brown sugar (packed firmly!) adds moisture, chew, and that classic caramel note.
- Egg: One large, room-temperature egg binds the dough. A cold egg won’t incorporate as smoothly.
- Pure vanilla extract: The flavor backbone. Avoid imitation for the best taste.
- All-purpose flour: Spoon it into your measuring cup and level it off. Scooping packs in too much flour and leads to a dry crust.
- Baking soda: Our leavener. Make sure it’s fresh for proper rise.
- Fine sea salt: Balances the sweetness and enhances all the chocolate flavors.
For the Gooey Topping:
- Semi-sweet chocolate chips: The workhorse. They provide deep chocolate flavor. I like to mix some into the dough and reserve some for on top.
- Milk chocolate chips & White chocolate chips: These are for topping. The variety creates beautiful visual appeal and different flavor notes. They are optional but recommended.
- Mini marshmallows: My secret for extra gooey pockets and a s’mores-like vibe. They melt beautifully into the surface.
Note: You’ll find the complete list of ingredients, along with their exact measurements, in the printable recipe card at the bottom of this post.
Kitchen Equipment Needed
You likely have everything you need already. The right pan is the only special consideration.
- 12-inch Pizza Pan or Large Baking Sheet: A pizza pan with small holes promotes even browning and a crispier bottom. A standard half-sheet pan works perfectly too.
- Parchment Paper: Non-negotiable for easy removal and cleanup. Don’t skip it.
- Mixer: A stand mixer with the paddle attachment is easiest, but a hand mixer works great. You can mix by hand with a sturdy spatula—it just takes a bit more arm power.
- Basic Prep Bowls: One large for wet ingredients, one medium for dry.
- Pizza Cutter or Sharp Knife: For clean slices through the gooey chocolate.
How to Make Gooey Chocolate Chip Dessert Pizza Recipe
Step 1: Cream the Butter and Sugars
Preheat your oven to 350°F (175°C) and line your pan with parchment. Now, let’s build the base of our flavor. In your mixing bowl, combine the softened butter, granulated sugar, and packed brown sugar.
Beat them on medium speed for a full 2-3 minutes. Trust me, this isn’t just mixing—it’s “creaming,” which incorporates tiny air bubbles into the butter. These bubbles expand in the oven, giving you a lighter, tender crust instead of a dense one.
The mixture should become pale and fluffy.
Step 2: Incorporate the Egg and Vanilla
With the mixer running on medium, add the room-temperature egg and vanilla extract. Beat for about a minute until the mixture is smooth and uniform, scraping down the bowl halfway. A room-temperature egg blends in seamlessly, creating a stable emulsion that prevents the dough from separating.
This is a small step that makes a big difference in the consistency of your final dough.
Step 3: Gently Add the Dry Ingredients
In a separate bowl, whisk together the flour, baking soda, and salt. This distributes the leavener evenly. Tip from me: Reduce your mixer speed to low before gradually adding the flour mixture.
Mix just until the last streaks of flour disappear. Overmixing at this stage is the enemy of a soft cookie—it develops gluten, which leads to toughness. A few floury streaks are okay; you’ll fold them in during the next step.
Step 4: Fold and Shape the Pizza Dough
Now comes the fun part. Use a spatula to fold in one cup of semi-sweet chocolate chips. Then, dump the dough onto the center of your prepared pan.
With lightly floured hands, press and pat the dough into an even circle, about 10-11 inches across and 1/2-inch thick. Believe me, creating a slight raised edge around the circumference isn’t just for looks—it helps contain all the melty toppings. Don’t worry about it being perfect; rustic is charming!
Step 5: Add Toppings and Bake to Gooey Perfection
Evenly scatter the remaining chocolate chips and mini marshmallows (if using) over the dough. Now, bake it on the center rack for 16-18 minutes. Here’s the most critical visual cue: the edges will be set and lightly golden, but the center should still look soft, puffy, and slightly underbaked.
It will firm up as it cools. This is the secret to that irresistible gooey texture. Resist the urge to bake until it looks “done” in the center.
Step 6: Cool, Slice, and Serve Warm
Remove the pizza from the oven and let it cool on the pan for at least 15-20 minutes. This resting period allows the structure to set so you can slice it without it falling apart. Use a pizza cutter for the cleanest wedges.
Serve it slightly warm, when the chocolate is still dreamily soft. For the ultimate experience, add a scoop of vanilla ice cream on top and watch it melt into the gooey crevices.
A few insights from the test kitchen can elevate your dessert pizza from good to exceptional.
- Butter Temperature is Key: Your butter should be cool to the touch but soft enough that your finger leaves a clear indentation. Too cold, and it won’t cream; too warm/melted, and your crust will spread too thin and become greasy.
- The Flour Measure Matters: The most common cause of a dry, cakey crust is over-measuring flour. Always spoon the flour into your measuring cup and level it off with a knife. Do not scoop the cup directly into the flour bag.
- Don’t Skip the Salt: That 1/4 teaspoon of fine sea salt is not optional. It cuts the overwhelming sweetness and makes the chocolate flavor taste richer and more complex. It’s the difference between a sugary treat and a balanced dessert.
- Pan Choice Changes Texture: A dark metal pan or pizza stone will yield a crispier, darker bottom and chewier edges. A light-colored aluminum sheet pan will produce a more even, softer bake. Choose based on your texture preference.
- The Perfect Slice: For picture-perfect slices, wipe your pizza cutter or knife clean between cuts. The melted chocolate and marshmallow can be sticky.
Recipe Variations & Customizations
- This recipe is a fantastic template. Once you’ve mastered the base, try these delicious twists.
- S’mores Pizza: Swap the chocolate chip topping for a layer of broken graham crackers before baking. Top with marshmallows and milk chocolate chips. After baking, drizzle with melted chocolate.
- Peanut Butter Cup: After pressing out the dough, dot the surface with halved mini peanut butter cups before baking. After cooling, drizzle with a simple peanut butter glaze (powdered sugar, milk, and peanut butter).
- Seasonal Candy: Make it for any holiday by using themed M&M’s, Reese’s pieces, or chopped seasonal candy bars as your topping. Press them in lightly before baking.
- Nutty Delight: Fold 1/2 cup of chopped toasted pecans or walnuts into the dough with the chocolate chips for added crunch and flavor.
- Gluten-Free Option: Use a 1:1 gluten-free all-purpose flour blend (like Bob’s Red Mill or King Arthur). The texture will be slightly more crumbly but still delicious.
- Double Chocolate: Replace 1/4 cup of the all-purpose flour with unsweetened cocoa powder for a chocolate-on-chocolate experience.
- Fruit & Chocolate: After baking and cooling, top with fresh raspberries or sliced strawberries and a dusting of powdered sugar. The tart fruit cuts the sweetness beautifully.
- Salted Caramel: After the pizza has cooled for 10 minutes, drizzle it generously with warm salted caramel sauce. Sprinkle with a pinch of flaky sea salt.
What to Serve With This Recipe
This dessert pizza is a star on its own, but a few pairings can turn it into a memorable dessert spread.
It’s the ideal finale for casual, hands-on meals like build-your-own taco bars, homemade pizza nights, or backyard barbecues. The shareable nature makes it a natural fit for parties. For beverages, cold milk is the classic, nostalgic pairing.
For adults, a cup of strong black coffee, a glass of port, or a cream liqueur like Baileys complements the rich chocolate wonderfully. If you’re serving a crowd, consider offering a DIY topping bar with small bowls of sprinkles, crushed pretzels, extra chocolate sauce, and whipped cream so guests can customize their slice. For a fuller dessert table, pair it with something light and fresh, like a berry fruit salad or lemon sorbet, to balance the richness.
Storage & Make-Ahead Instructions
- This dessert is best enjoyed the day it’s made, but you can manage leftovers and prep with ease.
- Storage: Once completely cool, cover the pizza tightly with plastic wrap or store slices in an airtight container at room temperature for up to 2 days. For longer storage, refrigerate for up to 4 days. The texture will become firmer, especially when chilled.
- Reheating: To recapture the gooey magic, warm individual slices in the microwave for 10-15 seconds. For a whole pizza, place it on a parchment-lined sheet and warm in a 300°F oven for 5-8 minutes.
- Freezing: You can freeze the fully baked and cooled pizza. Wrap it tightly in plastic wrap, then in foil. Freeze for up to 2 months. Thaw overnight in the refrigerator and reheat as above.
- Make-Ahead Dough: The cookie dough can be made, shaped into a disc, wrapped in plastic, and refrigerated for up to 3 days. Let it sit at room temperature for 20-30 minutes to soften slightly before pressing into the pan and baking.
Frequently Asked Questions
Q: Can I use a pre-made cookie dough for this?
A: You can, but the texture and flavor won’t be as good. A 16-18 oz tube of refrigerated chocolate chip cookie dough will work in a pinch. Press it into the pan and bake according to package instructions, but check early as baking time may vary.
Q: My center is too runny when I slice it. What happened?
A: This means it needed another 1-2 minutes in the oven. While a soft, gooey center is the goal, it should be set enough to hold its shape when sliced after cooling. Let it cool fully next time—it continues to set as it cools.
Q: Can I make this without a mixer?
A: Absolutely. Use a sturdy wooden spoon or spatula to vigorously cream the butter and sugars together. It will take a bit of elbow grease and a few extra minutes.
Mix in the egg and vanilla well, then fold in the dry ingredients.
Q: Why did my pizza turn out cakey and dry?
A: The most likely culprit is over-measuring the flour. Also, check your baking soda’s freshness and ensure you didn’t overmix the dough after adding the flour. Overbaking will also dry it out.
Q: Can I use all brown sugar or all white sugar?
A: I don’t recommend it. The combination is designed for optimal texture. All brown sugar will make it too moist and dense; all white sugar will make it crisp and thin, more like a shortbread.
Q: How do I get a perfectly round shape?
A: Place a 10-inch round cake pan or bowl upside down over the pressed dough and use it as a guide to trim any uneven edges with a knife. You can re-roll those scraps to patch any gaps.
Q: Is it safe to eat when the center looks underbaked?
A: Yes. The egg is fully cooked at 160°F, which the pizza reaches well before the center looks fully set. The residual heat from the pan and the carryover cooking during cooling finish the process safely.
Q: Can I add the marshmallows after baking?
A: You can, but they won’t melt and integrate into the surface. For the classic gooey look, add them before baking. If you prefer them toasted on top, add them in the last 2-3 minutes of baking.
Final Thoughts
This Gooey Chocolate Chip Dessert Pizza is more than just a recipe; it’s a guaranteed way to create a moment of joy. It combines the comforting, familiar flavors of a perfect chocolate chip cookie with the fun, communal spirit of sharing a pizza. By focusing on simple techniques—properly creaming the butter, measuring flour correctly, and, most importantly, trusting the visual cue of a soft center—you’ll achieve a professional-quality dessert every time.
I’ve served this to everyone from discerning food critics to picky toddlers, and it never fails to delight. So, gather your ingredients, preheat your oven, and get ready for the compliments. Don’t forget to snap a picture of your beautiful creation before everyone digs in!
I’d love to hear how yours turned out and what creative toppings you tried. Happy baking
Gooey Chocolate Chip Dessert Pizza
Equipment
- 12-inch round pizza pan or large rimmed baking sheet
- Parchment paper
- Stand mixer or hand mixer
- Large mixing bowls
- Measuring cups and spoons
- Spatula
- Pizza cutter or sharp knife
Ingredients
- 1/2 cup Unsalted butter softened to room temperature (1 stick)
- 1/2 cup Granulated sugar
- 1/2 cup Light brown sugar packed
- 1 large Egg room temperature
- 1 tsp Pure vanilla extract
- 1 1/4 cups All-purpose flour spooned and leveled
- 1/2 tsp Baking soda
- 1/4 tsp Fine sea salt
- 1 cup Semi-sweet chocolate chips plus 2 tbsp for topping
- 1/4 cup Milk chocolate chips for topping
- 1/4 cup White chocolate chips for topping (optional)
- 1/2 cup Mini marshmallows optional for extra gooeyness
Instructions
- Preheat your oven to 350°F (175°C). Line a 12-inch pizza pan or a large baking sheet with parchment paper. In a large mixing bowl, use a hand mixer or stand mixer fitted with the paddle attachment to cream together the softened butter, granulated sugar, and brown sugar on medium speed for 2-3 minutes, until light and fluffy. This step incorporates air, which is key for a soft, chewy texture.
- Add the room temperature egg and vanilla extract to the butter mixture. Beat on medium speed until fully combined, about 1 minute, scraping down the sides of the bowl as needed. A room temperature egg emulsifies better, creating a smoother, more cohesive dough.
- In a separate bowl, whisk together the flour, baking soda, and salt. With the mixer on low speed, gradually add the dry ingredients to the wet ingredients. Mix just until no streaks of flour remain, being careful not to overmix. Overworking the flour develops gluten, which can make the crust tough.
- Using a spatula, fold in 1 cup of the semi-sweet chocolate chips. Transfer the dough to the center of your prepared pan. With lightly floured hands, press and pat the dough into an even circle, about 10-11 inches in diameter and 1/2-inch thick. Create a slight ridge around the outer edge to help contain the toppings.
- Evenly sprinkle the remaining semi-sweet, milk, and white chocolate chips (if using) over the dough. For maximum gooeyness, scatter the mini marshmallows on top. Bake on the center rack for 16-18 minutes. The edges should be set and lightly golden, but the center will still look soft and slightly underbaked—this is crucial for that perfect gooey texture.
- Remove the pizza from the oven and let it cool on the pan for at least 15-20 minutes. This allows it to set enough to slice. Use a pizza cutter or sharp knife to slice into wedges. Serve warm with a scoop of vanilla ice cream for the ultimate experience.