
I’ll never forget the first time I stumbled into making a Healthy Apple Crisp. It was one of those crisp fall afternoons when the air smelled like leaves and cinnamon, and I had a bag of apples from a local orchard just begging to be used. I wanted something cozy but didn’t want to derail my wellness goals, so I started tinkering in the kitchen to create a lighter version of the classic dessert.
And let me tell you, when my family dug into that first batch of Healthy Apple Crisp, the smiles around the table were worth every second of peeling apples!
Since then, Healthy Apple Crisp has become a staple in my house, especially during apple season. I’ve tweaked the recipe over the years to balance indulgence with nutrition, and I’m so excited to share it with you. Whether you’re a seasoned baker or just dipping your toes into dessert-making, I’ve got your back with tips and tricks to nail this one.
If you’re craving a warm, comforting treat that won’t leave you feeling guilty, stick with me. This Healthy Apple Crisp is about to become your go-to for fall gatherings, cozy nights in, or honestly, any time you’ve got apples on hand!
Why You’ll Love This Recipe
I’ve found that this Healthy Apple Crisp hits all the right notes: it’s sweet, spiced, and has that perfect crunchy topping, but without the heavy butter or sugar overload. In my kitchen, it’s the dessert I whip up when I want to impress without stressing, because it’s so darn easy to throw together. Plus, the smell of it baking? Pure autumn magic!
And here’s the kicker: you don’t have to be a health nut to love this. My kids, who usually turn their noses up at anything “healthy,” devour this Healthy Apple Crisp every time. It’s proof you can have your dessert and feel good about it too!
Ingredients List
I’m pretty picky about what goes into my Healthy Apple Crisp, because quality ingredients make all the difference in a simple dish like this. I usually buy local apples when I can, since they’re fresher and support nearby farmers, but any crisp variety works. Let’s break down what you’ll need for both the filling and the topping to make this guilt-free treat.
For the Apple Filling
- 6 medium apples (about 2.5 lbs), peeled, cored, and sliced thin (I prefer Honeycrisp or Granny Smith for their balance of sweet and tart)
- 2 tablespoons (25g) granulated sugar, just enough to enhance the natural sweetness
- 1 tablespoon (15ml) lemon juice, for a bright zing and to prevent browning
- 1 teaspoon (3g) ground cinnamon, for that warm, cozy vibe
- 1/4 teaspoon (1g) ground nutmeg, optional but adds depth (I’m obsessed with this little touch)
For the Crisp Topping
- 3/4 cup (90g) old-fashioned rolled oats, for that hearty crunch
- 1/2 cup (60g) whole wheat flour, or all-purpose if that’s what you’ve got
- 1/4 cup (50g) brown sugar, packed (I like dark brown for a molasses kick)
- 1/3 cup (75g) unsalted butter, cold and cubed (or coconut oil for a lighter twist)
- 1/4 teaspoon (1g) salt, to balance the sweetness
- 1/2 teaspoon (2g) cinnamon, because you can never have too much in a Healthy Apple Crisp
These ingredients are pretty pantry-friendly, which is why I love whipping up a Healthy Apple Crisp on a whim. If you’ve got apples going soft on the counter, this is your sign to transform them into something amazing!
Variations
I’ve played around with this Healthy Apple Crisp recipe more times than I can count, and there are so many ways to make it your own. Whether you’ve got dietary needs or just wanna switch things up, these twists keep things fresh. Here are some variations I’ve tried (and loved) over the years.
- Nutty Crunch: Toss in 1/4 cup of chopped walnuts or pecans to the topping for extra texture. I tried this once for a holiday party, and it was a hit!
- Berry Boost: Mix 1 cup of fresh or frozen blueberries with the apples for a tart-sweet combo. My kids always ask for this version of Healthy Apple Crisp.
- Gluten-Free Swap: Use certified gluten-free oats and almond flour instead of wheat flour. It’s just as tasty, trust me.
- Vegan Vibes: Replace the butter with coconut oil or vegan margarine. I’ve made this for friends and they couldn’t tell the difference.
- Spice It Up: Add a pinch of ground cloves or allspice to the filling for an extra cozy punch. I stumbled on this combo by accident and now I’m hooked.
- Sugar-Free Twist: Swap sugar for a natural sweetener like maple syrup (about 2 tablespoons). It’s a game-changer for a lighter Healthy Apple Crisp.
- Tropical Touch: Mix in 1/2 cup of diced pineapple for a surprising twist. I did this on a whim last summer, and wow, what a fun spin!
- Protein Power: Stir 2 tablespoons of chia seeds into the topping for a sneaky nutritional boost. It’s my go-to when I’m craving a hearty Healthy Apple Crisp.
These variations let you tweak the recipe to your mood or pantry. Honestly, half the fun of a Healthy Apple Crisp is experimenting with what you’ve got on hand!
Servings and Timing
In my experience, timing a recipe like this Healthy Apple Crisp is pretty straightforward, even if you’re juggling a busy day. I’ve made it enough to know exactly how long it takes me to prep and bake, so here’s the breakdown for you to plan accordingly. It’s perfect for a quick dessert or a make-ahead treat!
- Prep Time: 20 minutes
- Cook Time: 40 minutes
- Total Time: 1 hour
- Servings: 6-8 portions
These timings are based on how I roll in my kitchen, so adjust if you’re a speedy peeler or taking your sweet time with the apples for your Healthy Apple Crisp. Either way, it’s worth every minute!
Step-by-Step Instructions
I’m gonna walk you through making this Healthy Apple Crisp like I’m right there in the kitchen with you. I’ve got some little tricks up my sleeve from years of baking this bad boy, so let’s get started. Follow along, and you’ll have a pan of deliciousness in no time!
Step 1: Preheat and Prep
First things first, crank your oven to 350°F (175°C) and grease an 8×8-inch baking dish with a smidge of butter or cooking spray. I’ve forgotten to grease the pan before, and let’s just say scraping out stuck apples ain’t fun. While the oven’s warming up, peel, core, and slice those apples into thin wedges—aim for even pieces so they cook uniformly.
Step 2: Mix the Filling
Toss your apple slices in a big bowl with the sugar, lemon juice, cinnamon, and nutmeg if you’re using it. I like to get in there with my hands to make sure every slice is coated—it’s like giving the apples a little spice massage! Spread this mix evenly into your prepared dish, and take a sec to admire how pretty a Healthy Apple Crisp looks even before baking.
Step 3: Make the Topping
Now, let’s whip up that crunchy topping for the Healthy Apple Crisp. In another bowl, combine the oats, flour, brown sugar, salt, and cinnamon, then cut in the cold butter with a pastry cutter or your fingers until it looks like coarse crumbs. I usually go the finger route ‘cause I find it therapeutic (and quicker) to squish it all together.
You want little pea-sized butter bits for maximum crispiness.
Step 4: Assemble and Bake
Sprinkle that crumbly goodness over the apples, covering every inch—don’t skimp here, folks! Pop the dish into the oven and bake for 35-40 minutes until the topping is golden and the apples are bubbling like a hot tub of deliciousness. I always peek through the oven door around the 30-minute mark, just to make sure my Healthy Apple Crisp isn’t getting too toasty.
Step 5: Cool and Enjoy
Here’s the hardest part: let your Healthy Apple Crisp cool for about 10 minutes before digging in. I’ve burned my tongue more times than I’d like to admit rushing this step (ouch!). The wait lets the flavors meld, and it’s easier to scoop out a perfect portion.
Trust me, these steps are foolproof if you’ve got a little patience. Making a Healthy Apple Crisp feels like second nature to me now, and soon it will for you too!
Nutritional Information
I’m all about balance, so I love that this Healthy Apple Crisp lets me indulge without the guilt trip. I’ve crunched the numbers (pun intended) for a rough idea of what you’re getting per serving, based on 8 portions. Keep in mind, this can vary a bit depending on your apples or swaps!
- Calories: 220 per serving
- Fat: 9g
- Protein: 3g
- Carbohydrates: 35g
- Sodium: 75mg
I think these stats are pretty darn reasonable for a dessert as satisfying as a Healthy Apple Crisp. It’s a treat I can feel good about serving to my crew!
Healthier Alternatives
If you’re looking to lighten up this Healthy Apple Crisp even more, I’ve got some swaps I’ve tried that keep the flavor on point. I’m always tweaking recipes when I’m watching calories or catering to different needs. Here are a few alternatives that work like a charm.
- Sugar Substitute: Swap the granulated and brown sugar for 2 tablespoons of maple syrup or honey. It’s a natural sweetness I love.
- Lower Fat: Use coconut oil instead of butter, or cut the amount in half and mix with applesauce. I’ve done this and still got a crispy topping for my Healthy Apple Crisp.
- Grain-Free: Replace oats with crushed almonds or coconut flakes for a different texture. It’s a bit unconventional, but I dig it in a Healthy Apple Crisp.
- Less Sweet: Skip the sugar in the filling altogether—ripe apples often don’t need it. I’ve gone this route for a super light Healthy Apple Crisp.
These tweaks let you customize without sacrificing that cozy dessert feel. Play around and see what works for you!
Serving Suggestions
I love serving this Healthy Apple Crisp in ways that elevate the whole experience, whether it’s a casual weeknight or a special occasion. Here are some of my favorite ways to dish it up, straight from my table to yours. Trust me, these pairings make it even better!
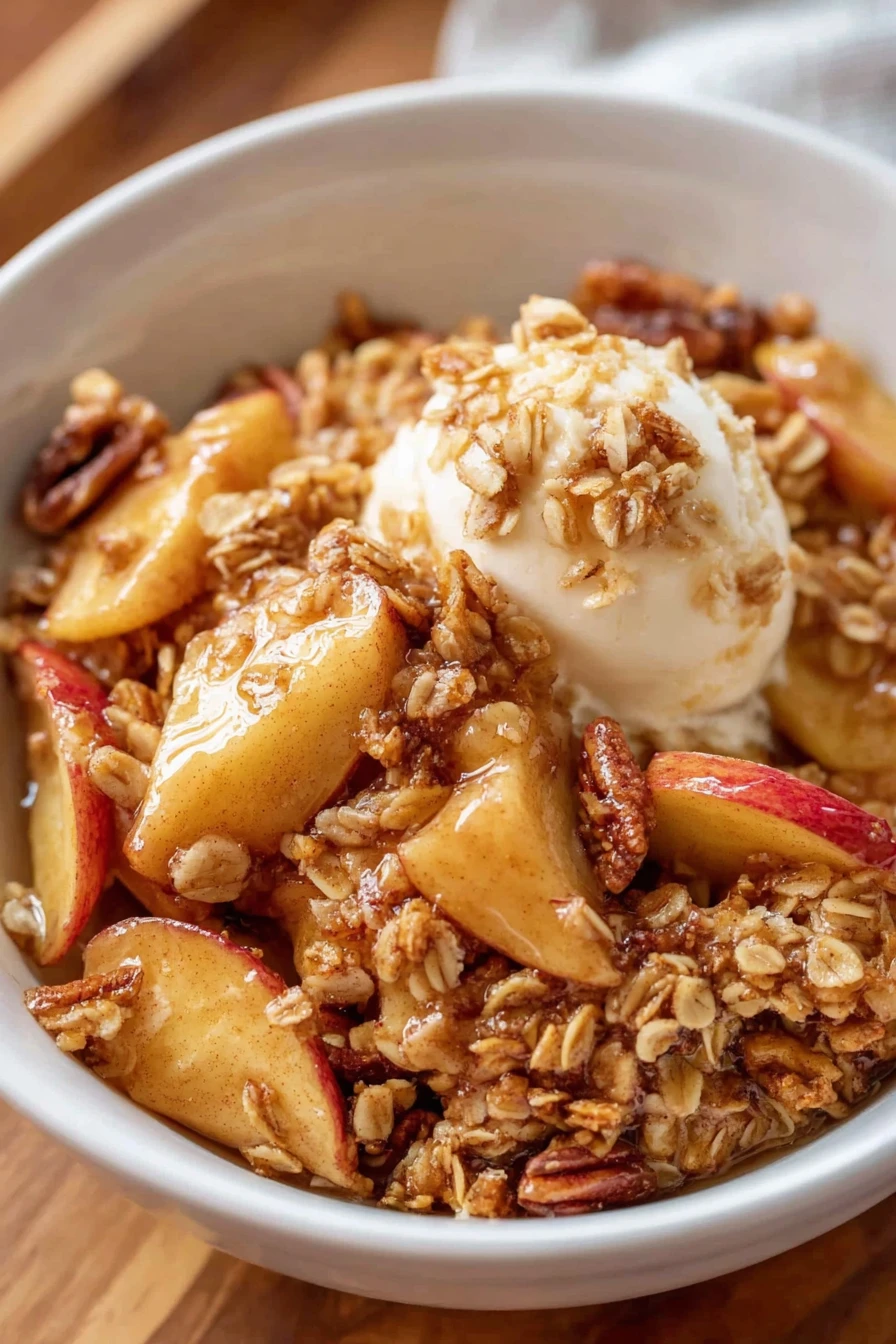
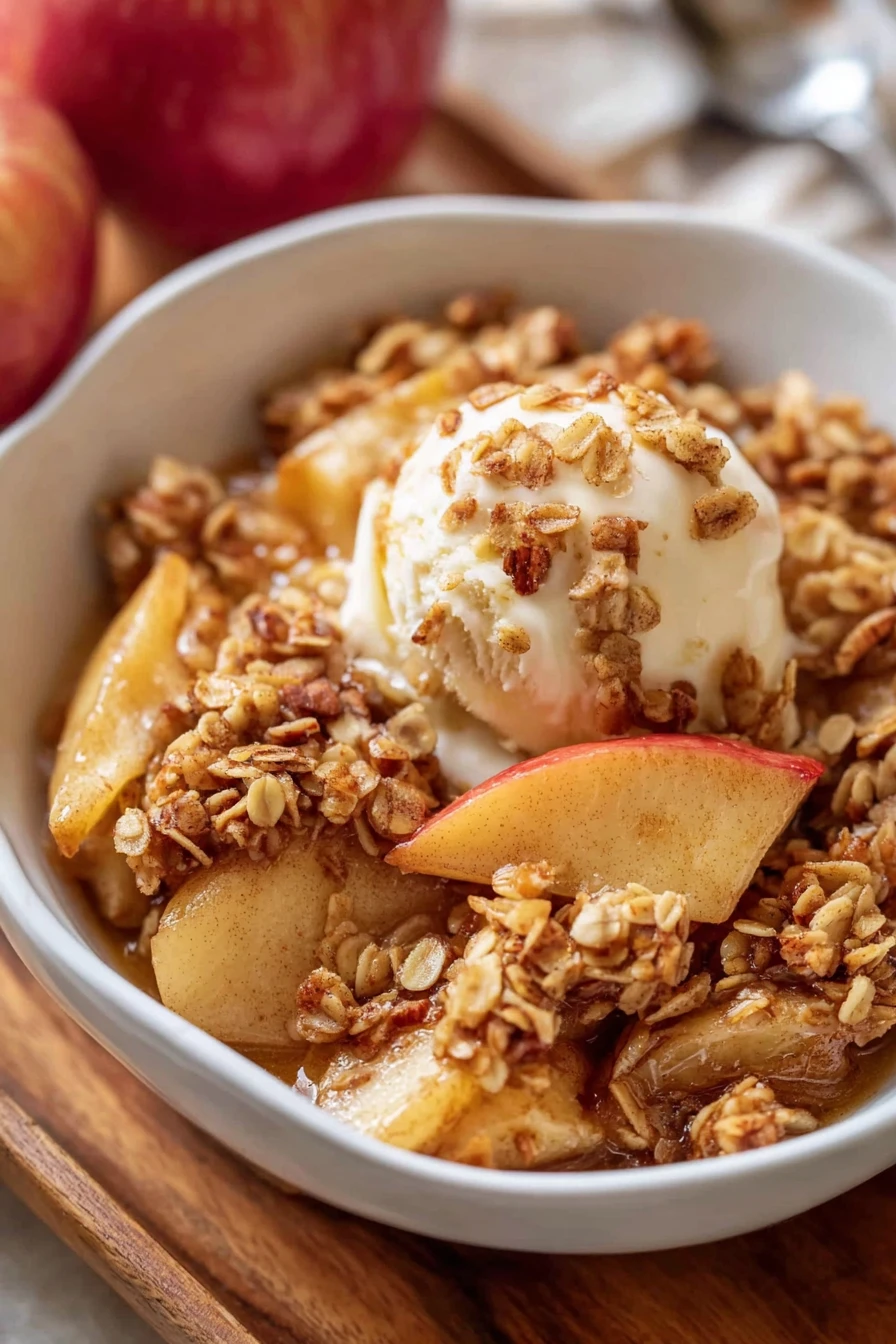
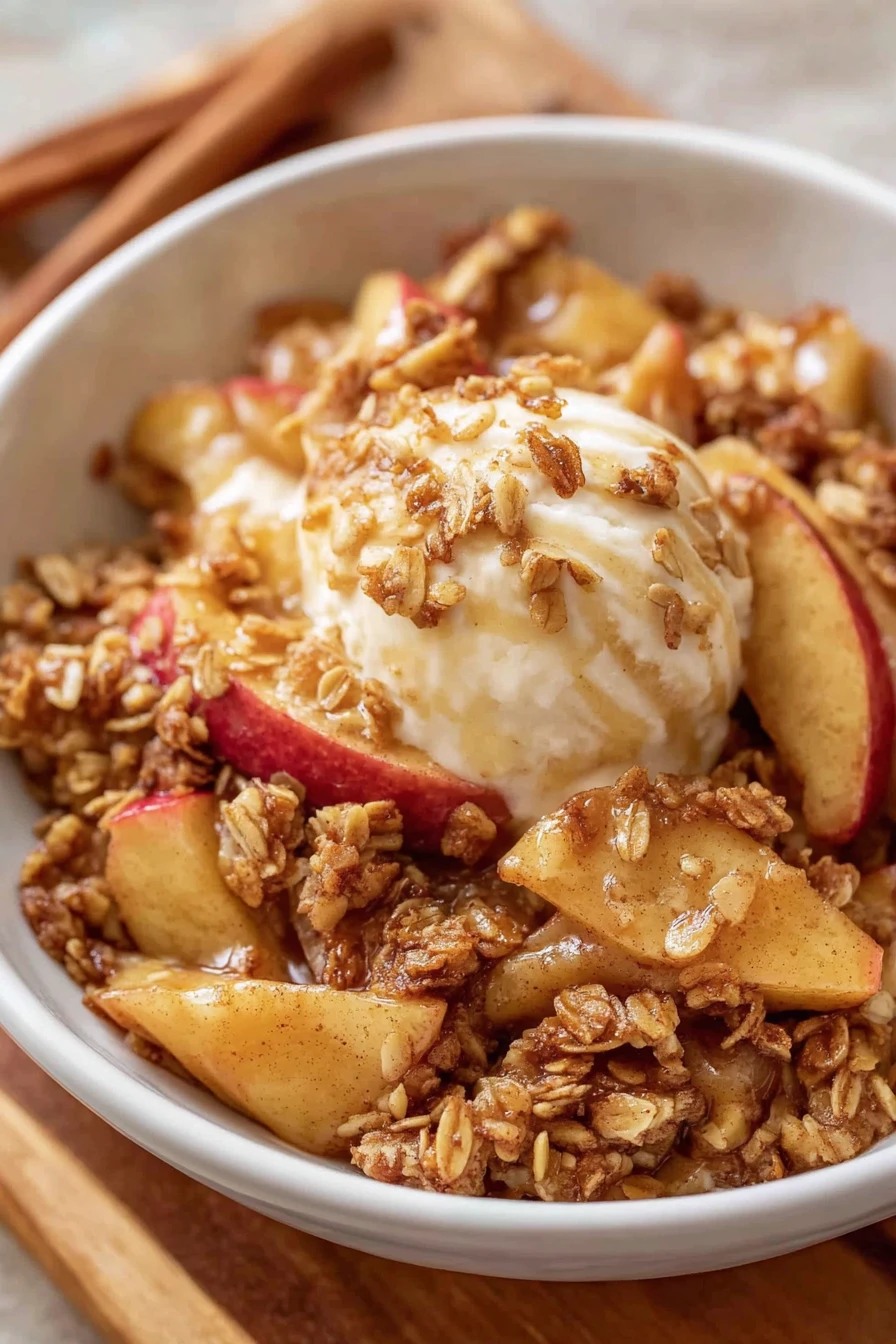
- For Dessert: Add a scoop of vanilla ice cream or a dollop of Greek yogurt on top. The creamy contrast is pure heaven with a Healthy Apple Crisp.
- With Coffee: Pair a warm slice with your morning brew for a sweet start. I do this on lazy weekends and it’s bliss.
- Brunch Star: Serve alongside a fruit platter for a lighter sweet option. I did this at my last brunch, and it stole the show.
- Holiday Treat: Drizzle with a tiny bit of caramel sauce for extra decadence. It’s my secret weapon for a festive Healthy Apple Crisp!
However you serve it, this dish just screams comfort. What’s your favorite way to enjoy it?
Common Mistakes to Avoid
I’ve had my fair share of kitchen flops with Healthy Apple Crisp, so I’m spilling the beans on pitfalls to dodge. Trust me on this one, I’ve learned the hard way over the years! Avoid these slip-ups for a dessert that’s spot-on every time.
- Too Many Apples: Overloading the dish makes it soggy instead of crisp. I once piled in too many and ended up with apple soup—yuck!
- Skipping the Lemon: Don’t ditch the lemon juice; it keeps apples from browning and adds balance. I forgot it once and the filling was just meh.
- Undercooked Topping: Bake until golden, not pale, or you’ll miss that crunch. My first Healthy Apple Crisp was underdone, and it was a sad day.
- Wrong Apple Type: Soft apples like Red Delicious turn to mush—go for firmer ones. I made this mistake early on with a Healthy Apple Crisp and regretted it.
Steer clear of these blunders, and you’ll be golden. We’ve all been there, right?
Storing Tips
I’ve found that this Healthy Apple Crisp keeps pretty well if you store it right, which is great for making ahead or saving leftovers. In my experience, it’s best to plan how you’ll stash it to keep that texture intact. Here’s how I do it.
- Refrigerator: Store in an airtight container for up to 4 days. It’s still tasty, though the topping softens a bit.
- Freezer: Freeze unbaked or baked Healthy Apple Crisp for up to 2 months. Thaw overnight before reheating.
- Reheating: Warm in the oven at 300°F for 10 minutes to revive the crunch of your Healthy Apple Crisp.
These tips have saved me when I’ve made a double batch. No waste here!
Frequently Asked Questions
I get a lot of questions about making a Healthy Apple Crisp, so I’m answering the most common ones here. Let’s dive into these queries with real talk from my kitchen. I’ve got you covered!
Can I make Healthy Apple Crisp ahead of time?
Absolutely, you can prep the filling and topping separately a day ahead and store them in the fridge. Assemble and bake when you’re ready. I’ve done this for parties, and it’s a total time-saver.
What apples are best for Healthy Apple Crisp?
I swear by Honeycrisp or Granny Smith for their firm texture and sweet-tart balance. They hold up well during baking without getting mushy. Use what’s fresh if you can!
Can I use quick oats instead of rolled oats?
Sure thing, though the texture might be a tad softer. I’ve used quick oats in a pinch for a Healthy Apple Crisp, and it still works. Rolled oats just give a better crunch, in my opinion.
Is this recipe gluten-free?
Not by default, but swap to gluten-free oats and flour, and you’re golden. I’ve made it this way for a friend, and it’s just as yummy.
Can I reduce the sugar more?
Yep, especially if your apples are super sweet. I’ve skipped sugar in the filling before and relied on the topping for sweetness. Play with it to suit your taste!
How do I keep the topping crispy?
Don’t cover it right after baking—let it cool uncovered first to avoid trapping steam. I learned this trick after a soggy Healthy Apple Crisp disaster.
Can I double the recipe?
For sure, just use a 9×13 dish and add a few minutes to the bake time. I’ve doubled it for potlucks, and it’s always a crowd-pleaser.
What if I don’t have a baking dish?
No worries, use a pie pan or even a cast-iron skillet. I’ve baked in a skillet before, and it looked rustic and charming. Just keep an eye on the cooking time.
Conclusion
I hope you’re as pumped as I am to whip up this Healthy Apple Crisp and fill your home with those amazing fall aromas. It’s been a joy to share my go-to recipe, along with all the little lessons I’ve picked up along the way. Grab those apples, give this Healthy Apple Crisp a try, and let me know how it turns out—I’d love to hear about your kitchen adventures with a Healthy Apple Crisp!
Conclusion
I hope you enjoyed this recipe for Healthy Apple Crisp! It’s truly one of my favorites, and I’m confident you’ll love it too.
Remember to follow the steps carefully for the best results. Don’t hesitate to experiment with your own variations and make this recipe your own. Happy cooking!