

There’s a special kind of satisfaction that comes from a bubbling, cheesy casserole emerging from the oven. It promises comfort, ease, and a meal that brings everyone to the table. But what if that classic comfort food could also be nourishing, packed with vegetables, and light enough that you don’t feel weighed down afterwards?
That’s the magic of this Healthy Chicken Cauliflower Rice Casserole. By swapping out starchy rice for fluffy, nutrient-dense cauliflower rice, we create a dish that delivers all the creamy, savory, cheesy goodness you crave, with a fraction of the carbs. It’s a weeknight hero that proves healthy eating doesn’t mean sacrificing flavor or that coveted cozy feeling.
This recipe is a staple in my home for a reason, and I’m confident it will become one in yours too.
- One-Pan Convenience: You’ll brown the chicken and sauté the veggies right in the same oven-safe skillet you bake it in. That means maximum flavor and minimal cleanup—a true win for busy nights.
- Big Flavor, Fast: By using techniques like properly browning the chicken and cooking the mushrooms until their liquid evaporates, we build layers of savory, umami-rich flavor in under an hour.
- Diet-Flexible: Naturally gluten-free and low in carbs, this casserole can easily be adapted for keto, dairy-free, or vegetarian preferences (see variations below). It’s a crowd-pleaser for diverse dietary needs.
- Meal Prep Champion: This casserole reheats beautifully, making it perfect for packing lunches or having a ready-made dinner in the fridge. It also freezes well for future you.
- Sneaky Veggie Power: With cauliflower, mushrooms, spinach, and onions, you’re getting a powerful serving of vegetables in every bite, all enveloped in a creamy, cheesy sauce that makes them irresistible.
- Family-Friendly Comfort: The texture is comforting and familiar, and the flavor is universally appealing. It’s a brilliant way to introduce more vegetables to picky eaters without a battle.
Ingredients You’ll Need
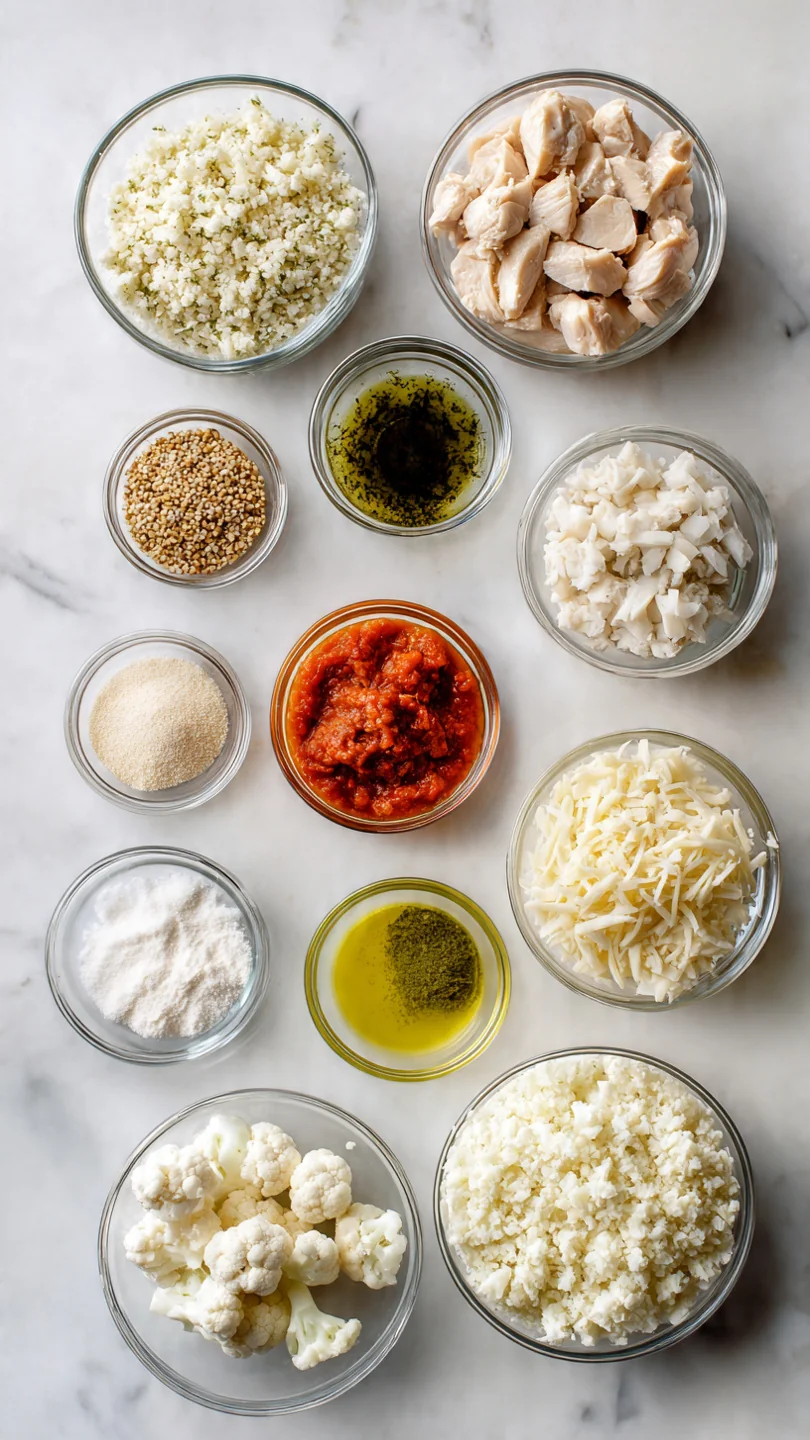
- Let’s gather our ingredients. This recipe is built on simple, whole foods that come together to create something greater than the sum of its parts. The key is in the quality and preparation.
For the base, you’ll need one large head of cauliflower. Trust me, ricing it fresh is worth the extra few minutes—it has a better texture and less moisture than most frozen varieties. You’ll also need boneless, skinless chicken breasts, cubed for quick cooking.
For the vegetable medley, cremini mushrooms (they have more flavor than white button mushrooms) and a couple handfuls of fresh baby spinach add earthiness and color.
The creamy sauce is where we get clever. Instead of a canned soup base, we’re using full-fat plain Greek yogurt. It provides tangy creaminess and a massive protein boost.
Chicken broth thins it to the perfect consistency. For flavor, you’ll need a yellow onion, garlic, dried thyme, and paprika. The finishing touch is a blend of shredded mozzarella for that iconic stretch and grated Parmesan for a salty, nutty punch.
Have your olive oil, kosher salt, and black pepper at the ready.
Note: You’ll find the complete list of ingredients, along with their exact measurements, in the printable recipe card at the bottom of this post.
Kitchen Equipment Needed
You don’t need any specialty gear for this recipe. A large (10-12 inch) oven-safe skillet or Dutch oven is the MVP—it goes from stovetop to oven seamlessly. A food processor makes quick work of ricing the cauliflower (a box grater works too, it just takes a bit more elbow grease).
Beyond that, you’ll need the usual suspects: a cutting board, a sharp chef’s knife, a wooden spoon for stirring, and a measuring cup set.
How to Make Healthy Chicken Cauliflower Rice Casserole Recipe
Step 1: Rice the Cauliflower and Preheat
Start by preheating your oven to 375°F (190°C). This ensures it’s perfectly hot when your casserole is ready to bake. While it heats, prepare the cauliflower.
Cut the head into florets, discarding the tough core. Working in batches, pulse the florets in your food processor until they break down into pieces the size of rice grains. Be careful not to over-process, or you’ll end up with cauliflower mash.
You should have about 4 cups. This fresh rice will absorb the sauce beautifully without getting soggy.
Step 2: Brown the Chicken
Heat one tablespoon of olive oil in your large oven-safe skillet over medium-high heat. Season your cubed chicken generously with salt and pepper. Believe me, seasoning at every stage is the secret to a flavorful final dish.
Add the chicken to the hot oil in a single layer and let it cook undisturbed for a few minutes to get a good sear. Stir and cook for another 4-5 minutes until the chicken is cooked through and has some golden-brown color. Remove it to a clean plate.
This step isn’t just about cooking the chicken; it’s about building a fond (those tasty browned bits) on the bottom of the pan for the next step.
Step 3: Sauté the Aromatics and Veggies
There’s no need to wash the skillet—those browned bits are flavor gold! Add the remaining tablespoon of oil, then toss in the diced onion and sliced mushrooms. Cook for 6-7 minutes, stirring occasionally.
You’ll see the mushrooms release their liquid; keep cooking until that liquid evaporates and the mushrooms start to brown slightly. This concentrates their flavor and prevents a watery casserole. Now add the minced garlic and cook for just one more minute until fragrant.
Tip from me: burning garlic makes it bitter, so keep the heat managed.
Step 4: Combine Everything and Create the Sauce
Reduce the heat to medium-low. Now, add the riced cauliflower, the cooked chicken, and all of the fresh spinach back to the skillet. To this, add the Greek yogurt, chicken broth, dried thyme, paprika, and half of each cheese.
This is the fun part—stir everything together until the spinach wilts and the creamy yogurt sauce coats every piece. The residual heat from the pan and veggies will gently warm the sauce. Take a moment to taste and adjust the seasoning with more salt and pepper.
It should taste delicious now, before it even hits the oven.
Step 5: Top, Bake, and Rest
Smooth the top of the casserole mixture with your spoon. Sprinkle the remaining mozzarella and Parmesan cheese evenly over the top, creating that irresistible golden crust. Carefully transfer the skillet to your preheated oven.
Bake for 20-25 minutes. You’re looking for the cheese to be fully melted, bubbly around the edges, and have some beautiful golden-brown spots. Once out of the oven, this is critical: let it rest for 5-10 minutes.
This allows the sauce to set slightly, ensuring you get clean, perfect servings instead of a soupy scoop. Step back and admire your beautiful, bubbling creation.
A few chef-level insights will guarantee your casserole turns out perfectly every single time.
- Managing Moisture: The most common issue with cauliflower casseroles is excess water. Using fresh (not frozen) riced cauliflower and cooking the mushrooms until their liquid fully evaporates are your two best defenses against a soggy dish.
- The Power of Resting: Letting the casserole sit after baking is non-negotiable. As it cools slightly, the proteins in the yogurt and cheese set, transforming the sauce from runny to luxuriously creamy.
- Don’t Skimp on Browning: That initial sear on the chicken isn’t just for color. The Maillard reaction (the scientific term for browning) creates complex, savory flavor compounds that permeate the entire dish. Pale, boiled chicken simply won’t deliver the same depth.
- Cheese Selection: Pre-shredded cheese contains anti-caking agents that can make your sauce grainy. For the smoothest melt, take the extra minute to shred a block of mozzarella yourself. The difference in texture is noticeable.
- Season in Layers: Season the chicken when you cook it, and season the vegetable mixture again before adding the sauce. This ensures every component is properly seasoned, not just the sauce itself.
Recipe Variations
- This recipe is a fantastic template. Once you’ve mastered the base, feel free to get creative with these tested variations.
- Keto & Extra Creamy: Replace the Greek yogurt with full-fat cream cheese softened to room temperature. Add an extra 1/4 cup of grated Parmesan to the sauce for a richer, thicker consistency.
- Dairy-Free Version: Use a plain, unsweetened dairy-free yogurt (like coconut or almond-based) and swap the cheeses for your favorite dairy-free shreds. A sprinkle of nutritional yeast in the sauce can add a cheesy flavor.
- Tex-Mex Twist: Swap the thyme and paprika for 1 tbsp chili powder and 1 tsp cumin. Use pepper jack cheese, and add a can of drained diced green chiles and a cup of black beans (if carbs aren’t a concern) with the cauliflower.
- Sun-Dried Tomato & Basil: Stir in 1/2 cup of chopped oil-packed sun-dried tomatoes and 1/4 cup of chopped fresh basil with the spinach. Use Italian seasoning in place of thyme.
- Turkey or Beef: Ground turkey or lean ground beef are excellent substitutes for the chicken. Simply brown the meat, breaking it up with a spoon, and proceed with the recipe.
- Vegetarian Delight: Omit the chicken and use an extra 8 oz of mushrooms (like a mix of cremini and shiitake). Add a can of drained and rinsed white beans or lentils for plant-based protein.
What to Serve With This Recipe
This casserole is a hearty and complete meal on its own, but it pairs beautifully with simple sides to round out your dinner table. For a fresh contrast, a simple arugula salad with a lemon vinaigrette cuts through the richness perfectly. If you’re serving a crowd or want something more substantial, roasted asparagus or garlic sautéed green beans are effortless complements.
For those not watching carbs, a loaf of crusty whole-grain bread is ideal for soaking up any extra creamy sauce. It’s an ideal dish for casual weeknight dinners, potlucks, or even a comforting weekend lunch.
Storage & Make-Ahead Instructions
- This casserole’s make-ahead friendly nature is one of its best features.
- Refrigeration: Cool the casserole completely, then cover the skillet tightly with foil or transfer portions to an airtight container. It will keep in the refrigerator for 3-4 days.
- Freezing: For longer storage, freeze individual portions in freezer-safe containers for up to 2 months. Thaw overnight in the refrigerator before reheating.
- Reheating: The best method is to reheat portions in a covered oven-safe dish at 350°F until warmed through (about 15-20 minutes). You can also use the microwave, but cover it with a damp paper towel to prevent the cheese from becoming rubbery.
- Make-Ahead Strategy: You can assemble the entire casserole (through Step 4) up to a day in advance. Cover and refrigerate. When ready to cook, let it sit at room temperature for 20-30 minutes, add the final cheese topping, and bake. You may need to add 5-10 minutes to the baking time since it’s starting cold.
Frequently Asked Questions
Q: Can I use frozen riced cauliflower?
A: You can, but you must thaw it completely and squeeze it in a clean kitchen towel to remove as much excess moisture as possible. Using it straight from frozen will almost certainly result in a watery casserole.
Q: My sauce seems thin after mixing. Did I do something wrong?
A: Not at all! The cauliflower will release a bit of moisture as it bakes and will absorb some of the sauce. The resting period after baking is crucial for the sauce to thicken to the perfect creamy consistency.
Trust the process.
Q: How do I know when the casserole is done baking?
A: It’s done when the cheese topping is fully melted, golden, and bubbly around the edges, and the casserole is heated through (you should see gentle bubbles at the sides of the pan). An instant-read thermometer inserted into the center should read at least 165°F.
Q: Can I make this vegetarian?
A: Absolutely. Omit the chicken and use a mix of hearty vegetables like extra mushrooms, zucchini, or bell peppers. For protein, add a can of rinsed white beans or chickpeas when you combine everything.
Q: Is Greek yogurt or sour cream better?
A: Both work well! Greek yogurt adds more protein and a tangier flavor. Full-fat sour cream creates a slightly richer, more traditional “casserole” creaminess.
Choose based on your dietary preference.
Q: Can I use a different type of cheese?
A: Yes, this is very flexible. A sharp cheddar, Monterey Jack, Gouda, or a Italian cheese blend would all be delicious. I recommend keeping at least some Parmesan for its salty, umami kick.
Q: My casserole turned out watery. What happened?
A: This is almost always due to excess moisture from the vegetables. Next time, ensure your mushrooms are cooked until very dry, and if using frozen cauliflower, squeeze it thoroughly. Also, make sure you’re letting it rest after baking.
Q: How can I add more protein?
A: The chicken and Greek yogurt already make this high in protein. For an extra boost, stir in a cup of cottage cheese (blended smooth if you prefer) with the Greek yogurt, or top with toasted slivered almonds before serving.
Final Thoughts
This Healthy Chicken Cauliflower Rice Casserole is more than just a recipe; it’s a reliable solution for those nights when you want nourishment without compromise. It embodies what I love most about modern home cooking: taking a beloved classic and thoughtfully adapting it to be better for you, without losing an ounce of its soul-satisfying appeal. The creamy texture, the savory cheese, the tender chicken and vegetables—it all comes together in one pan to create a meal that feels indulgent yet leaves you feeling energized.
I’ve tested this recipe rigorously in my own kitchen, and I’m so excited for you to try it in yours. Give it a go this week, and I’d love to hear how it turns out. Share your photos and variations with me, and don’t forget to rate the recipe if you loved it.
Happy, healthy cooking

Healthy Chicken Cauliflower Rice Casserole
Equipment
- Large oven-safe skillet or Dutch oven (10-12 inch)
- Food processor or box grater (for ricing cauliflower)
- Cutting board and chef’s knife
- Mixing bowls
Ingredients
- 1 large head cauliflower or 4 cups pre-riced cauliflower
- 1 lb boneless, skinless chicken breasts cut into 1-inch cubes
- 8 oz cremini mushrooms sliced
- 2 cups fresh baby spinach packed
- 1 medium yellow onion diced
- 3 cloves garlic minced
- 1 cup shredded mozzarella cheese divided
- 1/2 cup grated Parmesan cheese divided
- 1 cup full-fat plain Greek yogurt or sour cream
- 1/2 cup chicken broth
- 1 tsp dried thyme or 1 tbsp fresh
- 1 tsp paprika
- to taste kosher salt and black pepper
- 2 tbsp olive oil divided
Instructions
- Preheat your oven to 375°F (190°C). Prepare the cauliflower by removing the core and chopping the florets. Pulse in a food processor until it resembles rice-sized pieces, working in batches to avoid mush. You should have about 4 cups. Set aside.
- Heat 1 tablespoon of olive oil in a large, oven-safe skillet or Dutch oven over medium-high heat. Season the cubed chicken with salt and pepper. Add to the hot skillet and cook for 5-6 minutes, stirring occasionally, until browned on all sides and cooked through. Remove the chicken to a plate.
- Add the remaining tablespoon of oil to the same skillet. Add the diced onion and sliced mushrooms. Cook for 6-7 minutes, until the mushrooms have released their liquid and the onions are soft. Add the minced garlic and cook for 1 more minute until fragrant.
- Reduce heat to medium-low. Add the riced cauliflower, cooked chicken, spinach, Greek yogurt, chicken broth, thyme, paprika, half of the mozzarella, and half of the Parmesan. Stir everything together until the spinach is wilted and the mixture is well combined. Season generously with salt and pepper.
- Smooth the top of the casserole mixture. Sprinkle the remaining mozzarella and Parmesan cheese evenly over the top. Transfer the skillet to the preheated oven and bake for 20-25 minutes, until the cheese is melted, bubbly, and golden in spots.
- Carefully remove the skillet from the oven (the handle will be hot!). Let the casserole rest for 5-10 minutes before serving. This allows the creamy sauce to set slightly for perfect scooping. Garnish with fresh parsley or chives if desired.