

There’s a certain magic in the combination of peanut butter and chocolate that feels like a warm hug. Now, imagine that magic baked into a soft, sugar-crusted cookie and crowned with a perfect piece of chocolate. That’s the timeless appeal of the Hershey Kiss Cookie.
As a pastry chef, I’ve made thousands of cookies, but this classic, often called a Peanut Butter Blossom, remains a personal favorite for its simplicity, nostalgic charm, and guaranteed deliciousness. Whether you’re building a holiday cookie tray, need a lunchbox treat, or simply crave that perfect sweet-and-salty bite, this recipe delivers. I’ve refined my method over years of testing to ensure your cookies come out perfectly tender, not cakey or crumbly, with that iconic kiss nestled right in the center.
This recipe turns simple pantry staples into a beloved treat. Here’s why it’s a keeper:
- Foolproof & Family-Friendly: The method is straightforward, making it a perfect project for bakers of all levels, including kids who love to help roll the dough balls and press in the kisses.
- Perfect Texture: Through precise testing, I’ve nailed the balance of ingredients for a cookie that’s soft and slightly crumbly without being dry or greasy.
- Make-Ahead Magic: The dough chills beautifully, and baked cookies freeze well, so you can always have a batch ready to impress unexpected guests or satisfy a sudden craving.
- Endlessly Customizable: While the classic is perfect, this recipe is a fantastic canvas for creativity. I’ll share my favorite professional variations later.
- The Ultimate Crowd-Pleaser: These cookies have universal appeal. They disappear quickly from party platters and are always the most requested item in my holiday gift boxes.
Ingredients You’ll Need
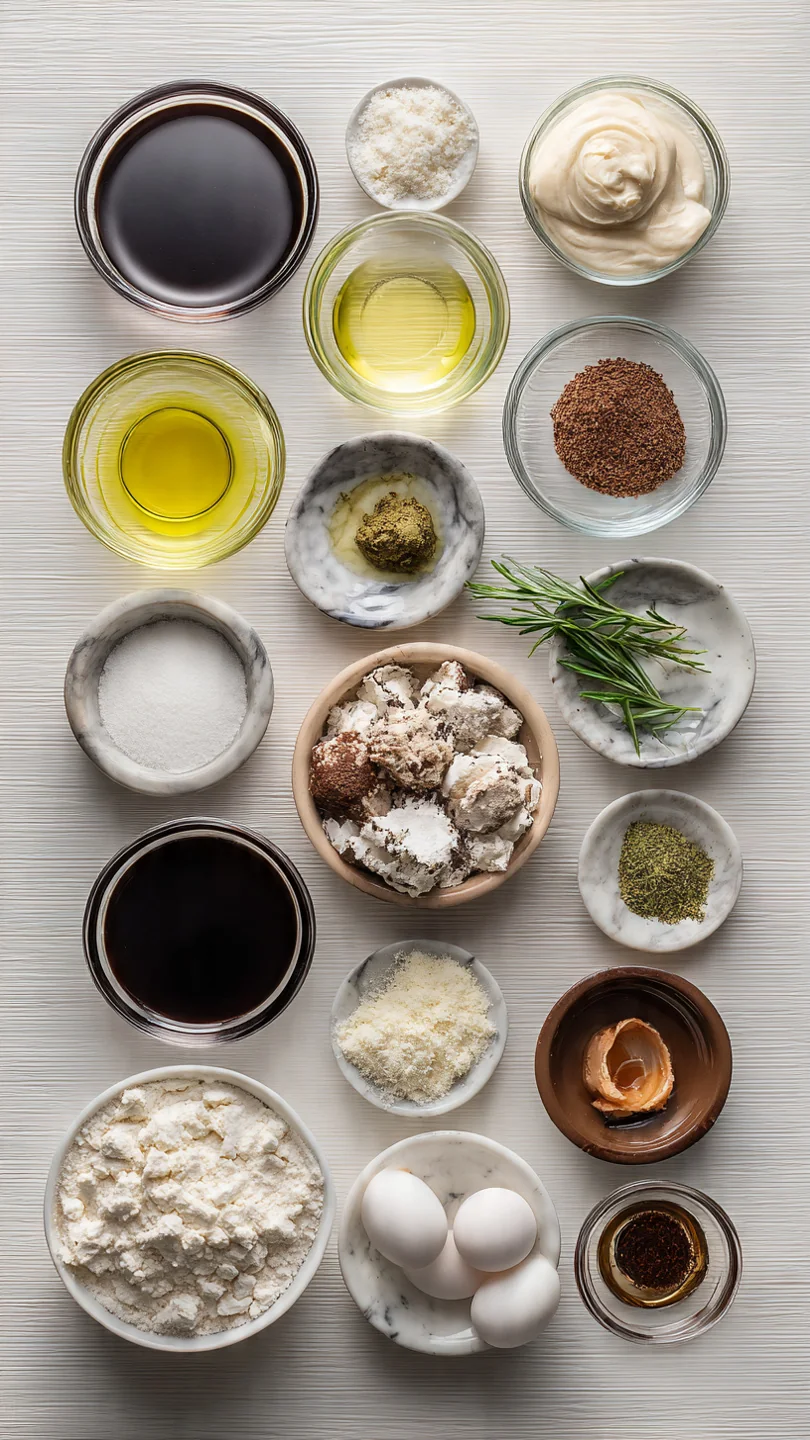
- Let’s gather our ingredients—this is where a few smart choices make all the difference. Using standard grocery store staples ensures consistent, bakery-quality results right in your own kitchen.
- Unsalted butter: Softened to true room temperature (about 65°F). It should yield slightly to pressure but not be greasy or melted. This allows for proper creaming, which traps air and gives the cookie its lift.
- Granulated & light brown sugar: The white sugar helps the cookies spread and gives a crisp edge, while the brown sugar adds moisture, chew, and a subtle molasses flavor. We’ll also use extra granulated sugar for rolling.
- Large eggs & vanilla extract: Room temperature eggs incorporate more evenly into the butter-sugar mixture. Pure vanilla extract adds a warm background note.
- Creamy peanut butter: This is key. Use a standard shelf-stable brand like Jif or Skippy. The natural, oil-separating kinds will alter the dough’s fat content and texture, leading to excessive spreading.
- All-purpose flour: Measure by spooning it into your cup and leveling it off with a knife. Packing the flour can result in dry, dense cookies.
- Baking soda & salt: The baking soda helps the cookies rise and brown. Salt balances the sweetness and enhances the peanut butter flavor.
- Hershey’s Kisses: The classic milk chocolate kiss is non-negotiable for the authentic look and taste. Have them unwrapped and ready before your cookies go into the oven.
Note: You’ll find the complete list of ingredients, along with their exact measurements, in the printable recipe card at the bottom of this post.
Kitchen Equipment Needed
You don’t need any specialty tools. A stand mixer makes creaming the butter and sugar effortless, but a sturdy hand mixer works perfectly.
- Stand mixer or hand mixer: Essential for achieving the light, fluffy creamed butter and sugar base.
- Baking sheets (2) & parchment paper: Lining your sheets prevents sticking and makes cleanup a breeze. It also promotes even browning on the bottom.
- Mixing bowls, measuring tools, and a spatula: For combining dry ingredients and scraping down the bowl.
- 1-tablespoon cookie scoop: This isn’t mandatory, but it guarantees uniform cookie size and even baking. A spoon works fine.
- Wire cooling rack: Allows air to circulate around the baked cookies, preventing the bottoms from getting soggy.
How to Make Hershey Kiss Cookies Recipe
Step 1: Cream the Butter and Sugars
This is the most important step for texture. In your mixer bowl, combine the softened butter, granulated sugar, and brown sugar. Beat on medium-high speed for a full 3 to 4 minutes.
Trust me, don’t rush this. You’re looking for the mixture to become noticeably paler, fluffy, and completely smooth. This process incorporates tiny air bubbles that act as leavening, giving your cookies a tender crumb rather than a dense one.
Step 2: Build the Wet Base
Scrape down the sides of the bowl with a spatula to ensure everything is mixed. With the mixer on low, add the eggs one at a time, letting each fully blend in before adding the next. This prevents the emulsion from breaking.
Then, mix in the vanilla and the creamy peanut butter just until combined. The mixture may look a bit curdled at this point—that’s okay and is often due to the peanut butter. It will come together when you add the flour.
Step 3: Combine Dry & Wet Ingredients
In a separate bowl, whisk together the flour, baking soda, and salt. This simple act distributes the leavening agent evenly, preventing bitter spots. Tip from me: always whisk your dry ingredients.
With the mixer on low, gradually add the flour mixture to the wet ingredients. Mix only until the last streaks of flour disappear. Overmixing develops gluten, which leads to tough cookies.
The dough will be soft. Cover the bowl and chill for 30 minutes; this firms up the butter slightly to prevent your cookies from spreading too thin in the oven.
Step 4: Shape, Sugar, and Bake
Preheat your oven to 350°F (175°C). Place about 1/2 cup of granulated sugar in a small bowl. Using your scoop or a spoon, portion the dough and roll it between your palms to form smooth balls.
Roll each ball generously in the sugar until fully coated. This creates that delightful sparkly, crackly crust. Place the balls 2 inches apart on your parchment-lined sheets.
Bake one sheet at a time on the center rack for 9-11 minutes. The cookies are done when the edges are set and just starting to turn golden, but the centers still look soft and puffy.
Step 5: The Signature Kiss and Cool
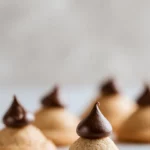
Now for the fun part! The moment you pull the baking sheet from the oven, immediately press an unwrapped Hershey’s Kiss straight down into the center of each hot cookie. Believe me, timing is everything here—the warm, soft cookie will crack beautifully around the edges and hold the kiss perfectly as it sets.
If you wait, the cookie surface will firm up and the kiss won’t adhere well. Let the cookies cool on the sheet for 5 minutes before transferring them to a wire rack to cool completely. Step back and admire your beautiful, classic creations.
A few insights from my years in professional kitchens will elevate your cookies from good to exceptional.
- Butter Temperature is Key: Your butter should be cool to the touch but soft enough that your finger leaves a clear indentation. If it’s too warm, your cookies will spread flat; if too cold, they won’t cream properly.
- The Chill Factor: Don’t skip chilling the dough. This 30-minute rest allows the flour to hydrate and the butter to firm up, giving you control over the cookie’s spread. If you’re in a rush, you can pop the shaped, sugared dough balls on the sheet into the freezer for 10 minutes.
- One Sheet at a Time: Baking two sheets at once often leads to uneven heating, causing the top sheet to brown too quickly and the bottom sheet to under-bake. For consistent results, bake in batches.
- The Press: When adding the kiss, press firmly so it sinks about halfway into the cookie. This ensures it stays put and gives you that perfect blossom look. Use a straight up-and-down motion to avoid tilting it.
Recipe Variations
- Once you’ve mastered the classic, try these delicious twists. Each has been tested in my kitchen.
- Dark Chocolate or Hugs: Swap the milk chocolate kisses for dark chocolate kisses or striped Hershey’s Hugs for a different flavor profile and visual appeal.
- Peanut Butter Cup Center: After baking, press a miniature peanut butter cup into the center instead of a kiss for an ultra-peanutty experience.
- Festive Roll: Roll the dough balls in red or green sparkling sugar, or a mix of sprinkles, for a holiday-themed look.
- Floured Thumbprint: Before baking, use your thumb or the back of a measuring spoon to make a deep indentation in the dough ball. Bake as directed, then fill the warm indentation with a kiss, a dollop of jam, or even melted chocolate.
- Double Chocolate: Replace 1/4 cup of the flour with unsweetened cocoa powder for a chocolate peanut butter cookie base.
- Gluten-Free Adaptation: Use a 1:1 gluten-free all-purpose flour blend (like Bob’s Red Mill) and ensure your other ingredients are certified gluten-free.
What to Serve With This Recipe
These cookies are stars on their own but also play well with others. For a classic cookie platter, pair them with shortbread, snickerdoodles, and a rich chocolate crinkle cookie. They’re perfect with a cold glass of milk, a hot cup of coffee, or even a dessert wine like a tawny port.
For a holiday party, create a cookie-decorating station with these as the base and bowls of different kiss varieties, drizzled melted chocolate, and chopped nuts for guests to customize. They also make wonderful edible gifts—tie a few in a cellophane bag with a ribbon for a heartfelt present.
Storage & Make-Ahead Instructions
- Proper storage keeps your cookies tasting fresh-baked.
- Room Temperature Storage: Once completely cooled, store cookies in a single layer in an airtight container at room temperature for up to 5 days. Place parchment paper between layers if stacking is necessary.
- Freezing Dough: You can freeze the shaped, sugared dough balls on a parchment-lined sheet until solid, then transfer to a freezer bag. Bake directly from frozen, adding 1-2 minutes to the baking time.
- Freezing Baked Cookies: Freeze fully cooled cookies in a single layer on a sheet, then pack into a freezer-safe container with parchment between layers. They will keep for up to 3 months. Thaw at room temperature.
- Important Note: The chocolate kiss may develop a white bloom (fat crystallization) if frozen, which is harmless but can affect appearance. For best visual results, freeze the cookies without the kiss and add it to thawed, briefly warmed cookies.
Frequently Asked Questions
Q: Can I use natural peanut butter?
A: I don’t recommend it for this specific recipe. Natural peanut butters have a different oil content and consistency, which often causes the cookies to spread too much and can result in a greasy, crumbly texture. Stick with a stabilized, creamy brand for guaranteed results.
Q: My cookies spread too much and became flat. What happened?
A: This is usually due to butter that was too warm or dough that wasn’t chilled. Ensure your butter is just softened, not melted, and don’t skip the 30-minute chill. Also, double-check your baking soda isn’t expired.
Q: Can I make the dough ahead of time?
A: Absolutely. You can cover and refrigerate the dough for up to 3 days. Let it sit at room temperature for 15-20 minutes to soften slightly before scooping and rolling.
You can also freeze the dough balls for up to 3 months.
Q: The chocolate kiss completely melted into the cookie. Why?
A: This happens if the cookie is over-baked, making it too hot and soft to support the kiss. Ensure you remove the cookies when the centers are still soft and puffy, not fully set. The residual heat is enough to soften the kiss slightly without melting it.
Q: Can I double this recipe?
A: Yes, it doubles beautifully. Just be sure to use a very large mixing bowl or mix in two batches to avoid overworking the dough. You’ll likely need to bake in more batches, so plan your time accordingly.
Q: Are there any nut-free alternatives?
A: For a nut-free version, you can try using sunflower seed butter as a 1:1 substitute for the peanut butter. Be aware that it may cause the baked cookies to have a greenish tint (a harmless chemical reaction with the baking soda), but the taste will be great.
Q: How do I keep the sugar coating from getting sticky?
A: Make sure the cookies are completely cool before storing them in an airtight container. Any residual warmth will create condensation, dissolving the sugar. Adding a food-safe silica gel packet to the container can also help absorb excess moisture.
Final Thoughts
The Hershey Kiss Cookie is more than just a recipe; it’s a bite of edible nostalgia that’s simple enough for a weeknight and special enough for the most festive table. My goal with this guide was to share not just a list of steps, but the why behind them—the techniques that ensure your batch is the best it can be. From the careful creaming of the butter to the perfectly timed press of the chocolate, each detail contributes to that ideal soft texture and classic look.
I hope this recipe becomes a trusted staple in your baking repertoire, creating sweet memories for years to come. If you try it, I’d love to hear how it turned out! Share your creations online and tag me, and don’t forget to explore my site for more tested, professional recipes designed for your home kitchen success.
Happy baking
Classic Hershey Kiss Cookies (Peanut Butter Blossoms)
Equipment
- Stand mixer or hand mixer
- Large and medium mixing bowls
- Measuring cups and spoons
- Baking sheets (2)
- Parchment paper or silicone baking mats
- 1-tablespoon cookie scoop (optional but helpful)
- Wire cooling rack
Ingredients
- 1 cup Unsalted butter softened to room temperature (2 sticks)
- 1 cup Granulated sugar plus extra for rolling
- 1 cup Light brown sugar packed
- 2 Large eggs room temperature
- 1 tsp Vanilla extract pure
- 1 cup Creamy peanut butter not natural or oily style
- 3 cups All-purpose flour spooned and leveled
- 2 tsp Baking soda
- 1/2 tsp Salt
- 36 Hershey’s Kisses milk chocolate, unwrapped
Instructions
- Preheat your oven to 350°F (175°C) and line two large baking sheets with parchment paper. In the bowl of a stand mixer fitted with the paddle attachment, cream together the softened butter, granulated sugar, and brown sugar on medium-high speed for 3-4 minutes, until light, fluffy, and pale in color. This step is crucial for creating the cookie’s tender texture.
- Scrape down the bowl. With the mixer on low, add the eggs one at a time, mixing until fully incorporated after each. Add the vanilla extract and creamy peanut butter, mixing just until combined. In a separate bowl, whisk together the flour, baking soda, and salt to ensure even distribution.
- Gradually add the dry ingredients to the wet mixture with the mixer on low speed. Mix only until no streaks of flour remain; overmixing will lead to tough cookies. The dough will be soft but not sticky. Cover the bowl and chill the dough in the refrigerator for 30 minutes. This prevents excessive spreading.
- Place about 1/2 cup of granulated sugar in a small bowl. Using a 1-tablespoon cookie scoop or spoon, portion the dough and roll into smooth balls. Roll each ball in the sugar to coat completely, then place them 2 inches apart on the prepared baking sheets.
- Bake one sheet at a time in the center of the preheated oven for 9-11 minutes. The cookies are done when the edges are just set and lightly golden, but the centers still look soft and puffy. They will not be browned all over. Remove from the oven and immediately press an unwrapped Hershey’s Kiss firmly into the center of each hot cookie. The cookie will crack around the edges—this is perfect! Let cool on the sheet for 5 minutes before transferring to a wire rack to cool completely.