

Man, I still remember the first time I tried making Homemade Fried Ice Cream at home. It was a hot summer afternoon, and I was desperate to impress my in-laws at a family barbecue. I’d seen it on a menu at a local diner and thought, “How hard can it be?” Spoiler: I nearly turned my kitchen into a sticky, melty disaster, but after a few tries, I’ve got this recipe down to a science, and now it’s a family favorite.
Seriously, there’s something magical about that crispy, warm shell paired with the cold, creamy center. My kids go nuts for it, and honestly, I do too. If you’ve been curious about whipping up Homemade Fried Ice Cream yourself, stick with me—I’m gonna walk you through every step, plus throw in some wild variations to keep things exciting.
Why You’ll Love This Recipe
Let me tell ya, I’ve found that Homemade Fried Ice Cream is a total crowd-pleaser. It’s not just dessert; it’s an experience! The contrast of hot and cold, crunchy and smooth, is something that hooks everyone from the first bite.
In my kitchen, this recipe has become a go-to for special occasions or even just a random Wednesday when I need a pick-me-up. It looks fancy, but trust me, it’s doable even if you’re not a pro chef. Plus, you can tweak it a million ways to fit your vibe—I’ll get into that soon!
Ingredients List
When it comes to making Homemade Fried Ice Cream, the ingredients are pretty straightforward, but I’ve got my preferences after testing this out over the years. I usually buy good-quality vanilla ice cream as my base (none of that cheap stuff that tastes like frozen air, ya know?). And for the coating, I’m all about using cornflakes for that perfect crunch, though I’ve got other ideas if you wanna switch it up.
Here’s everything you’ll need to make this treat for about 6 servings. I’ve broken it down into components for clarity, ‘cause let’s be real, organization saves the day in the kitchen.
Ice Cream Base
- 3 cups (750ml) vanilla ice cream, softened just enough to scoop
- 1 teaspoon vanilla extract, for an extra flavor punch (optional, but I love it)
Coating
- 3 cups (180g) cornflakes, crushed into coarse crumbs for maximum crunch
- 1/2 cup (100g) granulated sugar, to sweeten the crust a bit
- 1 tablespoon ground cinnamon, ‘cause it’s a game-changer with ice cream
- 2 large eggs, beaten, to help the coating stick
- 1/4 cup (60ml) milk, mixed with the eggs for a smoother batter
For Frying
- Vegetable oil, enough for deep frying (about 2-3 cups depending on your pot)
- Optional: 1/4 cup (60g) butter, if you’re pan-frying instead (I’ve done both!)
I tend to keep extra cornflakes on hand ‘cause I’ve been known to munch on ‘em while cooking (guilty!). Adjust the quantities if you’re making a bigger batch, but this setup works like a charm for a small crowd.
Variations
Alright, let’s talk about switching things up with Homemade Fried Ice Cream, ‘cause I’ve experimented with a ton of flavors over the years. I love how versatile this dessert is—you can go classic or get a little crazy. My family’s got their faves, and I’ve got mine, so here are some variations I’ve tried and loved. Mix and match to find your perfect twist on Homemade Fried Ice Cream!
- Chocolate Bliss: Swap vanilla for chocolate ice cream and add 2 tablespoons of cocoa powder to the coating mix for a double-choco hit. I tried this once for a birthday party, and it was gone in minutes!
- Nutty Crunch: Mix 1/2 cup chopped pecans or almonds into the crushed cornflakes. It’s a texture party, and my husband can’t get enough of it.
- Cookie Lover’s Dream: Use crushed vanilla wafers instead of cornflakes for the coating. My kids always ask for this version—it’s like a dessert sandwich.
- Tropical Escape: Go for coconut ice cream and roll in shredded coconut after the cornflake layer. I’m obsessed with this summery vibe.
- Spicy Kick: Add 1/4 teaspoon chili powder to the cinnamon-sugar mix for a subtle heat. Sounds weird, but trust me, it’s amazing.
- Fruit Burst: Use strawberry or mango ice cream for a fruity twist. I’ve paired this with fresh berries on top—chef’s kiss!
- Coffee Buzz: Swap in coffee-flavored ice cream for a grown-up treat. I make this when I need a late-night pick-me-up.
These are just the start! Play around with Homemade Fried Ice Cream and make it your own—I’m dying to hear what combos you come up with.
Servings and Timing
If you’re wondering how much this recipe makes or how long it’ll take, I’ve got ya covered. In my experience, this batch of Homemade Fried Ice Cream serves about 6 people (or fewer if you’ve got big dessert lovers like mine!). Here’s the breakdown on timing, based on how it usually goes in my kitchen.
- Prep Time: 30 minutes (plus a few hours of freezing)
- Cook Time: 5 minutes per batch
- Total Time: About 35 minutes active, plus freezing
It’s not a quick whip-up, but the wait is worth it. I usually prep the ice cream balls the night before to save time.
Step-by-Step Instructions
Let’s dive into making Homemade Fried Ice Cream, step by step. I’m gonna share exactly how I do it, including a few tricks I’ve picked up after many, many batches. Grab a coffee (or a snack), and let’s get rolling!
Step 1: Scoop and Freeze
First, scoop your ice cream into 6 equal balls—about 1/2 cup each works for me. I use a cookie scoop to keep ‘em uniform, though they don’t have to be perfect (mine never are!). Place them on a parchment-lined tray and pop ‘em in the freezer for at least 2 hours, or until they’re rock solid. This step is key to avoid a melty mess later.
Step 2: Prep the Coating
While they’re freezing, crush your cornflakes in a big ziplock bag with a rolling pin—great stress reliever, by the way! Mix the crumbs with sugar and cinnamon in a shallow bowl. In another bowl, whisk the eggs and milk together. Having these ready makes the Homemade Fried Ice Cream process so much smoother, trust me.
Step 3: Coat the Ice Cream
Once the balls are frozen, roll each one in the cornflake mix, then dip in the egg mixture, and roll in the crumbs again for a double coat. I’ve learned this extra layer keeps everything intact during frying. Freeze them again for another hour to lock in that coating. I’ve skipped this step before, and let’s just say it wasn’t pretty.
Step 4: Fry ‘Em Up
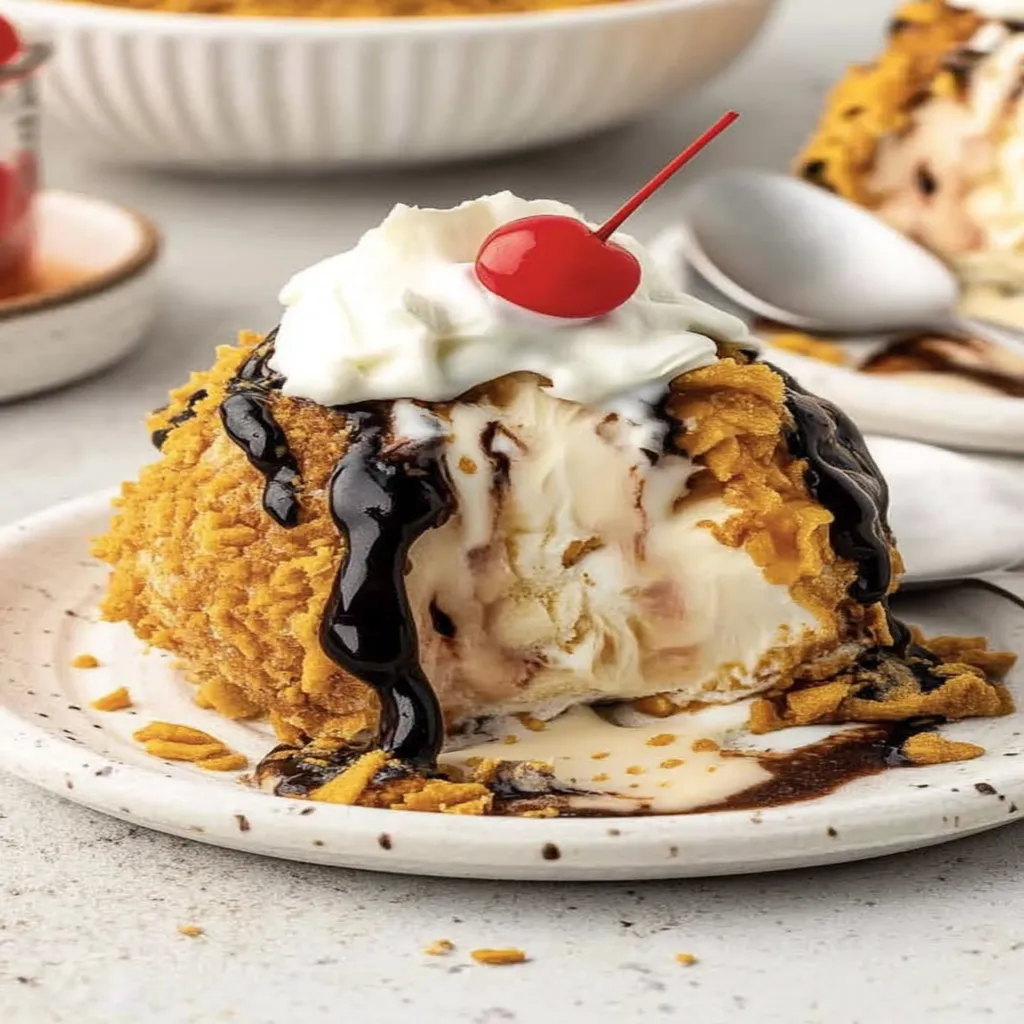
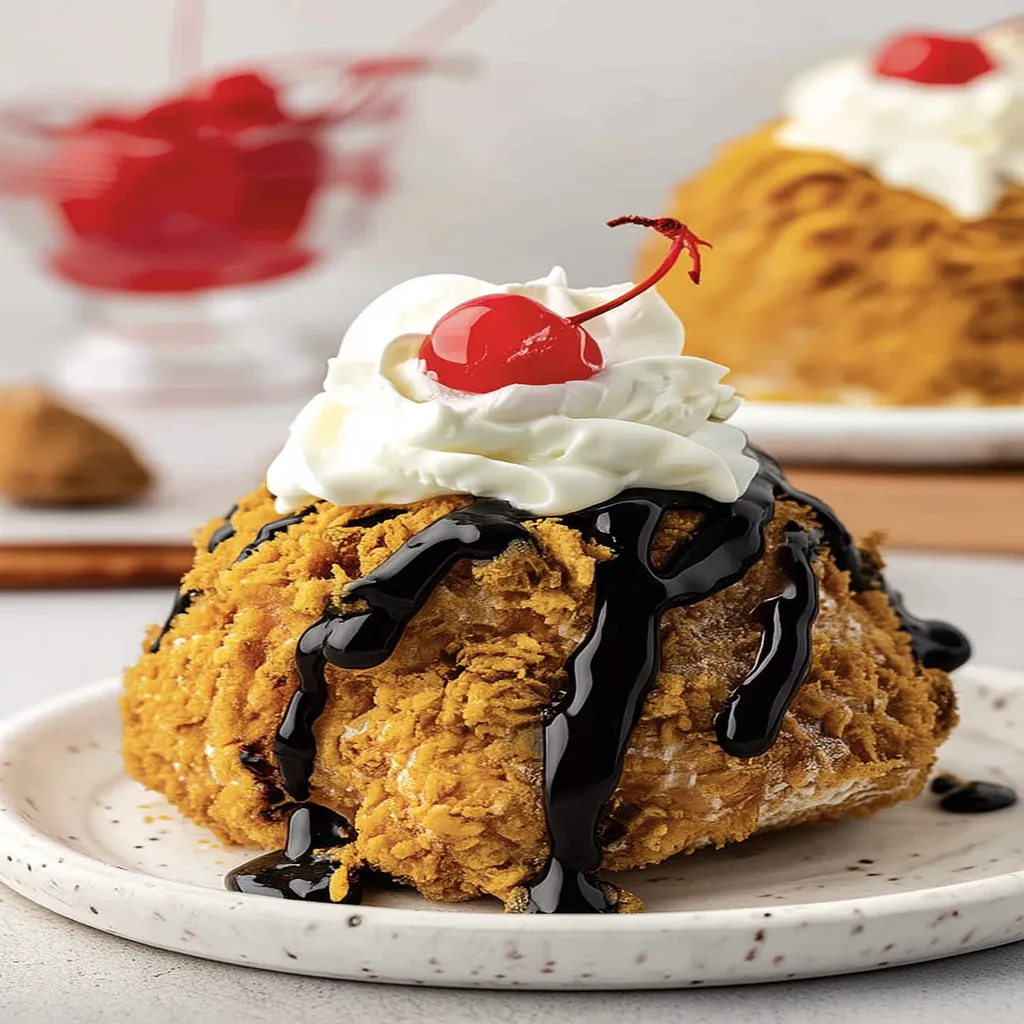
Heat your oil to 375°F (190°C) in a deep pot or fryer—I use a thermometer ‘cause eyeballing it’s a gamble. Fry each ball for just 15-20 seconds until golden; don’t overdo it or you’ll lose that icy center. I fry in small batches to keep the oil temp steady. Homemade Fried Ice Cream deserves that quick, hot bath for the best crunch!
Drain ‘em on paper towels and serve right away. I’ve burned my tongue rushing to eat these, but that crispy shell on Homemade Fried Ice Cream is worth the risk. You’ve got this!
Nutritional Information
I’m not gonna lie, Homemade Fried Ice Cream isn’t exactly a health food, but I think it’s good to know what you’re digging into. I’ve crunched the numbers (pun intended) for a single serving, based on my recipe. Here’s the breakdown, roughly speaking.
- Calories: 380 per serving
- Fat: 22g
- Protein: 5g
- Carbohydrates: 40g
- Sodium: 200mg
These numbers can shift depending on your ice cream or frying oil, but in my experience, it’s a fair estimate. Totally a splurge, but hey, life’s too short to skip dessert!
Healthier Alternatives
If you’re looking to lighten up Homemade Fried Ice Cream, I’ve got some swaps that still keep the wow factor. I’ve tried these myself when I’m watching my waistline, and they’re pretty darn good. Here are a few tweaks for a less guilty take on Homemade Fried Ice Cream.
- Low-Fat Ice Cream: Swap regular for low-fat or frozen yogurt. It’s not as rich, but still tasty.
- Baked, Not Fried: Skip the oil and bake the coated balls at 400°F (200°C) for 3-4 minutes. I’ve done this, and while it’s not as crispy, it cuts the fat big time.
- Sugar Substitute: Use a stevia blend instead of granulated sugar in the coating. I’m not a huge fan, but it works if you’re cutting sugar.
These options let you enjoy the fun without overindulging. Gotta balance those cravings sometimes!
Serving Suggestions
I love getting creative with how I serve Homemade Fried Ice Cream, ‘cause presentation can really amp up the excitement. At my last dinner party, I got so many “oohs” and “aahs” just from the way I plated it. Here are some ideas for serving Homemade Fried Ice Cream that I’ve found work like a charm.
- Classic Drizzle: Top with a swirl of hot fudge or caramel sauce. It’s my go-to for that extra decadence.
- Berry Blast: Add a handful of fresh strawberries or raspberries on the side. The tartness cuts through the richness beautifully.
- Whipped Cream Cloud: Dollop on some whipped cream and a sprinkle of cinnamon. It’s simple but looks so fancy!
However you serve it, just make sure it’s fresh from the fryer for that hot-cold magic. Your guests will flip!
Common Mistakes to Avoid
I’ve made plenty of blunders while perfecting Homemade Fried Ice Cream, so let me save you some heartache. Trust me on this one—I’ve learned the hard way! Here are the biggest pitfalls I’ve fallen into with Homemade Fried Ice Cream, and how to dodge ‘em.
- Not Freezing Long Enough: If the ice cream isn’t rock hard before frying, it’ll melt everywhere. I’ve had soupy disasters because I rushed this step.
- Oil Too Cool: If your oil isn’t hot enough, the coating gets soggy instead of crispy. I’ve ruined batches by not checking the temp—use a thermometer!
- Overcrowding the Pot: Frying too many at once drops the oil temp. Guilty as charged, and it’s a mess to fix.
Take it slow and steady, and you’ll be golden—literally!
Storing Tips
Got leftovers or wanna prep Homemade Fried Ice Cream ahead? I’ve found a couple of ways to store these babies without losing that magic. It’s not quite the same as fresh, but it works in a pinch.
- Freezer (Pre-Fried): Keep coated, unfried balls in the freezer for up to a week in an airtight container. Just fry when ready.
- Post-Fried: I don’t recommend storing after frying— they lose the crisp. If you must, wrap tightly and refry briefly to crisp up.
I usually just make what I need, ‘cause fresh is best with this one. You’ll thank me later!
FAQs
Got questions about Homemade Fried Ice Cream? I’ve heard ‘em all, and I’m happy to help with the stuff I’ve figured out over time. Here are some common queries I get about making Homemade Fried Ice Cream, answered straight from my kitchen to yours.
Can I make this recipe ahead of time?
Absolutely! Scoop and coat the ice cream balls up to a week in advance, then store ‘em in the freezer. Just fry ‘em up right before serving for that fresh Homemade Fried Ice Cream crunch.
What if I don’t have a deep fryer?
No worries—I’ve pan-fried these with a shallow layer of oil in a skillet. It works fine, just flip ‘em carefully to brown all sides. Takes a bit longer, but still tasty.
Can I use a different cereal for the coating?
Yep, I’ve swapped cornflakes for crushed Frosted Flakes or even Cinnamon Toast Crunch. Adds a sweet twist! Experiment and see what you like best.
How do I keep the ice cream from melting while frying?
Freeze, freeze, freeze! Make sure they’re solid before they hit the oil, and don’t fry longer than 20 seconds. I’ve had meltdowns (literally) when I skipped this.
Is there a no-fry option?
Sure is—bake ‘em at 400°F for a few minutes like I mentioned earlier. Not as crispy, but it’s a solid backup if frying’s not your thing.
What oil is best for frying?
I stick with vegetable oil or canola for a neutral taste and high smoke point. Peanut oil works too if you’ve got no allergies in the house.
Can I use dairy-free ice cream?
Totally! I’ve used coconut-based ice cream, and it fries up just fine. Just double-check it freezes hard enough to hold shape.
Why does my coating fall off?
Probably ‘cause the egg wash didn’t stick well or the oil wasn’t hot enough. I’ve had this issue—make sure to double-coat and get that oil to 375°F before frying.
Conclusion
Well, there ya have it—everything I’ve learned about whipping up Homemade Fried Ice Cream at home. It’s such a fun treat to make, and I hope my tips and tricks help you nail your own batch of Homemade Fried Ice Cream without the flops I went through. Drop a comment if you try it or come up with a cool variation—I’m all ears! Now, go get frying and enjoy every crispy, creamy bite.