
There’s a quiet moment of panic in many kitchens when someone craves a poached egg but doesn’t want to deal with a pot of simmering water, the swirling, the stray wisps of egg white, and the inevitable timer-watching. I’ve been there during busy brunch services and on rushed weekday mornings. What if I told you the secret to a flawless, restaurant-style poached egg is hiding in plain sight, and it takes about 90 seconds?
Forget everything you think you know about poaching. Your microwave is about to become your favorite breakfast tool. This method delivers a tender, set white cradling a gloriously runny yolk, with none of the fuss.
It’s a small culinary revolution for one.
The benefits of this method go far beyond just speed. It’s a complete rethinking of a classic technique.
- Unbeatable Speed: From craving to plate in under two minutes, this is the ultimate fast, high-protein breakfast or snack.
- Consistently Perfect: Eliminates the variables of stovetop poaching—no worrying about water temperature or vortex strength. The microwave provides even, controlled heat.
- Minimal Cleanup: You use one mug and a spoon. There’s no pot to scrub or splattered stovetop to clean.
- Single-Serve Simplicity: Designed for one, making it perfect for solo meals without waste or the need to scale.
- Diet-Friendly Foundation: Naturally low-carb, keto, gluten-free, and vegetarian, serving as a perfect base for countless healthy meals.
- Gateway Technique: Mastering this builds confidence and opens the door to easy, impressive-looking meals any time of day.
Ingredients You’ll Need
- Let’s gather our ingredients—this is the shortest grocery list you’ll ever see for a technique that feels so luxurious. The magic is in the method, not a long list of components.
- Fresh Large Egg: This is non-negotiable for the best results. A very fresh egg has a thicker, more viscous white that holds together tightly around the yolk, giving you that classic poached egg “teardrop” shape.
- Water: Plain tap water is fine. Using hot water from the tap simply reduces the microwave time by a few seconds, getting you to breakfast even faster.
- White Vinegar or Lemon Juice (Optional): A teaspoon of acid helps the proteins in the egg white coagulate more quickly and firmly. It can make the white slightly more compact, which is helpful, but I’ve tested it extensively both ways—you can absolutely make a beautiful poached egg without it.
- Salt & Black Pepper: For finishing. Seasoning after cooking is key, as salt in the water can break down the egg white proteins and create frayed edges.
Note: You’ll find the complete list of ingredients, along with their exact measurements, in the printable recipe card at the bottom of this post.
Kitchen Equipment Needed
You likely have everything you need already. The goal is simplicity.
- A Microwave-Safe Mug or Ramekin: This is your poaching vessel. Choose something that holds at least 8 ounces (1 cup) to allow enough water to fully submerge the egg. A wider, shallow bowl will work but may produce a flatter egg.
- A Slotted Spoon: Essential for gently lifting the finished egg out of the hot water without breaking it.
- A Microwave-Safe Plate or Saucer: Used to loosely cover the mug. This contains any potential splatters and helps trap steam, cooking the top of the egg evenly. Don’t use a tight seal.
How to Make Microwave Poached Eggs Recipe
Step 1: Prepare Your Poaching Station
Fill your chosen microwave-safe mug with about 1/2 cup of hot tap water. If you’re using the vinegar or lemon juice, add it now and give it a quick stir. The vessel choice matters—a standard coffee mug is perfect.
Believe me, taking 10 seconds to get your station ready makes the whole process smooth and stress-free.
Step 2: Crack with Care (The Secret Step)
Here’s the professional tip that guarantees no broken yolks: never crack the egg directly into the poaching water. Instead, crack it into a separate small bowl, custard cup, or even a ladle. This serves two critical purposes: it ensures no shell fragments make it into your egg, and it allows you to gently introduce the egg to the water for a perfect shape.
Step 3: Create the Vortex and Gently Lower
Using a spoon, stir the water in your mug to create a gentle whirlpool in the center. The goal is a smooth swirl, not a raging vortex. Now, slowly lower the lip of the bowl with your cracked egg into the water and let the egg slide out into the center of the swirl.
The moving water will help the white envelop the yolk neatly. Tip from me: do this step confidently but gently.
Step 4: Microwave with Precision
Carefully place the mug in the center of your microwave. Loosely cover it with a plate—this isn’t for sealing, just for catching splatters. Microwave on HIGH for 60 seconds.
This is your baseline. Trust me, microwaves vary in power, so starting here and checking is the key to a runny yolk. Over-microwaving is the only way to ruin this.
Step 5: Check and Finish Cooking
After 60 seconds, look at the egg. The white should be completely set and opaque. If you see any significant areas of clear, runny white, microwave in additional 15-second intervals.
It usually takes 75-90 seconds total. The short bursts are non-negotiable for perfect control. Now comes the satisfying part: using your slotted spoon, lift the beautiful poached egg from the water.
Step 6: Drain, Season, and Serve Immediately
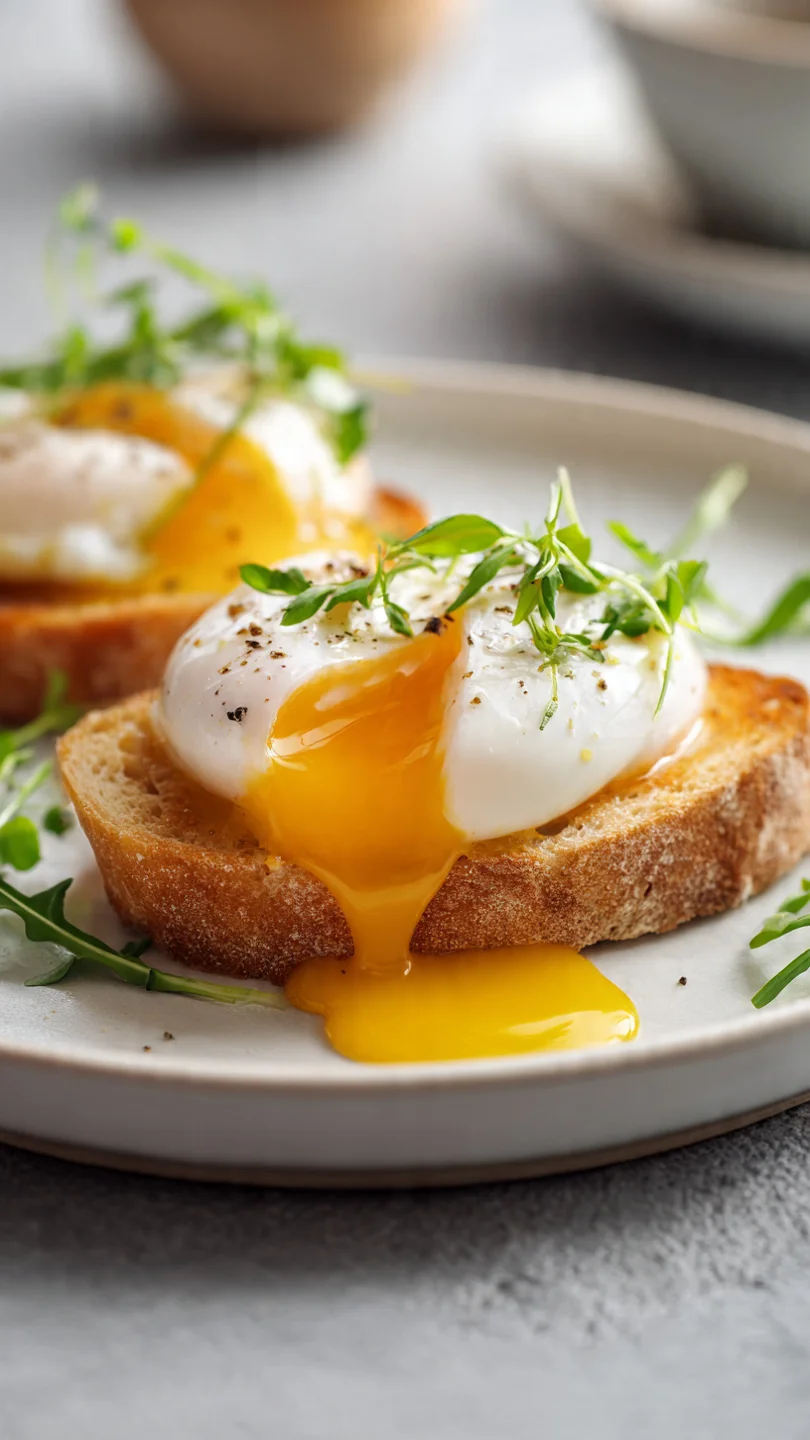
Let the egg drain for a few seconds over the mug, then transfer it to a plate lined with a paper towel to blot away any excess water. Season it right away with a pinch of flaky salt and a grind of black pepper. Step back and admire your 90-second masterpiece.
Serve it instantly while the yolk is at its peak liquidity.
A few insights from years of testing will elevate your microwave poaching from good to absolutely foolproof.
- Freshness is Key: The single biggest factor in a tidy poached egg is the age of the egg. A very fresh egg has thick albumen (egg white) that holds its shape. Older eggs have thinner whites that spread more.
- The Power of the Poke: If you’re unsure about doneness after microwaving, gently poke the white with the tip of your spoon. It should feel firm, not jiggly or liquid. The yolk underneath will feel soft.
- Water Level Wisdom: Ensure there’s enough water to completely cover the egg by at least a 1/2 inch. Too little water and the top of the egg won’t cook through; too much and it may take longer and increase boil-over risk.
- Altitude Adjustment: If you live at a high altitude, water boils at a lower temperature. You may need to add 10-15 seconds to your cooking time to achieve the same level of doneness.
- Batch Cooking Caution: I recommend making eggs one at a time. Trying to poach two eggs in one mug often leads to uneven cooking and tangled whites. For multiple servings, use multiple mugs and microwave them sequentially.
Recipe Variations
- Once you’ve mastered the basic technique, the customization possibilities are endless. Here are some of my favorite tested variations.
- Herb-Infused: Add a pinch of dried herbs (like chives, dill, or tarragon) or a small fresh herb sprig to the water before microwaving for a subtle, aromatic flavor.
- The “Egg-in-a-Hole”: Lightly butter your mug, add a tablespoon of your favorite salsa, pico de gallo, or even a spoonful of marinara sauce. Crack the egg on top and microwave as directed. You get a flavorful, saucy poached egg.
- Asian-Inspired: Replace the water with a 50/50 mix of water and low-sodium chicken or dashi broth. Add a drop of toasted sesame oil to the water before poaching. Serve over rice.
- Cheesy Finish: After removing the poached egg and draining it, place it in a clean, warm bowl and sprinkle with finely grated Parmesan or sharp cheddar. The residual heat will melt the cheese deliciously.
- Spicy Kick: Add a pinch of red pepper flakes or a dash of hot sauce to the poaching water for an egg with a built-in zing.
What to Serve With This Recipe
A perfectly poached egg is the crown jewel of so many dishes. Its runny yolk acts as a luxurious sauce.
- The Classic: On a toasted, buttered English muffin or slice of artisan sourdough, perhaps with a slice of ham or Canadian bacon for Eggs Benedict vibes.
- Healthy Bowl: Over a bowl of steamed greens (spinach, kale), sliced avocado, and a sprinkle of everything bagel seasoning or red pepper flakes.
- Heartier Base: On top of a crispy hash brown patty, a bed of creamy polenta, or a scoop of warm quinoa or farro for a satisfying grain bowl.
- Lunch or Light Dinner: Atop a savory vegetable fritter (like zucchini or sweet potato), a black bean burger, or even a warm lentil salad.
Storage & Make-Ahead Instructions
- Poached eggs are truly best served immediately. However, with the right technique, you can plan ahead.
- Not Recommended for Storage: The texture of a reheated poached egg becomes rubbery and the yolk solidifies. I do not recommend making these ahead to store and reheat.
- The “Almost” Make-Ahead: You can have everything ready to go. In the morning, have your mug, water, and a bowl for cracking measured and set out. The actual cooking is so fast that prepping the components is the best time-saver.
- For Meal Prep: If you must prep, cook the eggs to a slightly softer stage (about 60-70 seconds), then immediately transfer them to an ice water bath to stop the cooking. Store submerged in cold water in a sealed container in the fridge for up to 24 hours. To serve, reheat very gently in a bowl of hot (not boiling) water for 1-2 minutes. Manage your expectations—the texture will be different.
Frequently Asked Questions
Q: Can I make more than one egg at a time in the microwave?
A: I strongly recommend against poaching multiple eggs in the same mug, as they will cook unevenly and stick together. For multiple servings, use individual mugs and microwave them one after the other. The process is so quick that this is still faster than stovetop.
Q: My egg exploded! What happened?
A: This is almost always caused by overcooking or forgetting to pierce the yolk if you’re making a “coddled” style egg in a sealed container. For this open-water poaching method, explosions are rare, but can happen if the egg is cooked far too long. Always use the recommended times and check early.
Q: Is it safe to poach an egg in the microwave?
A: Yes, when done correctly. The water gets hot enough to cook the egg thoroughly, eliminating pathogens. The key is ensuring the egg white is fully set and opaque before you eat it.
Using a microwave-safe container is also crucial.
Q: Why did my egg white get tough and rubbery?
A: This is a sure sign of overcooking. Microwave power varies dramatically. If your egg is rubbery, reduce your initial cook time to 50 seconds, then check and proceed with 10-second intervals.
The goal is the minimum time needed to set the white.
Q: Can I use this method without any vinegar or lemon juice?
A: Absolutely. The acid helps coagulate the proteins for a slightly neater shape, but it’s not mandatory. A very fresh egg will hold its shape well in plain hot water.
I often skip it for a purer egg flavor.
Q: What’s the best way to get the egg out of the mug?
A: A slotted spoon is the ideal tool. Gently slide it under the egg, lift straight up, let it drain over the mug for a moment, then transfer to your plate or paper towel. Avoid using a fork, which can puncture the yolk.
Q: Can I use cold water instead of hot tap water?
A: You can, but it will simply add 15-20 seconds to your total microwave time. The egg needs to heat the water to a simmer before it can begin to cook in earnest. Using hot water jump-starts the process.
Q: My yolk broke when I cracked it. Can I still poach it?
A: You can, but it won’t be a classic poached egg with a runny center. It will cook more like a scrambled egg in water. For the best presentation, it’s worth cracking a new egg if the first one breaks.
Final Thoughts
This microwave poached egg method is more than just a kitchen shortcut; it’s a liberation from the idea that certain techniques are too fussy for everyday life. In under two minutes, you can have a protein-rich, elegant component that elevates toast, salads, and bowls from simple to special. It’s the kind of technique that builds kitchen confidence—once you realize how easy it is, you’ll find yourself adding a poached egg to meals you never thought you would.
I encourage you to try it exactly as written the first time, then start playing with the variations. Find your perfect timing for your specific microwave. That moment when you lift out a perfectly formed, tender egg with a liquid gold center is genuinely satisfying.
Give it a try this weekend, or better yet, on a busy Tuesday morning. I’d love to hear how it goes for you—tag me on social media or leave a comment below with your creations! Now, go conquer your breakfast.

Microwave Poached Eggs
Equipment
- Microwave-safe mug, ramekin, or small bowl (at least 8 oz capacity)
- Slotted spoon
- Microwave-safe plate for covering
Ingredients
- 1 large Egg Fresh, cold eggs work best for a tight white.
- 1/2 cup Water Hot tap water is ideal to speed up the process.
- 1 tsp White vinegar or lemon juice Optional, but helps the egg white coagulate faster.
- Salt and freshly ground black pepper For seasoning.
Instructions
- Fill a microwave-safe mug, ramekin, or small bowl with 1/2 cup of hot tap water. If using, add 1 teaspoon of vinegar or lemon juice. The vessel should be deep enough to fully submerge the egg.
- Crack your egg into a separate small bowl or cup. This is a crucial step—it prevents a broken yolk from ruining your poaching water and allows you to gently slide the egg in for a perfect shape.
- Using a spoon, create a gentle whirlpool in the center of the hot water in your mug. Slowly slide the cracked egg from its bowl into the center of the vortex. The swirling water helps the white wrap neatly around the yolk.
- Carefully place the mug in the microwave. Cover it loosely with a microwave-safe plate or saucer to prevent splatters. Microwave on high power for 60 seconds.
- After 60 seconds, check the egg. The white should be fully set and opaque. If it still looks watery or translucent, microwave in 15-second intervals until done. Trust me, these short bursts prevent overcooking. Total time is typically 75-90 seconds.
- Using a slotted spoon, carefully lift the poached egg out of the water. Let it drain for a moment over the mug, then transfer to a plate lined with a paper towel to absorb excess moisture. Season immediately with salt and pepper and serve.