
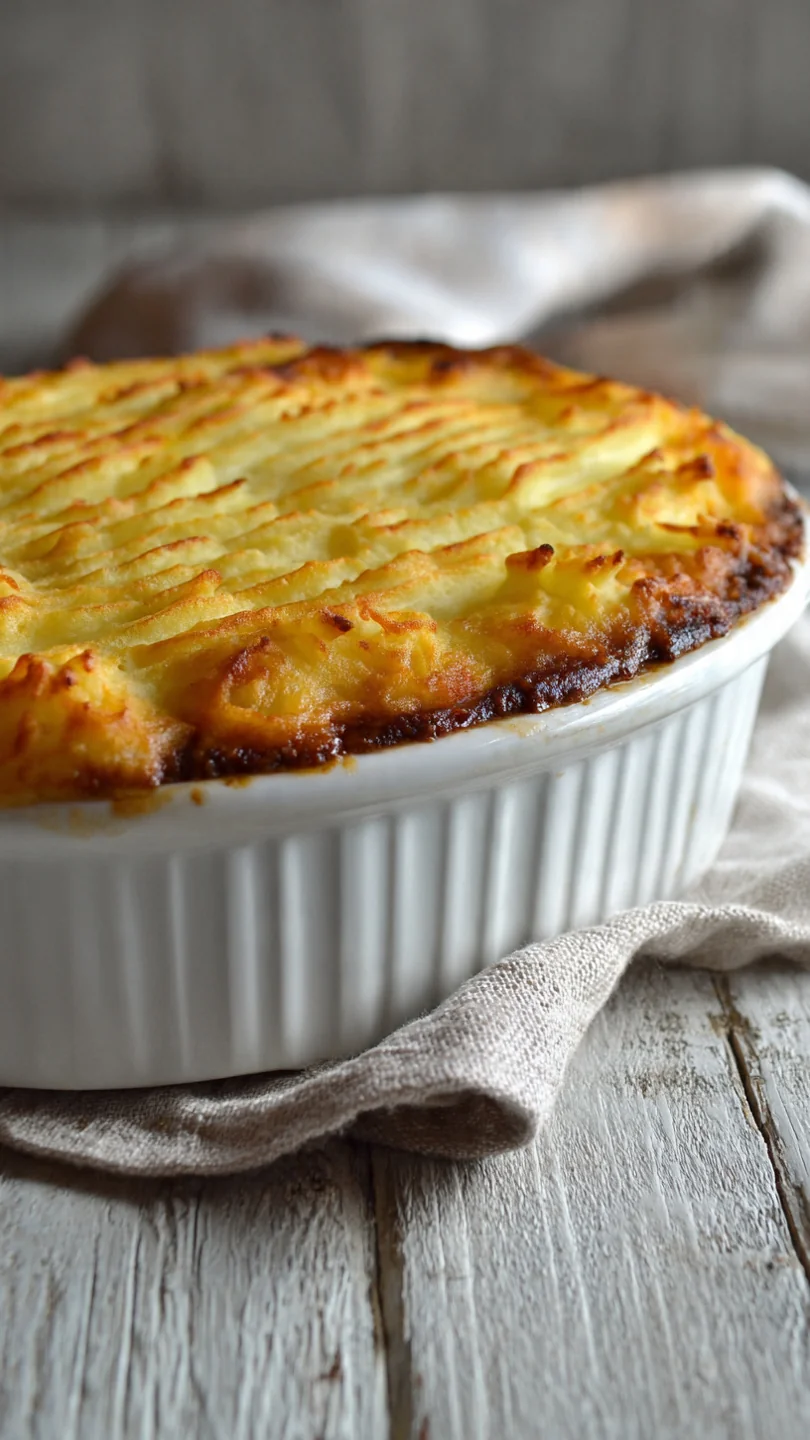
There’s a particular kind of magic in a dish that emerges from the oven golden, bubbling, and radiating a warmth that fills the entire kitchen. For me, that dish has always been a proper cottage pie. It’s not just dinner; it’s a hug on a plate.
This recipe is the culmination of years of tasting, testing, and tweaking—a version that honors the humble, hearty tradition of the dish while applying professional kitchen techniques to ensure you get a deeply flavorful filling and a perfectly textured topping every single time. You’ll end up with a savory, rich beef and vegetable base under a blanket of creamy, golden mashed potatoes. It’s the ultimate family-friendly comfort food that’s as satisfying to make as it is to eat.
This recipe is designed for success, whether it’s your first time making cottage pie or your hundredth. Here’s why it’s a keeper:
- One-Pan Filling: The entire savory base cooks in one skillet or Dutch oven, minimizing cleanup and allowing all the flavors to meld beautifully.
- Perfect Texture Balance: The technique for the mashed potato topping ensures it’s creamy underneath with delightfully crispy peaks, giving you the best of both worlds.
- Make-Ahead Friendly: You can assemble the entire pie a day in advance and refrigerate it, making it a lifesaver for busy weeknights or entertaining.
- Kid-Approved & Customizable: It’s a universally loved dish. You can easily hide extra veggies in the filling or adjust the seasonings to suit your family’s taste.
- Freezer-Friendly: This pie freezes exceptionally well, either before or after baking, giving you a ready-made comfort meal for future you.
- Economical & Filling: Made with affordable ground beef and pantry staples, it’s a cost-effective way to feed a crowd with leftovers that taste even better the next day.
Ingredients You’ll Need
- Let’s gather our ingredients. This is where simple, wholesome components come together to create something truly special. The “holy trinity” of onion, carrot, and celery (a mirepoix) forms the aromatic foundation. Using a good-quality, not-too-lean ground beef (I recommend 85/15) provides essential flavor and fat for the gravy. For the potatoes, starchy russets are non-negotiable—they yield the fluffiest, most absorbent mash. Don’t skip the Worcestershire sauce; its fermented, savory tang is a key flavor builder. If you can find it, a rich, gelatinous beef stock will make your gravy incredible, but a good low-sodium store-bought broth works perfectly.
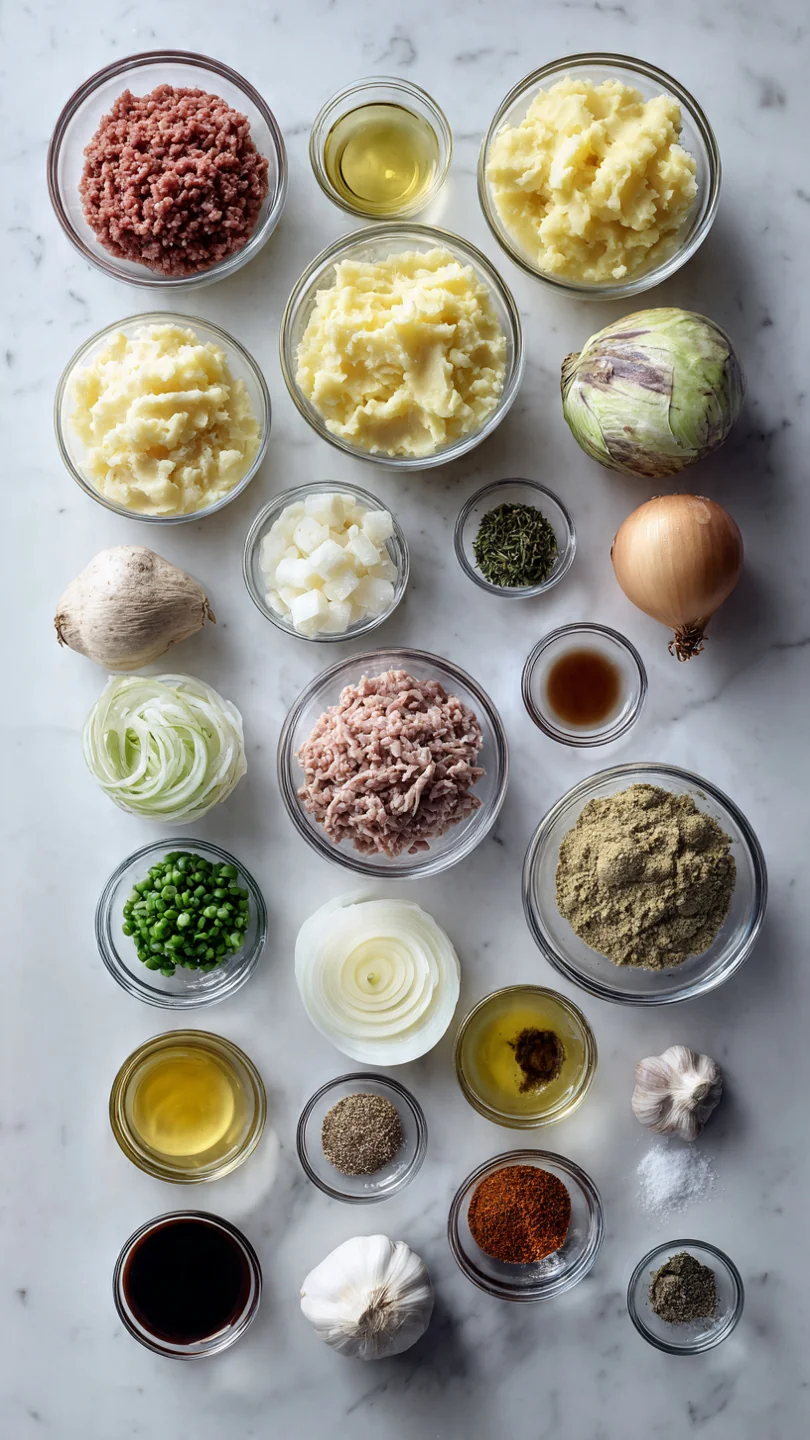
Note: You’ll find the complete list of ingredients, along with their exact measurements, in the printable recipe card at the bottom of this post.
Kitchen Equipment Needed
You don’t need any specialty gear for this classic. A large, oven-safe skillet or Dutch oven is ideal for building the filling and then transferring it straight to the oven, but a regular skillet and a separate 9×13 inch baking dish work just as well. You’ll need a large pot for boiling the potatoes, a colander for draining, and a potato masher or ricer.
A ricer will give you the smoothest, lump-free mash, but a standard masher is perfectly fine. A wooden spoon is best for breaking up the ground beef without scratching your pan.
How to Make Mum’s Traditional Cottage Pie Recipe
Step 1: Start the Potatoes and Veggies
Place your peeled, quartered potatoes in a pot of cold, salted water. Starting them cold ensures they cook evenly from the outside in. Bring it to a boil, then simmer.
This is your passive cooking time. Meanwhile, in your large skillet, heat the oil over medium and cook the diced onion, carrot, and celery. Trust me, taking a full 8-10 minutes here to soften them slowly, without browning, is crucial—it sweetens the vegetables and builds a deep flavor base for the entire pie.
Step 2: Brown the Beef and Build Flavor
Once your veggies are soft and fragrant, add the garlic for just a minute—you want to smell it, not burn it. Crank the heat up to medium-high and add the ground beef. Use your wooden spoon to break it into small crumbles.
The goal is browning, not steaming, so don’t overcrowd the pan. Let it develop some fond (those tasty browned bits) on the bottom of the pan. Drain excess fat if there’s more than a tablespoon or so.
Step 3: Create the Rich Gravy
Here’s a pro trick: sprinkle the flour directly over the cooked meat and veggies. Stir constantly for a full minute to cook out the raw flour taste—this is your instant roux. Then, stir in the tomato paste and Worcestershire sauce, coating everything in that concentrated umami.
Now, pour in your beef stock. It will sizzle and steam, and you’ll use your spoon to scrape up all that glorious fond from the pan bottom. This is where the flavor lives!
Let it simmer and thicken into a luscious gravy.
Step 4: Make the Creamy Potato Topping
Your potatoes should be fork-tender by now. Drain them well and let them sit in the hot, dry pot for a minute to evaporate any surface moisture—wet potatoes make gluey mash. Tip from me: warm your milk before adding it.
Adding cold liquid to hot potatoes can make them gummy. Mash with the butter and warm milk until smooth. Season aggressively with salt and pepper; this topping needs to stand up to the flavorful filling.
Step 5: Assemble and Bake to Perfection
Spread the beef filling evenly in your baking dish. Believe me, an even layer is key for consistent bites. Dollop the mashed potatoes on top and gently spread them with a spoon or spatula.
Now for the fun part: use a fork to create swirls and peaks all over the surface. These ridges will crisp up beautifully in the oven. If you’re using cheese, sprinkle it on now.
Step 6: Rest and Serve
Bake until the filling is bubbling vigorously at the edges and the topping is a perfect golden brown. The most important step comes next: let it rest for a full 10 minutes. This allows the gravy to set slightly so your serving spoon gets a perfect, neat portion instead of a runny mess.
Step back and admire your creation, then dish it up.
A few insights from the kitchen can elevate your pie from good to exceptional:
- Brown, Don’t Steam: When cooking the ground beef, ensure your pan is hot enough and don’t overcrowd it. You want a deep, savory sear, not a gray steam.
- Season in Layers: Don’t wait until the end to add all your salt. Season the vegetables lightly as they cook, season the beef, and definitely season the mashed potatoes well. Building seasoning in stages creates a more complex flavor profile.
- The Fork Trick: Creating those peaks with a fork isn’t just for looks. It increases the surface area of the potato topping, giving you more delicious crispy bits in every bite.
- Resting is Non-Negotiable: I can’t stress this enough. Letting the pie sit after baking allows the starches in the gravy to tighten up, ensuring a perfect slice. It also makes it safe to eat without burning your mouth!
- Broil with Caution: If you want extra browning, use the broiler for the last 1-2 minutes, but watch it like a hawk. It can go from golden to burnt in seconds.
Recipe Variations
- This classic recipe is wonderfully adaptable. Here are some tested variations to make it your own:
- Lamb Shepherd’s Pie: The classic swap. Replace the ground beef with ground lamb for a richer, gamier flavor that’s traditional in a Shepherd’s Pie.
- Hearty Vegetable Version: For a vegetarian twist, use 2 cups of cooked brown lentils or a plant-based ground “meat” alternative. Use vegetable stock and add mushrooms for extra savoriness.
- Cheesy Mash Topping: Stir 1/2 cup of grated sharp cheddar or Parmesan cheese directly into the mashed potatoes before topping for an extra decadent, flavorful crust.
- Guinness Gravy: Replace 1/2 cup of the beef stock with Guinness or another stout for a deeply rich, malty gravy with incredible depth.
- Sweet Potato Topping: Swap half the russet potatoes for peeled sweet potatoes. The slight sweetness pairs beautifully with the savory beef.
- Spicy Kick: Add a pinch of red pepper flakes to the beef while browning, or stir in a tablespoon of horseradish into the mashed potatoes.
- Extra-Veggie Boost: Finely chop a handful of mushrooms and cook them with the initial vegetables. They’ll add a wonderful umami depth and help stretch the meat.
What to Serve With This Recipe
Cottage pie is a complete meal in a dish, but a few simple sides can round out the table perfectly. A crisp, green vegetable is ideal for cutting through the richness. Steamed green beans, buttered peas, or a simple side salad with a sharp vinaigrette work wonderfully.
For a pub-style experience, serve it with buttered corn or pickled red cabbage. Beverage-wise, a malty brown ale or a medium-bodied red wine like a Merlot complements the savory flavors beautifully. This dish is perfect for a casual family dinner, a cozy weekend meal, or even a comforting contribution to a potluck.
Storage & Make-Ahead Instructions
- This pie is a meal-prepper’s dream. To store leftovers, cool completely and transfer to an airtight container. It will keep in the refrigerator for 3-4 days. Reheat individual portions in the microwave, or reheat larger portions in a 350°F oven covered with foil until warmed through (about 20-30 minutes). To freeze, you have two great options: freeze the assembled, unbaked pie (wrap the baking dish tightly in plastic wrap and foil) for up to 3 months. Thaw in the fridge overnight before baking as directed, adding a few extra minutes if needed. Or, freeze baked portions for quick single servings. The best make-ahead strategy is to prepare the filling and mash separately, store them in the fridge, and assemble and bake the pie just before you want to serve it for the freshest texture.
Frequently Asked Questions
Q: What’s the difference between cottage pie and shepherd’s pie?
A: Traditionally, cottage pie is made with ground beef, while shepherd’s pie is made with ground lamb. The terms are often used interchangeably, but that’s the classic distinction.
Q: Can I make this entire pie ahead of time?
A: Absolutely. Assemble the pie completely, cover tightly, and refrigerate for up to 24 hours. You may need to add 5-10 minutes to the baking time since it will be going into the oven cold.
Q: My mashed potatoes are always gluey. What am I doing wrong?
A: The most common culprits are overworking the potatoes (which releases too much starch) and adding cold liquid. Use a ricer or masher, not a food processor, and always warm your milk and butter first.
Q: Can I use frozen vegetables?
A: You can use a frozen mirepoix blend for the onion, carrot, and celery to save time. Add them directly to the hot pan—no need to thaw. I still recommend adding the peas at the end as directed.
Q: How do I know when the pie is done baking?
A: It’s done when the filling is bubbling vigorously around the edges (you should see active bubbles, not just steam) and the potato topping is golden brown in spots.
Q: Can I make this gluten-free?
A: Yes. Use a certified gluten-free flour blend or cornstarch as a thickener (mix 1 tbsp cornstarch with 2 tbsp cold water, then stir into the simmering filling). Also, ensure your Worcestershire sauce is gluten-free.
Q: The filling seems too wet. How can I thicken it?
A: Let it simmer uncovered for a few more minutes to reduce. Alternatively, mix another teaspoon of flour with a tablespoon of cold water to make a slurry and stir it into the simmering filling.
Q: What’s the best way to get crispy potatoes on top?
A: The fork-peak method is key. For extra crispiness, you can brush the peaks lightly with melted butter or olive oil before baking.
Final Thoughts
This Mum’s Traditional Cottage Pie is more than just a recipe; it’s a reliable, soul-warming template for countless delicious dinners. It embodies what I love most about cooking: transforming simple, accessible ingredients into a meal that feels like a celebration. The techniques here—proper browning, building a gravy in the pan, seasoning in layers—are foundational skills that will serve you well in countless other dishes.
I hope this recipe becomes a trusted favorite in your home, just as it is in mine. Give it a try, and don’t forget to let it rest before you dive in! I’d love to hear how it turns out for you.
Share your results and tag me, or leave a comment with your own family twists on this classic. Happy cooking

Mum’s Traditional Cottage Pie
Equipment
- Large skillet or Dutch oven
- 9×13 inch (or 3-quart) baking dish
- Large pot for boiling potatoes
- Potato masher or ricer
- Wooden spoon
- Colander
Ingredients
- 2 tbsp vegetable oil or olive oil
- 1 large yellow onion finely diced
- 2 medium carrots peeled and finely diced
- 2 ribs celery finely diced
- 2 cloves garlic minced
- 1.5 lbs ground beef 85/15 lean-to-fat ratio recommended
- 2 tbsp tomato paste
- 1 tbsp Worcestershire sauce
- 1 cup beef stock low-sodium preferred
- 1 tbsp all-purpose flour
- 1 tsp dried thyme or 1 tbsp fresh thyme leaves
- 1 cup frozen peas
- to taste salt and black pepper
- 2.5 lbs russet potatoes peeled and quartered
- 1/2 cup whole milk warmed
- 4 tbsp unsalted butter
- 1/2 cup sharp cheddar cheese grated (optional, for topping)
Instructions
- Preheat your oven to 400°F (200°C). Place the peeled and quartered potatoes in a large pot of cold, salted water. Bring to a boil over high heat, then reduce to a simmer and cook for 15-20 minutes, or until the potatoes are fork-tender. While the potatoes cook, start the filling.
- Heat the oil in a large, deep skillet or Dutch oven over medium heat. Add the diced onion, carrot, and celery. Cook, stirring occasionally, for 8-10 minutes until the vegetables have softened. Add the minced garlic and cook for another minute until fragrant.
- Increase the heat to medium-high and add the ground beef to the skillet. Use a wooden spoon to break it up into small crumbles. Cook until the beef is no longer pink, about 5-7 minutes. Drain any excess fat if necessary, leaving about 1 tablespoon for flavor.
- Sprinkle the flour over the beef mixture and stir for 1 minute to cook out the raw flour taste. Add the tomato paste and Worcestershire sauce, stirring to coat everything. Pour in the beef stock and add the dried thyme. Bring to a simmer, then reduce heat to low and cook for 10-15 minutes, stirring occasionally, until the gravy has thickened. Stir in the frozen peas and season generously with salt and pepper. Remove from heat.
- Drain the cooked potatoes well and return them to the hot pot. Let them steam-dry for a minute. Add the warm milk and butter. Mash with a potato masher or ricer until smooth and creamy. Season well with salt and pepper.
- Transfer the beef filling to a 9×13 inch (or similar 3-quart) baking dish, spreading it into an even layer. Carefully spoon the mashed potatoes over the top. Use a fork to create decorative peaks, which will get beautifully crispy. If using, sprinkle the grated cheese over the potatoes.
- Bake in the preheated oven for 25-30 minutes, or until the filling is bubbling around the edges and the potato topping is golden brown. For extra browning, you can broil for the final 1-2 minutes, watching closely. Let the pie rest for 10 minutes before serving to allow the filling to set.