
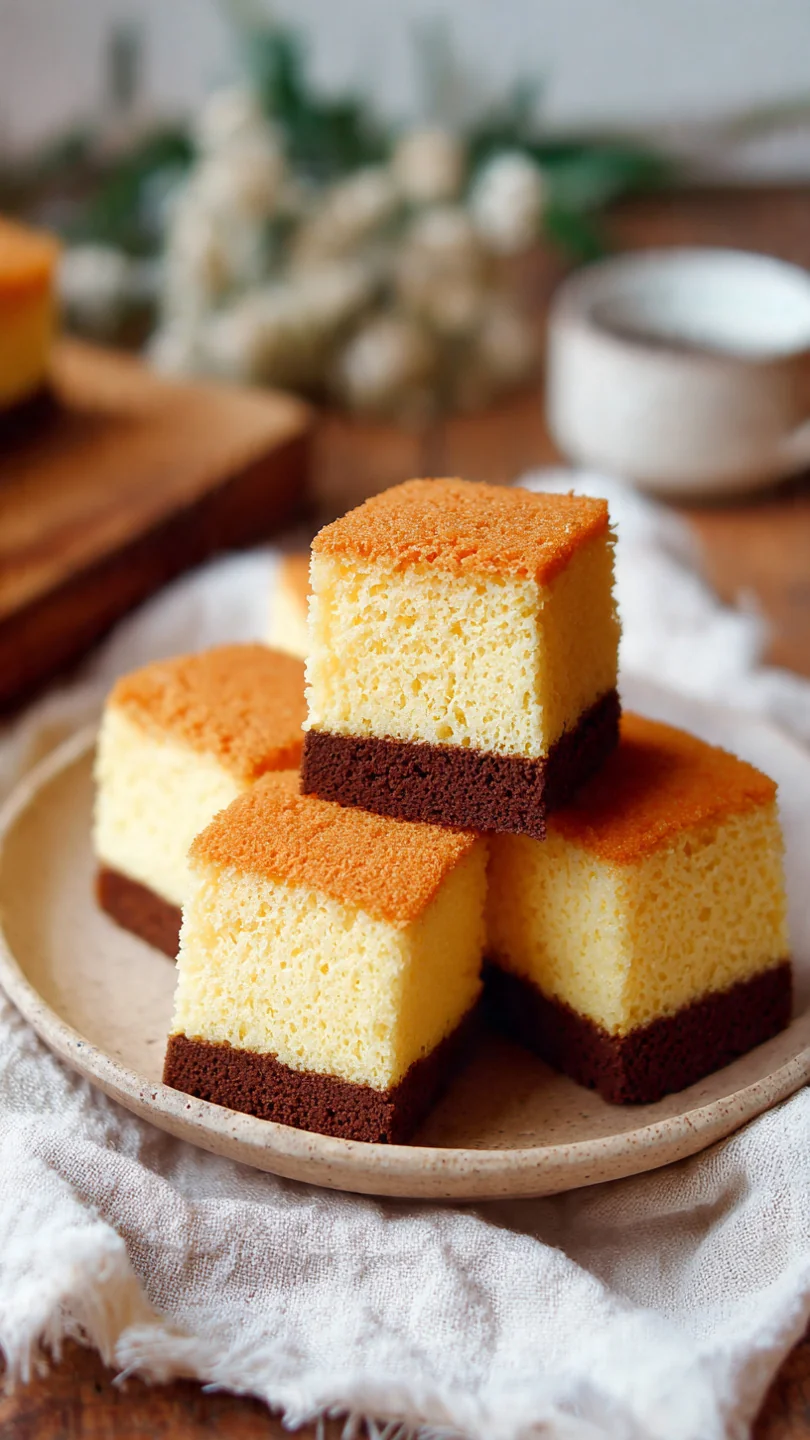
There’s a particular magic in the alchemy of candy making, and few treats demonstrate it as dramatically as sponge candy. That moment when a simple syrup transforms into a volcanic, golden foam never fails to delight. The result is a confection of beautiful contrasts: shatteringly crisp, impossibly light, and deeply caramelized, all wrapped in a sleek coat of dark chocolate.
If you’ve only ever bought it from a box, making it yourself is a rewarding kitchen adventure that yields a far superior, fresher bite. Let’s walk through the simple science and precise steps to create this classic honeycomb toffee in your own kitchen.
- Dramatic Kitchen Science: Witness the incredible foaming reaction when baking soda hits hot syrup—it’s edible chemistry at its most fun.
- Superior Freshness & Crunch: Homemade sponge candy has an unparalleled crispness that store-bought versions often lose during shipping and storage.
- Surprisingly Simple Ingredients: You likely have sugar, corn syrup, and baking soda in your pantry right now.
- Perfect for Gifting: Broken into pieces and dipped in chocolate, it makes an impressive and personal homemade gift for holidays or hostess presents.
- Endlessly Customizable: Once you master the base, you can experiment with different chocolate coatings, mix-ins, and flavors.
- A Confident Baker’s Milestone: Successfully making candy to the hard crack stage is a skill that will boost your kitchen confidence.
Ingredients You’ll Need
Let’s gather our ingredients—this short list holds the key to that iconic honeycomb texture. Precision and quality matter here, as there’s no hiding behind extra flavors or ingredients.
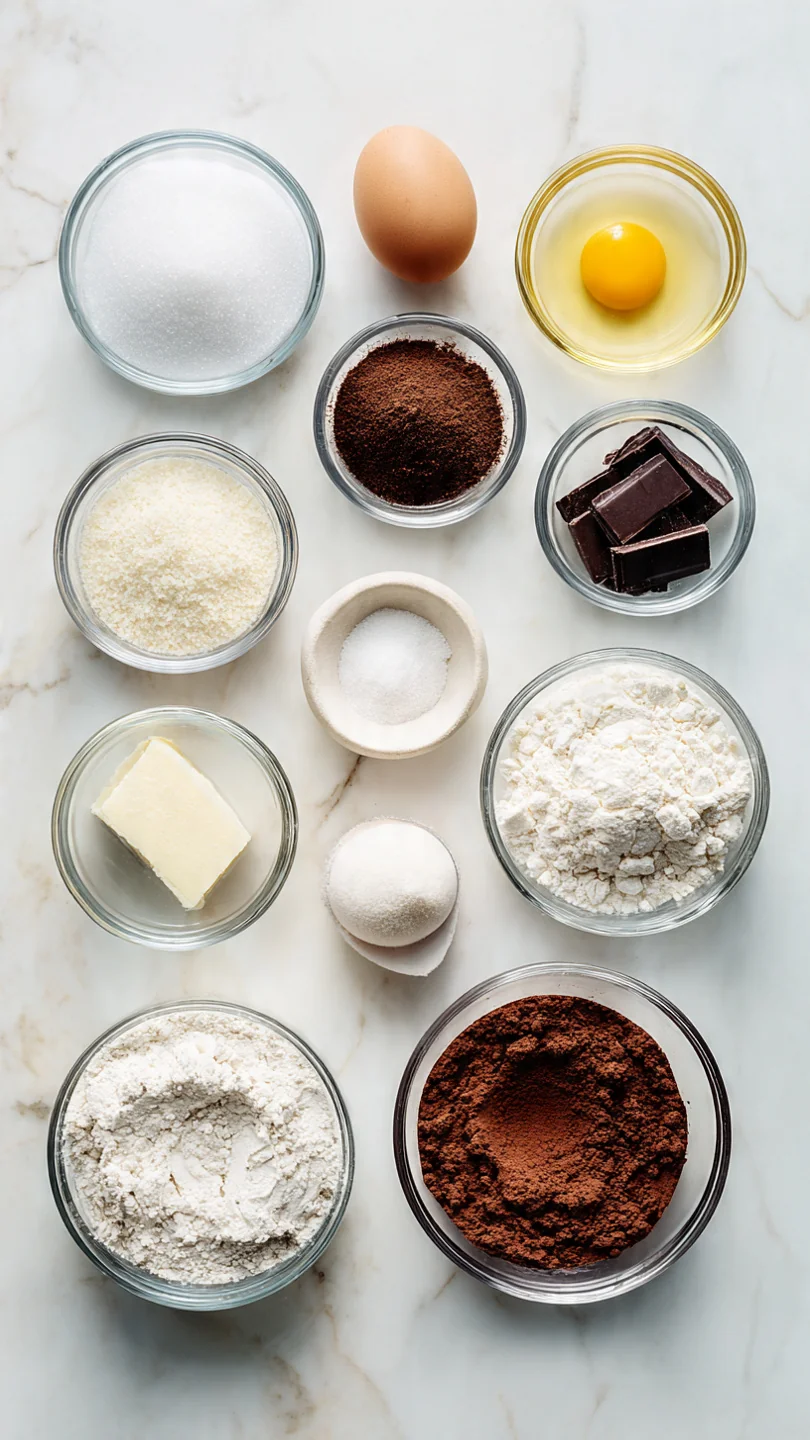
- Granulated sugar: This forms the base of our syrup and provides the deep caramel notes as it cooks. Use standard white sugar for consistent results.
- Light corn syrup: This is the unsung hero. Its glucose prevents the sucrose in the granulated sugar from crystallizing, ensuring our candy stays smooth and glassy, not grainy.
- Water: It helps dissolve the sugar evenly at the start of the cooking process.
- Baking soda (sifted!): This is the magic. When added to the 300°F syrup, it decomposes instantly, releasing carbon dioxide gas that gets trapped in the thickening syrup, creating millions of tiny bubbles that set into the signature honeycomb.
- Pure vanilla extract: Added with the baking soda, it gives a warm, round flavor to balance the caramel. Use pure, not imitation.
- Dark chocolate (for coating): A high-quality bar or chips (around 60-70% cacao) works best. The slight bitterness perfectly cuts the sweetness of the toffee. Semi-sweet is also excellent.
- Coconut oil or shortening (optional): Adding a small amount to your melting chocolate makes it more fluid for easier dipping and gives a lovely sheen.
Note: You’ll find the complete list of ingredients, along with their exact measurements, in the printable recipe card at the bottom of this post.
Kitchen Equipment Needed
Having the right tools set up before you start is half the battle in candy making. You don’t need specialty gear, but these items are essential.
- Heavy-Bottomed Saucepan (3-quart minimum): A pot with a thick base distributes heat evenly, preventing hot spots that can burn the sugar. The large capacity is crucial because the mixture will foam to 4-5 times its volume.
- Candy Thermometer: This is non-negotiable. A digital instant-read thermometer is ideal for speed and accuracy. If using an analog one, ensure it’s calibrated.
- 9×9 Inch Baking Pan: A metal pan works best for quick cooling. Lining it perfectly with parchment paper is your ticket to easy removal.
- Parchment Paper: Do not substitute wax paper or foil, as the candy can stick.
- Whisk: For quickly and thoroughly incorporating the baking soda.
- Heatproof Spatula: Helpful for scraping every last bit of foam from the pot.
How to Make Sponge Candy Recipe
Step 1: Prep Your Station
Trust me, mise en place is critical here. Line your 9×9 inch pan with parchment, letting the paper overhang two opposite sides like a sling—do not grease it. Sift your baking soda onto a small plate to remove any lumps, and have your vanilla measured.
Place the pan, whisk, and these prepped ingredients right next to your stove. Once the syrup hits temperature, you won’t have time to search for anything.
Step 2: Cook the Syrup to Precision
In your heavy saucepan, combine the sugar, corn syrup, and water. Stir over medium heat just until the grains of sugar dissolve. This is the last time you’ll stir until the very end.
Attach your candy thermometer. Now, let it boil undisturbed. Believe me, stirring now introduces sugar crystals that can seed crystallization in your entire batch.
Watch the thermometer climb steadily to 300°F (Hard Crack stage). This takes 10-15 minutes. The syrup will be a clear, golden amber.
Step 3: The Foaming Reaction
The second the thermometer reads 300°F, pull the pot off the heat. Working quickly but carefully, whisk in the sifted baking soda and vanilla all at once. Tip from me: stand back slightly as you start to whisk—the mixture will erupt into a voluminous, pale golden foam instantly.
Whisk vigorously for just 5 seconds to fully incorporate; over-mixing can deflate the bubbles.
Step 4: Pour and Let Magic Happen
Immediately pour the foaming mass into your prepared pan. Do not spread it or jiggle the pan. The candy will find its own level and the bubbles will continue to set.
This is the fun part—watching the honeycomb structure form before your eyes. Now, walk away. Let it cool completely at room temperature for at least an hour.
It will harden into a solid, porous slab.
Step 5: Break and Coat with Chocolate
Once it’s completely cool and crisp to the touch, use the parchment sling to lift the entire slab onto a cutting board. Here’s a pro move: use the blunt back of a large chef’s knife or simply your hands to break it into rustic, irregular pieces. Trying to slice it with a sharp knife will crush the delicate structure.
Now, melt your chocolate (with a bit of coconut oil if desired) until smooth. Dip or drizzle each piece, let the excess drip off, and place on a parchment-lined tray to set. Step back and admire your beautiful, professional-looking homemade candy.
- Temperature is Everything: A few degrees under 300°F and your candy will be chewy; a few degrees over and it can taste burnt. Trust your thermometer, not the clock or the color alone.
- Why No Stirring? Stirring after the sugar dissolves can cause the syrup to “seed” with sugar crystals, leading to a grainy, crystallized candy instead of a smooth, glassy one. The corn syrup helps prevent this, but don’t tempt fate.
- The Right Pan Matters: Using too small a saucepan is the most common mistake. The foam needs room to triple or quadruple in volume safely without bubbling over.
- Work with Speed and Confidence: From 300°F to poured in the pan should take less than 30 seconds. Hesitation allows the syrup to cool slightly, which can inhibit the full foaming power of the baking soda.
- Testing for Doneness (Backup Plan): If you doubt your thermometer, have a bowl of ice water ready. Drop a tiny bit of syrup in it; at the hard crack stage, it will solidify instantly and shatter when bent.
Recipe Variations & Customizations
- Chocolate Variations: Use milk chocolate for a sweeter treat, white chocolate for contrast, or even peanut butter chips mixed with chocolate for a twist.
- Flavor Infusions: Add 1/2 teaspoon of espresso powder to the dry sugar for a mocha version, or a pinch of cayenne pepper for a spicy kick.
- Sea Salt Finish: Sprinkle a few flakes of flaky sea salt over the chocolate coating before it sets for a sublime sweet-salty combination.
- Mix-In Magic: After pouring the foam into the pan, immediately sprinkle the top with 1/4 cup of toasted chopped nuts or crushed pretzels for added crunch.
- Citrus Zest: Add a tablespoon of finely grated orange or lemon zest with the vanilla for a bright, aromatic note.
- Dipped vs. Drizzled: For a quicker option, simply drizzle melted chocolate over the broken pieces instead of fully dipping them.
- Candy Cane Crush: During the holidays, mix crushed candy canes into the chocolate coating for a festive peppermint version.
What to Serve With This Recipe
Sponge candy is a star on its own, but it shines as part of a dessert spread. Serve a bowl of pieces alongside after-dinner coffee or espresso—the bitterness of the brew complements the sweet toffee perfectly. For a whimsical ice cream sundae, crush a piece over a scoop of high-quality vanilla bean ice cream.
It also makes a wonderful addition to a holiday cookie tray, adding a different texture among the softer baked goods. Package pieces in clear cellophane bags tied with ribbon for a truly special homemade gift that always impresses.
Storage & Make-Ahead Instructions
- Airtight is Essential: Store finished sponge candy in a single layer in an airtight container at room temperature in a cool, dry place. Moisture is its enemy, as it will cause the candy to become sticky and lose its crisp snap.
- Shelf Life: Properly stored, it will maintain its best texture for 3-4 days. It will still be edible after a week but will gradually soften.
- Freezing is Not Recommended: The freezing and thawing process introduces moisture that will ruin the delicate honeycomb structure, making it chewy.
- Make-Ahead Strategy: You can make the uncoated sponge candy slab 1 day ahead. Store the whole slab, wrapped tightly in parchment and then in an airtight container. Break and dip it in chocolate the day you plan to serve or gift it for the freshest crunch.
- Chocolate Bloom: If your chocolate coating develops a whitish haze (fat bloom), it’s still perfectly safe to eat—it’s just a cosmetic change from temperature fluctuations.
Frequently Asked Questions
Q: Can I use honey or maple syrup instead of corn syrup?
No, I don’t recommend it. Corn syrup is pure glucose, which actively inhibits sugar crystallization. Honey and maple syrup contain different sugars and moisture that will alter the chemical reaction and texture, likely resulting in a chewy or grainy candy.
Q: Why did my candy turn out chewy instead of crisp?
This almost always means the syrup didn’t reach a high enough temperature. Ensure your candy thermometer is accurate by testing it in boiling water (it should read 212°F/100°C). Cooking to a true 300°F (Hard Crack) is non-negotiable for the correct glass-like set.
Q: My candy collapsed or was very dense. What happened?
This indicates the baking soda may have been old and lost its potency, or the syrup had cooled slightly before the soda was added, reducing the vigor of the foaming reaction. Always use fresh baking soda and add it the instant the pot is off the heat.
Q: Can I make this without a thermometer?
I strongly advise against it. The small window between perfect caramelization and burning, and between hard crack and soft crack stage, is impossible to judge reliably by eye or water test for a beginner. A thermometer guarantees success.
Q: Is this the same as honeycomb, cinder toffee, or hokey pokey?
Yes, essentially! Sponge candy is the common American name. In the UK and elsewhere, it’s often called cinder toffee or honeycomb.
Hokey pokey is the New Zealand version, typically made with golden syrup and formed into clusters.
Q: My candy tastes bitter. Did I burn it?
Possibly. If you cooked the syrup past 300°F, it can develop a burnt, bitter flavor. Also, ensure you’re using baking soda, not baking powder, which contains other acids and will impart an off-taste.
Q: Can I double this recipe?
You can, but you must use a much larger pot (at least a 5-quart Dutch oven) to accommodate the double volume of foam. Do not attempt to double it in a standard saucepan.
Final Thoughts
Mastering this sponge candy recipe is a rite of passage for any home confectioner. It teaches precision, timing, and the thrilling science of cooking, all while yielding a treat that feels far more sophisticated than its simple ingredient list suggests. The sound of that first crisp bite, the way it dissolves into caramel on your tongue, and the rich contrast of dark chocolate is a reward worth the careful attention.
I encourage you to try it—follow the steps closely, trust the process, and don’t be intimidated. Once you’ve experienced the magic of that foaming transformation in your own kitchen, you’ll understand why this classic candy has endured. I’d love to hear how yours turns out!
Share your results and any creative variations you try. Happy candy making

Classic Sponge Candy
Equipment
- Heavy-bottomed medium saucepan (3-quart minimum)
- Candy thermometer (digital is best for accuracy)
- 9×9 inch baking pan
- Parchment paper
- Whisk
- Heatproof spatula
Ingredients
- 1 cup Granulated sugar Use standard white sugar for the cleanest caramel flavor.
- 1 cup Light corn syrup Essential for preventing crystallization and creating the right texture.
- 1/4 cup Water
- 1 tablespoon Baking soda Sifted. This is the magic ingredient that creates the foam.
- 1 tsp Pure vanilla extract
- 8 ounces Dark chocolate Or semi-sweet chocolate, chopped or in chips, for coating.
- 1 tablespoon Coconut oil or shortening Optional, for thinning the chocolate coating.
Instructions
- Prepare a 9×9 inch baking pan by lining it with parchment paper, letting the paper overhang on two sides for easy removal. Do not grease the paper. Have your sifted baking soda and vanilla measured and ready by the stove. This recipe moves fast at the end.
- In a medium, heavy-bottomed saucepan (at least 3-quart capacity to allow for foaming), combine the sugar, corn syrup, and water. Stir over medium heat just until the sugar dissolves. Once dissolved, stop stirring and attach a candy thermometer to the side of the pan. Cook without stirring until the mixture reaches 300°F (Hard Crack stage). This will take 10-15 minutes.
- The moment the syrup hits 300°F, immediately remove the pan from the heat. Working quickly but carefully, whisk in the sifted baking soda and vanilla extract. The mixture will foam up dramatically—this is the chemical reaction creating the honeycomb. Whisk just until combined, about 5 seconds.
- Immediately pour the foaming candy into your prepared pan. Do not spread it or touch it; it will find its own level. Let it cool completely at room temperature for at least 1 hour. It will harden and become very porous.
- Once completely cool, use the parchment paper to lift the entire slab of candy out of the pan. Place it on a cutting board and use the blunt side of a large knife or your hands to break it into rustic, bite-sized pieces. Avoid using a sharp slicing motion, as it will crush the delicate structure.
- Melt the chocolate (and coconut oil, if using) in a double boiler or in 20-second bursts in the microwave, stirring until smooth. Dip or drizzle each piece of sponge candy in chocolate, letting the excess drip off. Place on a parchment-lined tray and let set at room temperature or in the refrigerator until the chocolate is firm.