
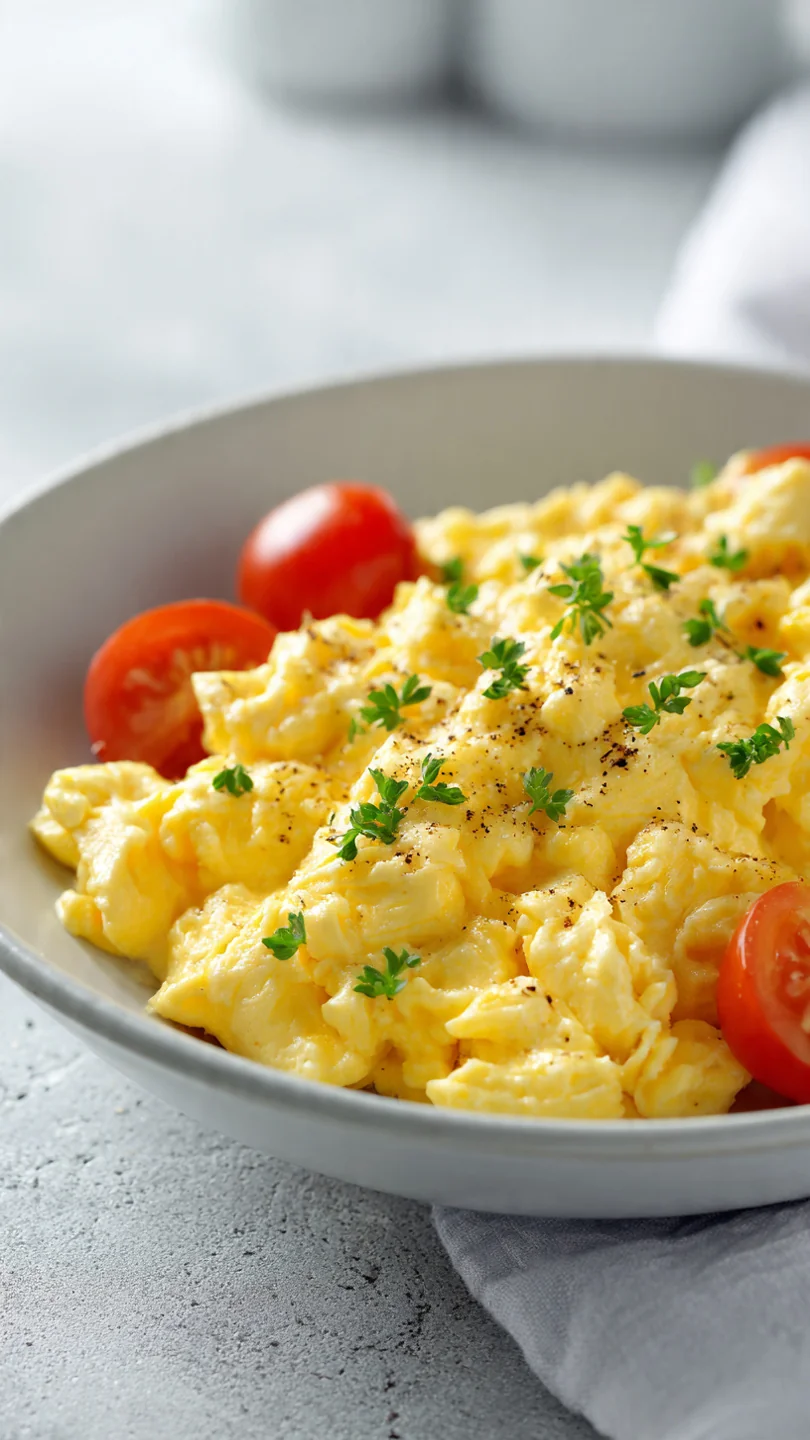
There’s scrambled eggs, and then there are scrambled eggs—the kind that are so impossibly light, creamy, and cloud-like they feel like a small luxury. You know the ones I mean: the tender, soft curds served in fancy brunch spots that seem to melt on your tongue. For years in professional kitchens, I watched chefs turn the humblest ingredient into something sublime with a few deliberate techniques.
The secret isn’t a special ingredient; it’s a method that respects the delicate nature of the egg. This recipe demystifies that process. By controlling just two things—air and heat—you can transform your morning routine into a moment of pure, fluffy delight.
- Restaurant-Quality at Home: Master the simple technique chefs use to achieve that signature creamy, soft-scrambled texture without any fancy equipment.
- 5-Minute Wonder: From cracking eggs to plating, this is a genuinely quick breakfast that feels special, perfect for busy weekday mornings or lazy weekends.
- Incredibly Customizable: This fluffy base is a perfect canvas. Once you master the method, you can fold in endless variations of cheese, herbs, and vegetables.
- Minimal Ingredients: You likely have everything you need in your kitchen right now: eggs, butter, and salt. The magic is in the method, not a long grocery list.
- Kid-Friendly & Crowd-Pleasing: The soft, mild texture and rich flavor are a hit with all ages, making it an ideal dish for family breakfasts or brunch with guests.
- The Science of Satisfaction: Understanding the why behind each step empowers you to make perfect eggs every single time, banishing dry, rubbery scrambles for good.
Ingredients You’ll Need
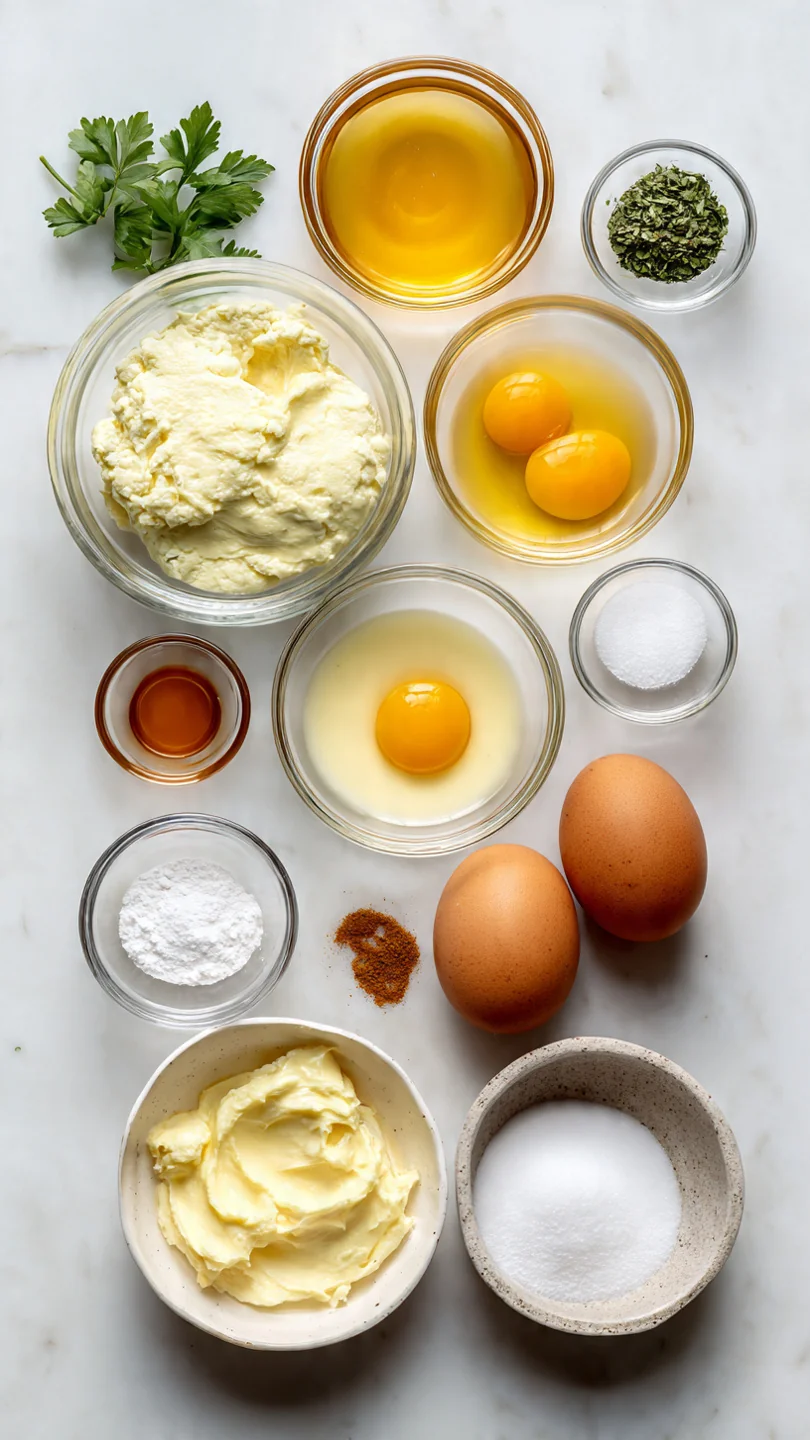
Let’s gather our ingredients—this is where simple pantry staples create magic. The quality of your eggs makes a noticeable difference here. If you can, seek out pasture-raised eggs; their yolks are often a deeper orange and contribute a richer flavor.
For the butter, I insist on unsalted. It gives you complete control over the seasoning, and its milk solids brown beautifully, adding a subtle nutty note. The optional splash of milk or cream isn’t for thinning the eggs, but for adding an extra layer of richness that protects the proteins from tightening up too quickly.
If you’re dairy-free, a teaspoon of water works to create steam for lift. Remember, cold eggs beat up fluffier than room temperature ones, so pull them straight from the fridge.
Note: You’ll find the complete list of ingredients, along with their exact measurements, in the printable recipe card at the bottom of this post.
Kitchen Equipment Needed
You don’t need much. An 8 or 10-inch non-stick skillet is my non-negotiable tool; it allows for gentle stirring without sticking and makes cleanup a breeze. A flexible silicone spatula is perfect for softly folding the curds without tearing them.
For beating, a simple fork or small whisk in a medium mixing bowl is all you need—the goal is to incorporate air, which doesn’t require a powerful machine. If you want to be extra precise, a digital instant-read thermometer can help you monitor the pan’s surface temperature, aiming for around 250°F (120°C) before adding the eggs.
How to Make Super Fluffy Scrambled Eggs Recipe
Step 1: Beat with Abandon
Crack your cold eggs into a medium bowl. Add the salt and your optional dairy. Now, take your fork or whisk and beat them—I mean really beat them—for a full 60 seconds.
You’re looking for a completely homogenous, pale yellow, frothy liquid with no strands of egg white visible. Believe me, this vigorous incorporation of air is your first and most important step toward a lofty texture. The mixture should almost look like a loose foam.
Step 2: Melt Butter Over Gentle Heat
Place your non-stick skillet over medium-low heat. Add the butter and let it melt slowly, swirling the pan to coat the bottom. This is critical: the pan should be warm, not sizzling hot.
You should be able to hold your hand a few inches above the surface for 5-6 seconds. If the butter immediately browns or smokes, your pan is too hot. Tip from me: low and slow heat is what cooks the eggs gently, preventing them from seizing up and becoming tough.
Step 3: Pour and Let Set
Pour your frothy egg mixture into the center of the pan. Now, exercise patience. Let the eggs sit undisturbed for about 20-30 seconds.
You’ll see a thin, cooked layer start to form at the very edges. This initial set creates a foundation of delicate curds. Rushing in with your spatula now would break up this structure and release all the precious air and moisture you worked so hard to incorporate.
Step 4: Gently Fold the Curds
Using your silicone spatula, gently push the eggs from the outer edges of the pan toward the center. Tilt the pan slightly so the uncooked, liquid egg flows into the newly created empty space. Repeat this push-and-tilt motion every 15-20 seconds, working your way around the pan.
You’re not scrambling in the traditional sense; you’re slowly folding the eggs over themselves to form large, soft, creamy curds. This process should take about 3 minutes.
Step 5: Remove from Heat and Serve
Here’s the chef’s secret: remove the pan from the heat while the eggs still look slightly wet and glossy on top. They should be mostly set but still seem a bit underdone. Trust me, carryover cooking will finish the job perfectly as you transfer them to a warm plate.
Immediately slide your fluffy masterpiece onto plates. The residual heat will leave you with eggs that are creamy, soft, and never dry. Step back and admire your beautiful, professional-looking scramble.
- The Cold Egg Advantage: Always start with cold eggs straight from the refrigerator. They whip up much more voluminously than room-temperature eggs, trapping more air for a better lift.
- Pan Temperature Test: A reliable test is to flick a few drops of water into the pan after the butter melts. If the droplets dance and evaporate slowly, it’s perfect. If they instantly vaporize in a violent sizzle, the pan is too hot.
- Salt Early: Salting the eggs during beating, not during cooking, helps break down the proteins slightly for a more tender result. It does not make them watery if cooked promptly.
- The “Low Heat” Mindset: If you think your heat is low enough, turn it down a notch. Perfect scrambled eggs are a lesson in gentle cooking. High heat is the enemy of fluffiness.
- Stop-Stir Method: For extra-large, soft curds, try the “stop-stir” method: let the eggs set for 30 seconds, stir for 5, then let them set again. This creates wonderful, pillow-like folds.
Recipe Variations
- Cheese Lover’s Delight: Once the eggs are just off the heat, gently fold in 1/4 cup of finely grated sharp cheddar, creamy goat cheese, or Parmesan. The residual heat will melt it beautifully without making the eggs greasy.
- Fresh Herb Garden: Stir in 1 tablespoon of finely chopped soft herbs like chives, parsley, dill, or tarragon right at the end. Their bright flavor cuts through the richness perfectly.
- Creamy Luxe: Replace the milk with a full tablespoon of crème fraîche or sour cream beaten into the eggs. This creates an incredibly tangy, rich, and custard-like texture.
- Dairy-Free & Still Fluffy: Use a neutral oil like avocado or ghee instead of butter, and replace the milk with one teaspoon of water or unsweetened plain plant-based milk.
- Everything Bagel Style: After plating, sprinkle the top of your eggs with everything bagel seasoning for a fantastic crunch and burst of garlic, onion, and sesame flavor.
What to Serve With This Recipe
These fluffy eggs are the star of any breakfast or brunch plate. For a classic diner-style meal, pair them with crispy hash browns or buttery toast for soaking up every last bit. They’re also fantastic nestled next to sautéed greens like spinach or kale for a healthy, balanced start.
If you’re hosting a brunch, serve them alongside oven-cured bacon, breakfast sausages, and a fresh fruit salad. For a lighter option, a simple side of sliced avocado with a squeeze of lime complements the eggs’ richness beautifully. A glass of freshly squeezed orange juice or a good cup of coffee is the perfect beverage pairing.
Storage & Make-Ahead Instructions
- Best Served Immediately: Scrambled eggs are truly at their peak within minutes of cooking. Their delicate texture and moisture suffer upon storage.
- Short-Term Storage: If you must store them, let the eggs cool completely, then transfer to an airtight container and refrigerate for up to 1 day.
- Reheating Gently: Reheat leftovers gently in a non-stick pan over very low heat with a tiny pat of butter, or in the microwave at 50% power in 20-second intervals, stirring between each.
- Avoid Freezing: I do not recommend freezing scrambled eggs, as they become watery and rubbery upon thawing and reheating.
- Make-Ahead Strategy: For a crowd, you can crack and beat the eggs the night before and keep them covered in the fridge. Cook them fresh in the morning for the best results.
Frequently Asked Questions
Q: Why are my scrambled eggs always rubbery?
This is almost always due to heat that’s too high. High heat forces the egg proteins to contract violently and squeeze out all their moisture. The key is persistent, gentle, medium-low heat.
Q: Can I use water instead of milk or cream?
Absolutely. A teaspoon of water per egg, beaten in, will create steam as it cooks, which can help with fluffiness. You won’t get the same richness, but the texture will still be light.
Q: How do I know exactly when to take them off the heat?
The eggs are done in the pan when they are mostly set but still look wet and shiny on top. They should mound softly on a plate, not run, but also not look fully dry or firm.
Q: What’s the best cheese to add?
Finely grated cheeses that melt smoothly are best. Think sharp cheddar, Gruyère, fontina, or a soft cheese like goat cheese or cream cheese added at the very end.
Q: Can I make this for a large group?
Yes, but cook in batches. Overcrowding the pan lowers the temperature and steams the eggs, making them watery. It’s better to use two pans or cook in successive batches, keeping finished eggs warm in a low oven.
Q: Are fluffy scrambled eggs safe for pregnant people?
Cook eggs until both the yolk and white are firm, not runny. These eggs, cooked to a soft but fully set consistency as described, are considered safe.
Q: My eggs stick even in a non-stick pan. What am I doing wrong?
Ensure your pan is properly preheated with butter or oil before adding the eggs. Also, check that you’re using a silicone or wooden utensil, as metal can scratch the non-stick coating over time.
Final Thoughts
Mastering these super fluffy scrambled eggs is more than learning a recipe—it’s learning a fundamental technique that will elevate your everyday cooking. It proves that the most extraordinary results often come from paying attention to the simplest details: the vigor of your whisking, the patience to use low heat, and the courage to take them off the stove a moment before they look done. This method has never failed me, from busy restaurant brunch services to quiet Sunday mornings at home.
I encourage you to try it exactly as written first, then make it your own with your favorite add-ins. Once you experience that first bite of cloud-like, creamy egg, you’ll understand why this is the only way I scramble. I’d love to hear how it turns out for you—share your results and any creative variations you come up with!

Super Fluffy Scrambled Eggs
Equipment
- 8 or 10-inch non-stick skillet
- Silicone spatula or wooden spoon
- Medium mixing bowl
- Fork or small whisk
Ingredients
- 4 large eggs Cold from the refrigerator
- 1 tbsp unsalted butter plus more for the pan
- 1/4 tsp kosher salt or to taste
- 1 tbsp whole milk or heavy cream optional, for extra richness
Instructions
- Crack the cold eggs into a medium bowl. Add the salt and milk or cream, if using. Using a fork or whisk, beat the eggs vigorously for a full 60 seconds until they are completely uniform, frothy, and pale yellow. This incorporates air, which is the first key to fluffiness.
- Place a non-stick skillet over medium-low heat. Add the butter and let it melt completely, swirling to coat the pan. The pan should be warm, not hot—you should be able to hold your hand a few inches above it comfortably. This low, gentle heat is non-negotiable for creamy eggs.
- Pour the beaten eggs into the center of the pan. Let them sit, undisturbed, for about 20-30 seconds until you see a thin cooked layer forming at the bottom edges. Trust me, this initial set is crucial for creating structure.
- Using a silicone spatula, begin pushing the eggs from the edges toward the center. Tilt the pan to let the uncooked egg run into the empty spaces. Continue this gentle push-and-tilt motion every 15-20 seconds. You’re forming large, soft curds, not chopping them into small pieces.
- When the eggs are mostly set but still look wet and glossy on top (this takes about 3-4 minutes total), remove the pan from the heat immediately. The residual heat will finish cooking them perfectly. Tip from me: slightly underdone in the pan means perfectly done on the plate.