
There’s a quiet magic in a perfect plate of scrambled eggs. It’s the first meal I learned to cook as a child, and after 15 years in professional kitchens, it’s still the dish I use to judge a cook’s skill. The difference between good and great scrambled eggs isn’t a secret ingredient—it’s a simple, intentional technique.
When done right, they’re a revelation: creamy, soft, and bursting with rich flavor, not the dry, rubbery curds you might be used to. This recipe will guide you through the chef-approved method to achieve that luxurious, diner-style texture every single time, turning a humble breakfast staple into something truly special.
- Restaurant-Quality at Home: Master the simple, low-heat technique that professional chefs use to create impossibly creamy, soft curds.
- 5-Minute Wonder: From cracking the eggs to plating, you’re only about 7 minutes away from a perfect, hot breakfast.
- Foolproof Technique: With clear visual cues and timing, this method eliminates guesswork and guarantees consistent results, even for beginners.
- Endlessly Customizable: This recipe is a perfect, neutral canvas. Once you master the base, you can add endless variations from cheese to fresh herbs.
- Minimal Ingredients: You likely have everything you need in your kitchen right now: eggs, butter, and a splash of dairy.
- Diet-Friendly Base: Naturally gluten-free, low-carb, keto-friendly, and vegetarian, making it a versatile option for many dietary needs.
Ingredients You’ll Need
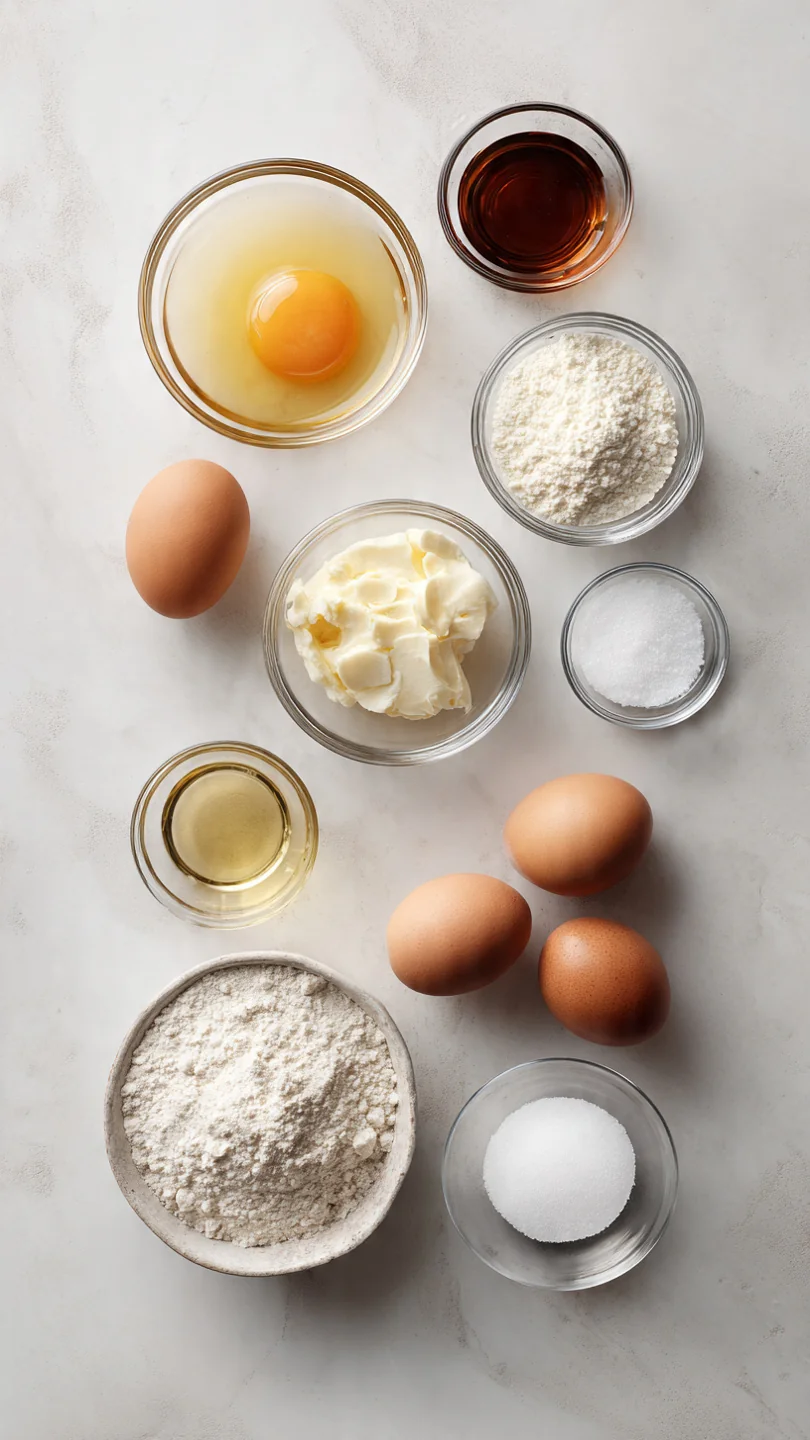
Let’s gather our simple ingredients—this is where quality truly shines. You don’t need much, but using the best you can find makes a noticeable difference in flavor and color.
- Eggs: The star. I highly recommend splurging on high-quality, pasture-raised eggs if possible. Their yolks are a deeper orange and impart a richer, more complex flavor.
- Dairy (Milk or Cream): A small amount of liquid is non-negotiable for creamy eggs. Whole milk works, but heavy cream (or even half-and-half) adds an extra layer of luxurious richness and helps stabilize the proteins.
- Butter: Unsalted butter is my fat of choice. It adds incomparable flavor and contributes to a silky mouthfeel. Use it for cooking and a final pat on top.
- Salt & Pepper: Kosher salt is less salty by volume than table salt and disperses beautifully. Freshly cracked black pepper adds a gentle warmth. Seasoning the raw egg mixture is crucial for even flavor distribution.
- Fresh Chives: Optional, but recommended. Their mild, oniony freshness is the classic, perfect garnish that cuts through the richness.
Note: You’ll find the complete list of ingredients, along with their exact measurements, in the printable recipe card at the bottom of this post.
Kitchen Equipment Needed
You don’t need fancy gear. The right pan is 90% of the battle for perfect scrambled eggs.
- A 10-Inch Nonstick Skillet: This is non-negotiable. The nonstick surface allows for gentle stirring and easy release without needing excessive fat. The size gives the eggs enough room to form proper curds.
- Silicone Spatula: Its flexibility is perfect for gently folding and pushing the eggs without scratching your pan.
- Mixing Bowl & Fork/Whisk: For beating the eggs thoroughly. A small whisk is great, but a fork works perfectly.
- Warmed Plates: A simple, pro-level trick. Placing your finished eggs on a cold plate makes them set too quickly. Warm your plates briefly in the oven or with hot water.
How to Make The Best Scrambled Eggs Recipe
Step 1: Beat with Purpose
Crack your eggs into a medium bowl. Add your dairy, salt, and pepper. Now, beat them like you mean it!
Trust me, 30-45 seconds of vigorous whisking with a fork is essential. You’re looking for a completely homogenous, pale yellow, and slightly frothy mixture. This incorporates air, which translates directly into a lighter, fluffier final texture.
Don’t just mix until combined—really go for it.
Step 2: Melt the Butter Gently
Place your nonstick skillet over medium-low heat. Add the butter. The key here is patience.
Let the butter melt slowly and foam. If it immediately sizzles and browns, your pan is too hot—take it off the heat for a moment to cool down. You want the butter hot enough to cook the eggs immediately upon contact, but not so hot that it scorches.
Swirl the pan to coat the bottom evenly.
Step 3: Cook with a Gentle Touch
Pour your beaten eggs into the center of the pan. Now, let them sit. Seriously, don’t touch them for 15-20 seconds.
You’ll see a thin, cooked layer start to form at the edges. This is your cue. Using your silicone spatula, gently push these cooked edges toward the center.
Tilt the pan so the uncooked, liquid egg runs into the newly empty space. This is the heart of the technique.
Step 4: Form Soft Curds
Continue this gentle push-and-tilt motion every 15-20 seconds. Believe me, resisting the urge to constantly stir is hard but vital. You’ll see large, soft, creamy curds beginning to form.
They should look wet and glossy. The moment they are mostly set but still look a bit too soft and wet for your liking (about 3-4 minutes total), it’s time for the most important step.
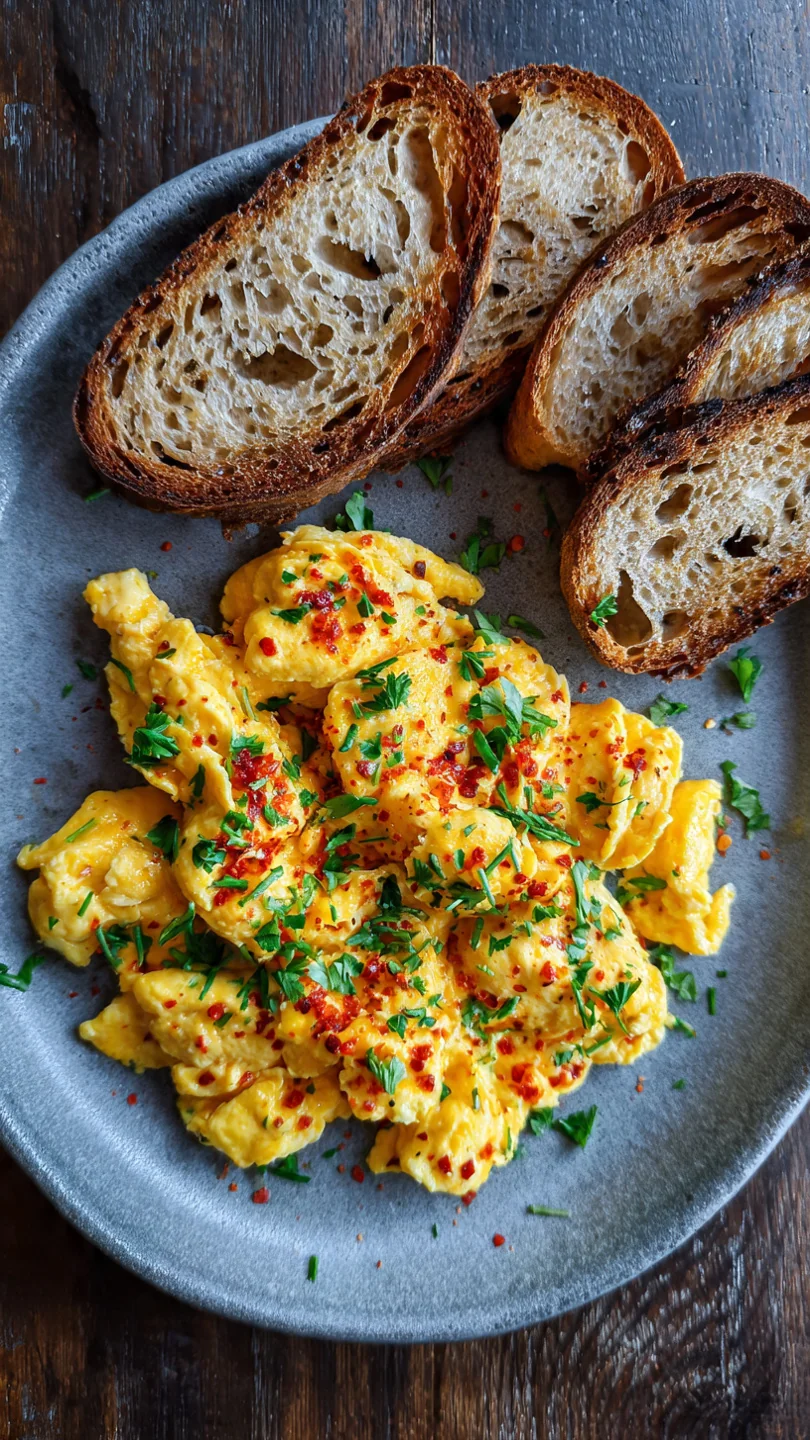
Step 5: The Perfect Finish and Serve
Remove the pan from the heat immediately. Tip from me: the eggs will continue to cook from the residual heat in the pan. Transfer them right away to your warmed plates.
This stops the cooking process at the ideal moment. Top with an extra tiny pat of butter if you’re feeling indulgent and a sprinkle of fresh chives. Step back and admire your beautiful, creamy creation, then serve immediately.
- Temperature is Everything: Medium-low heat is not a suggestion—it’s the rule. High heat forces the egg proteins to contract violently, squeezing out moisture and creating tough, dry curds. Low heat allows them to coagulate gently, trapping moisture for a creamy texture.
- The Carryover Cooking Secret: Removing the eggs from the heat while they still look slightly underdone is the single biggest pro tip. They will finish cooking to perfect doneness on the plate. If you wait until they look perfect in the pan, they’ll be overdone by the time you eat them.
- Salt Early, Not Late: Seasoning the raw egg mixture allows the salt to dissolve and distribute evenly throughout the protein structure, seasoning every bite from within. Salting at the end only seasons the surface.
- Don’t Crowd the Pan: Using a pan that’s too small steams the eggs. A 10-inch skillet for 4 eggs gives them the space they need to cook properly via conduction, not steam.
- The Butter Finish: Adding a final cold pat of butter to the hot eggs just after plating (called monter au beurre) creates a luxurious, glossy sauce that coats the curds, enhancing flavor and mouthfeel.
Recipe Variations
- Cheesy Delight: In the last 30 seconds of cooking, fold in 1/4 cup of shredded sharp cheddar, gruyère, or goat cheese. Let it just melt into the curds.
- Creamy Herb: Stir 1 tablespoon of chopped fresh soft herbs (like chives, dill, or parsley) into the beaten eggs before cooking for flavor in every bite.
- Truffle Indulgence: After plating, drizzle with a tiny amount of high-quality truffle oil or truffle salt for an instant gourmet upgrade.
- Protein-Packed: Cook 1-2 slices of chopped bacon or diced ham in the pan first, remove, then cook the eggs in the rendered fat for added smoky flavor.
- Dairy-Free: Substitute the milk with a splash of unsweetened, unflavored non-dairy milk (like oat or almond) and cook the eggs in ghee or a neutral oil like avocado oil.
- French-Style (Baveuse): For ultra-creamy, almost saucy eggs, continuously stir over low heat with an extra tablespoon of butter and remove from heat a full minute earlier.
What to Serve With This Recipe
These creamy scrambled eggs are a versatile centerpiece. For a classic, comforting breakfast, serve them alongside buttered, crispy toast for dipping into those soft curds. They’re also fantastic with a side of roasted potatoes or hash browns for a hearty meal.
For a lighter option, pair them with a simple arugula salad dressed with lemon vinaigrette. If you’re building a brunch spread, they complement smoked salmon, crispy bacon, and fresh fruit beautifully. A glass of freshly squeezed orange juice or a good cup of coffee is the perfect beverage pairing.
Storage & Make-Ahead Instructions
- Storage: Leftover scrambled eggs can be stored in an airtight container in the refrigerator for 3-4 days. Be aware that they will lose their creamy texture and become more firm.
- Reheating: The best method is gentle reheating. Place them in a nonstick skillet over very low heat with a tiny splash of water or milk. Stir gently until just warmed through. Microwaving tends to make them rubbery.
- Freezing: I do not recommend freezing scrambled eggs, as the texture becomes very watery and grainy upon thawing and reheating.
- Make-Ahead: You can beat the eggs with the dairy and seasoning, cover tightly, and refrigerate overnight. Give them a quick re-whisk before cooking. For best results, cook them fresh.
Frequently Asked Questions
Q: Can I use water instead of milk or cream?
A: You can, but I don’t recommend it for this recipe. Water will steam and can make the eggs slightly puffier, but it doesn’t add the richness, flavor, or protein-stabilizing qualities that dairy fat provides. For the creamiest results, stick with milk or cream.
Q: Why are my scrambled eggs always dry and rubbery?
A: This is almost always due to heat that’s too high and/or overcooking. Cooking eggs over high heat causes the proteins to tighten too quickly and squeeze out all their moisture. Stick to medium-low heat and remove them from the pan while they still look slightly wet.
Q: How do I make scrambled eggs for a crowd?
A: Beat the eggs in a large bowl. Cook them in batches in your skillet, wiping it out and adding fresh butter for each batch. Do not try to cook more than 6-8 eggs at once in a standard skillet, or they will steam instead of sauté.
Q: Is it safe to eat slightly runny scrambled eggs?
A: For safety, eggs should be cooked to 160°F (71°C) to eliminate risk of salmonella. In this recipe, the “slightly wet” stage we aim for is achieved through carryover cooking, which brings them to a safe temperature. They should not be actively runny.
Q: Can I make these without butter?
A: Yes, you can use a neutral oil like avocado or grapeseed oil. However, butter contributes significantly to the flavor and creamy texture. For a dairy-free option, ghee is an excellent substitute that provides that buttery taste.
Q: What’s the difference between American and French scrambled eggs?
A: American-style (like this recipe) forms distinct, soft curds. French-style (œufs brouillés) is cooked even more slowly with constant stirring, resulting in a very small-curded, almost custard-like or saucy consistency.
Q: My eggs stick to my nonstick pan. What am I doing wrong?
A: First, ensure your pan is truly nonstick and not scratched. Second, make sure your butter is fully melted and foaming before adding eggs—this creates a protective layer. Third, never use metal utensils on a nonstick surface.
Final Thoughts
Mastering scrambled eggs is one of the most rewarding skills in the kitchen. It transforms a daily routine into a small moment of delight. This recipe isn’t about complexity; it’s about intention—taking those extra 30 seconds to beat the eggs well, having the patience to use low heat, and the confidence to take them off just a moment early.
Once you experience the creamy, fluffy, rich result of this method, you’ll never go back. I encourage you to try it exactly as written first, then have fun with the variations. I’d love to hear how it turns out for you!
Share your perfect plate with me on social media, and if you have any questions, leave a comment below. Now, go enjoy the best scrambled eggs of your life.
The Best Scrambled Eggs
Equipment
- 10-inch nonstick skillet
- Medium mixing bowl
- Fork or small whisk
- Silicone spatula
Ingredients
- 4 large eggs preferably high-quality, pasture-raised for best flavor
- 2 tbsp whole milk or heavy cream cream yields a richer texture
- 1 tbsp unsalted butter plus more for serving
- 1/4 tsp kosher salt or to taste
- 1/8 tsp freshly ground black pepper or to taste
- fresh chives optional, for garnish
Instructions
- Crack the eggs into a medium bowl. Add the milk or cream, salt, and pepper. Using a fork or whisk, beat the mixture vigorously for 30-45 seconds until it’s completely uniform, frothy, and pale yellow. This aeration is key for fluffiness.
- Place a 10-inch nonstick skillet over medium-low heat. Add the butter and let it melt completely, swirling the pan to coat the bottom. The butter should foam but not brown. If it browns immediately, your pan is too hot.
- Pour the egg mixture into the center of the pan. Let it sit undisturbed for 15-20 seconds until you see a thin cooked layer forming at the edges. Using a silicone spatula, gently push the cooked edges toward the center, tilting the pan to let the uncooked egg run into the empty space.
- Continue this gentle push-and-tilt motion every 15-20 seconds. The eggs will form large, soft curds. The moment they look mostly set but still slightly wet and glossy (about 3-4 minutes total), remove the pan from the heat. The residual heat will finish cooking them.
- Immediately transfer the eggs to warm plates. Top with an extra small pat of butter if desired and garnish with fresh chives. Serve right away while hot and creamy.