
There’s something profoundly comforting about lifting a spoon through a golden, flaky crust into a steaming, savory filling. This vegetarian mushroom pot pie delivers that classic comfort with a rich, umami depth that will satisfy even the most devoted meat-eaters at your table. Developed through multiple tests in my professional and home kitchens, this recipe focuses on technique to build layers of flavor, transforming humble mushrooms and vegetables into a luxurious, creamy centerpiece.
It’s the perfect dish for a cozy Sunday supper, a holiday centerpiece, or any time you need a hug in a baking dish.
This recipe is designed for success and satisfaction. Here’s what makes it special:
- Restaurant-Quality Flavor at Home: By browning the mushrooms in batches and building a proper roux, we create a deeply savory, complex filling that rivals any bistro version.
- Perfectly Balanced Texture: The filling is luxuriously creamy without being gloppy, and the top crust bakes up shatteringly flaky and golden.
- Make-Ahead Friendly: You can prepare the entire filling a day or two in advance, making assembly on a busy weeknight a breeze.
- Endlessly Customizable: The vegetable mix and herbs can be swapped based on season or preference (see variations below).
- A Crowd-Pleasing Centerpiece: It’s visually impressive, universally loved, and serves a group beautifully.
- Diet-Flexible Foundation: Easily adaptable to be vegan or gluten-free with a few simple swaps.
Ingredients You’ll Need
- Let’s gather our ingredients. This recipe uses simple, accessible components, but the magic is in how we treat them. Using a mix of mushroom varieties (like cremini for earthiness, shiitake for meatiness, and oyster for delicate texture) is my professional secret for a filling with incredible depth. A splash of soy sauce is our umami powerhouse, amplifying the savory notes without tasting overtly Asian.
- Unsalted Butter & Olive Oil: This combination gives us the rich flavor of butter with the higher smoke point of oil for better browning.
- Mixed Mushrooms: Aim for 1.5 pounds total. Cremini are essential; supplement with shiitake, oyster, or even a small amount of rehydrated dried porcini for an extra layer.
- Mirepoix (Onion, Carrots, Celery): The aromatic foundation. Dice them evenly for consistent cooking.
- Garlic: Freshly minced is best. Add it after the vegetables soften so it doesn’t burn.
- All-Purpose Flour: This is the thickener for our sauce, cooked into a roux with the vegetable fats.
- Vegetable Broth: Use a good-quality, low-sodium broth so you can control the seasoning.
- Milk: Whole milk creates the creamiest sauce, but unsweetened almond or oat milk work perfectly for a vegan version.
- Fresh Thyme: Its woodsy, slightly floral notes are a classic pairing with mushrooms. Dried works in a pinch.
- Soy Sauce or Tamari: This is our flavor accelerator, adding salt and deep umami. Don’t skip it.
- Frozen Peas: They add a pop of color and sweetness. No need to thaw.
- Store-Bought Puff Pastry or Pie Crust: A huge time-saver. I prefer all-butter puff pastry for its incredible flakiness.
- Egg (for wash): This gives the crust a professional, glossy, golden-brown finish.
Kitchen Equipment Needed
You don’t need specialized gear, but a few key pieces will make the process smoother. A heavy-bottomed Dutch oven or large pot is ideal for evenly browning the mushrooms and building the sauce without hot spots. A deep 9-inch pie dish or a 2-quart ceramic baking dish is perfect.
A rolling pin, of course, for the pastry, and a pastry brush for the egg wash. If you want to guarantee a crisp bottom, having a baking sheet to preheat in the oven is a great pro move.
How to Make Vegetarian Mushroom Pot Pie Recipe
Step 1: Prep Your Pastry and Pan
Begin by preheating your oven to 400°F (200°C). This high heat is crucial for getting that initial puff and golden color on the crust. Lightly butter your baking dish—this simple step prevents any frustrating sticking.
Roll out your thawed pastry on a lightly floured surface just large enough to cover your dish with about an inch of overhang. Place it on a parchment-lined tray and slide it into the fridge. A cold crust hitting a hot filling is the secret to maximum flakiness.
Step 2: Brown the Mushrooms Deeply
This is the most important step for flavor. In your large pot, heat the butter and oil over medium-high heat. Add your mushrooms in a single, uncrowded layer.
Believe me, crowding will steam them, and we want a hard sear. Cook for 5-7 minutes without moving them much, until they release their water, it evaporates, and they develop a beautiful brown crust. Transfer to a bowl and repeat.
This patience builds the foundational “meaty” taste of the pie.
Step 3: Build the Aromatic Base and Roux
In the same pot (all those flavorful browned bits are still there!), add the diced onion, carrots, and celery with a pinch of salt. Cook over medium heat for 8-10 minutes until they soften and sweeten. Add the garlic and cook for just one minute until fragrant.
Now, sprinkle the flour over everything. Cook, stirring constantly, for a full two minutes. This cooks the raw flour taste out and toasts it slightly, which is what creates the nutty backbone of your sauce.
Step 4: Create the Creamy Filling
Now, gradually pour in the vegetable broth while whisking vigorously to prevent lumps. Follow with the milk. Bring the mixture to a gentle simmer—you’ll see it thicken beautifully.
Tip from me: if any lumps form, a quick blitz with an immersion blender fixes it instantly. Stir the browned mushrooms back in, along with the thyme, soy sauce, and frozen peas. Let it simmer for 3-4 more minutes.
Taste it now and season boldly with salt and pepper.
Step 5: Assemble and Bake to Perfection
Carefully pour the hot filling into your prepared dish. Retrieve your cold pastry from the fridge and drape it over the top. Tuck the edges in and crimp them with a fork to seal.
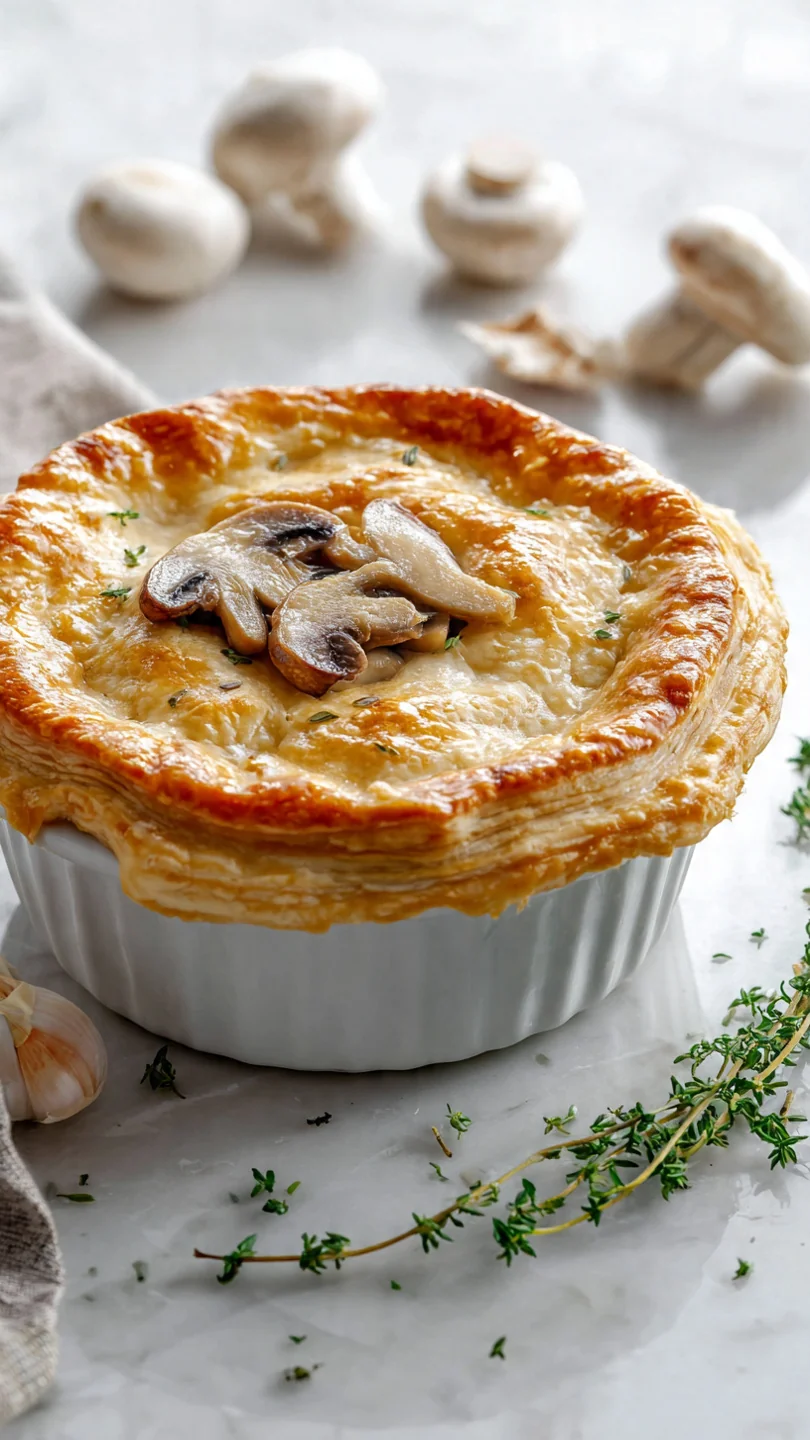
Cut a few small slits in the center to act as steam vents. For that gorgeous finish, whisk an egg with a tablespoon of water and brush it lightly over the pastry. Bake for 35-40 minutes, until the crust is a deep, irresistible golden brown and you see the filling bubbling at the edges.
Step 6: The Crucial Rest and Serve
I know it’s tempting, but you must let the pot pie rest for at least 15 minutes after pulling it from the oven. This allows the filling to set from a lava-like consistency to a perfect, spoonable creaminess. Step back and admire your beautiful, golden creation.
Use a sharp knife to cut portions, and serve it warm, perhaps with that simple green salad I mentioned.
A few insights from my years in kitchens will elevate your results from good to exceptional.
- Mushroom Moisture is the Enemy: Always cook mushrooms in batches. If you crowd the pan, they release all their water at once and steam instead of sear, resulting in a gray, boiled texture and less flavor.
- Roux is Your Friend: Don’t rush the step of cooking the flour with the fat and vegetables. Those two minutes are essential for developing flavor and ensuring your sauce doesn’t taste pasty.
- Season in Layers: Season your vegetables as they cook, and then do a final aggressive seasoning of the finished filling before baking. Heat dulls salt, so it needs to be assertive at this stage.
- Keep the Pastry Cold: A hot filling will melt the fat in a warm pastry before it hits the oven, leading to a less flaky crust. Chilling the rolled pastry is a non-negotiable step.
- Test for Doneness: The filling should be bubbling actively at the edges, and an instant-read thermometer inserted into the center (through a steam vent) should read at least 165°F.
Recipe Variations & Customizations
- This recipe is a wonderful template. Feel free to make it your own with these tested variations.
- Vegan Version: Use vegan butter or all olive oil, plant-based milk, and a store-bought vegan puff pastry. Skip the egg wash or use plant milk brushed on top.
- Gluten-Free Version: Substitute the all-purpose flour with a 1:1 gluten-free flour blend and use a certified GF pie crust or pastry.
- Creamy White Wine Version: Deglaze the pot with 1/2 cup of dry white wine (like Sauvignon Blanc) after cooking the vegetables and before adding the flour. Let it reduce by half.
- Hearty Lentil Addition: For extra protein and heartiness, stir in 1 cup of cooked brown or French green lentils (Puy lentils) with the peas.
- Root Vegetable Swap: In the fall, replace the peas and carrots with diced parsnip, sweet potato, or turnip. Just give them a few extra minutes to soften during sautéing.
- Herb Garden Twist: Swap the thyme for fresh rosemary (use half the amount) or sage, finely chopped. Tarragon adds a lovely, subtle anise note.
- “Chicken” Pot Pie Style: Add 1-2 cups of shredded cooked chicken or a plant-based chicken alternative for those who want a more traditional protein.
What to Serve With This Recipe
This rich, savory pie is a complete meal in a dish, but a few simple sides can round out the table beautifully. A crisp, acidic salad is the perfect counterpoint—think mixed greens with a lemon-Dijon vinaigrette or an arugula salad with shaved fennel and a citrus dressing. For a more substantial meal, roasted Brussels sprouts with balsamic glaze or simple garlicky green beans are excellent.
Beverage-wise, a medium-bodied red wine like Pinot Noir or a rich, oaky Chardonnay pairs wonderfully. For a non-alcoholic option, sparkling water with lemon or a tart cranberry spritzer cleanses the palate.
Storage & Make-Ahead Instructions
- This recipe is fantastic for planning ahead.
- Make-Ahead Filling: The mushroom filling can be prepared, cooled, and stored in an airtight container in the refrigerator for up to 3 days. Reheat it gently on the stovetop with a splash of broth before assembling and baking.
- Storing Leftovers: Cooled leftovers can be covered tightly and refrigerated for 3-4 days. The crust will soften, but the flavor remains excellent.
- Freezing Instructions: You can freeze the unbaked, assembled pie (wrap tightly in plastic and foil) for up to 2 months. Bake from frozen, adding 15-20 minutes to the baking time, and tent the crust with foil if it browns too quickly. You can also freeze the filling alone for up to 3 months.
- Reheating Best Practices: Reheat individual portions in a 350°F oven for 15-20 minutes until hot throughout. The microwave will make the crust very soggy, so I don’t recommend it for the best texture.
Frequently Asked Questions
Q: Can I use only one type of mushroom?
A: Yes, you can use all cremini (baby bella) mushrooms. However, using a mix of varieties creates a more complex, restaurant-quality flavor profile that’s worth the small extra effort.
Q: My filling seems too thick/thin. What did I do wrong?
A: If it’s too thick after simmering, simply whisk in a little more broth or milk until it reaches a creamy, gravy-like consistency. If it’s too thin, let it simmer a few minutes longer to reduce and thicken, or create a quick slurry with 1 tbsp cornstarch and 2 tbsp cold water, then whisk it in.
Q: Can I make individual pot pies?
A: Absolutely! Divide the filling among 4-6 oven-safe ramekins or small bowls. Cut your pastry to fit the tops, seal, and vent.
Baking time will be reduced to about 20-25 minutes.
Q: Why did my bottom crust get soggy?
A: The most common cause is putting a cold filling into the dish. Ensure your filling is piping hot when you add the pastry. Placing your filled dish on a preheated baking sheet in the oven also helps conduct heat to the bottom faster.
Q: Is there a substitute for soy sauce?
A: Yes, you can use an equal amount of coconut aminos, or for a soy-free option, use 1 teaspoon of Marmite or Vegemite dissolved in a tablespoon of hot water, or simply add an extra 1/4 teaspoon of salt.
Q: Can I use a homemade pie crust?
A: Of course! Use your favorite double-crust pie dough recipe. You may need to blind bake the bottom crust for 10-15 minutes if you prefer it very crisp, though it’s not strictly necessary with this thick filling.
Q: How do I know when the pot pie is done baking?
A: The crust should be a deep golden brown all over, and you should see the filling bubbling actively through the steam vents. An instant-read thermometer inserted into the center should read at least 165°F.
Final Thoughts
This vegetarian mushroom pot pie is more than just a meal; it’s a testament to how technique can transform simple ingredients into something extraordinary. The process of patiently browning mushrooms, building a flavorful roux, and balancing the seasoning is where the culinary magic happens. It’s a rewarding dish to make, filling your kitchen with incredible aromas and culminating in that satisfying moment when you break through the golden crust.
I hope this recipe becomes a cherished part of your comfort food repertoire. If you give it a try, I’d love to hear how it turned out for you—leave a comment or rating below. And if you’re sharing your beautiful creation on social media, tag me so I can admire your work!
For more tested, professional recipes designed for the home cook, be sure to explore the other dishes on the blog. Happy cooking

Ultimate Vegetarian Mushroom Pot Pie
Equipment
- 9-inch deep-dish pie plate or 2-quart oven-safe baking dish
- Large Dutch oven or heavy-bottomed pot
- Wooden spoon or spatula
- Rolling Pin
- Pastry brush (for egg wash)
- Parchment paper
Ingredients
- 2 tbsp unsalted butter plus more for greasing dish
- 2 tbsp olive oil
- 1.5 lbs mixed mushrooms cremini, shiitake, and oyster, cleaned and sliced
- 1 large yellow onion diced
- 2 medium carrots peeled and diced
- 2 stalks celery diced
- 3 cloves garlic minced
- 1/3 cup all-purpose flour
- 2 cups vegetable broth low-sodium recommended
- 1 cup whole milk or unsweetened plant milk
- 2 tsp fresh thyme leaves or 1 tsp dried
- 2 tsp soy sauce or tamari
- 1 cup frozen peas
- 1 sheet store-bought puff pastry or pie crust thawed if frozen
- 1 large egg for egg wash (optional)
- salt and black pepper to taste
Instructions
- Preheat your oven to 400°F (200°C). Lightly butter a 9-inch deep-dish pie plate or a 2-quart baking dish. Roll out your pastry on a lightly floured surface to fit the top of your dish with a 1-inch overhang. Place it on a parchment-lined baking sheet and refrigerate while you make the filling.
- In a large Dutch oven or heavy-bottomed pot, heat the butter and olive oil over medium-high heat. Add the sliced mushrooms in batches—don’t crowd the pan—and cook for 5-7 minutes per batch until deeply browned. Transfer to a bowl. This browning, called the Maillard reaction, is non-negotiable for building a rich, meaty flavor base.
- Reduce heat to medium. Add the onion, carrots, and celery to the same pot with a pinch of salt. Cook for 8-10 minutes, stirring occasionally, until softened. Add the garlic and cook for 1 minute until fragrant. Sprinkle the flour over the vegetables and cook, stirring constantly, for 2 minutes to cook out the raw flour taste.
- Gradually whisk in the vegetable broth, followed by the milk, ensuring no lumps remain. Bring to a simmer, stirring frequently. The mixture will thicken noticeably. Stir in the cooked mushrooms, thyme, soy sauce, and frozen peas. Season generously with salt and pepper. Simmer for 3-4 minutes until the peas are heated through. Taste and adjust seasoning—trust me, this is your last chance to perfect the filling’s flavor.
- Pour the hot filling into your prepared baking dish. Carefully place the chilled pastry over the top. Trim any excess and crimp the edges to seal. Cut a few small slits in the center to allow steam to escape. For a golden finish, whisk the egg with 1 tbsp water and brush it lightly over the pastry. Bake for 35-40 minutes, or until the crust is puffed and deeply golden brown, and the filling is bubbling around the edges.
- Let the pot pie rest on a wire rack for at least 15 minutes before serving. This crucial step allows the filling to set slightly, so it doesn’t run everywhere when you cut into it. Step back and admire your beautiful, golden creation, then serve warm.