
Have you ever needed a reliable, make-ahead appetizer that pleases absolutely everyone? The kind of dish that disappears from the platter first, leaving guests asking for the recipe? As a chef who has catered countless events, I’ve found that the humble vegetable square is often the unsung hero.
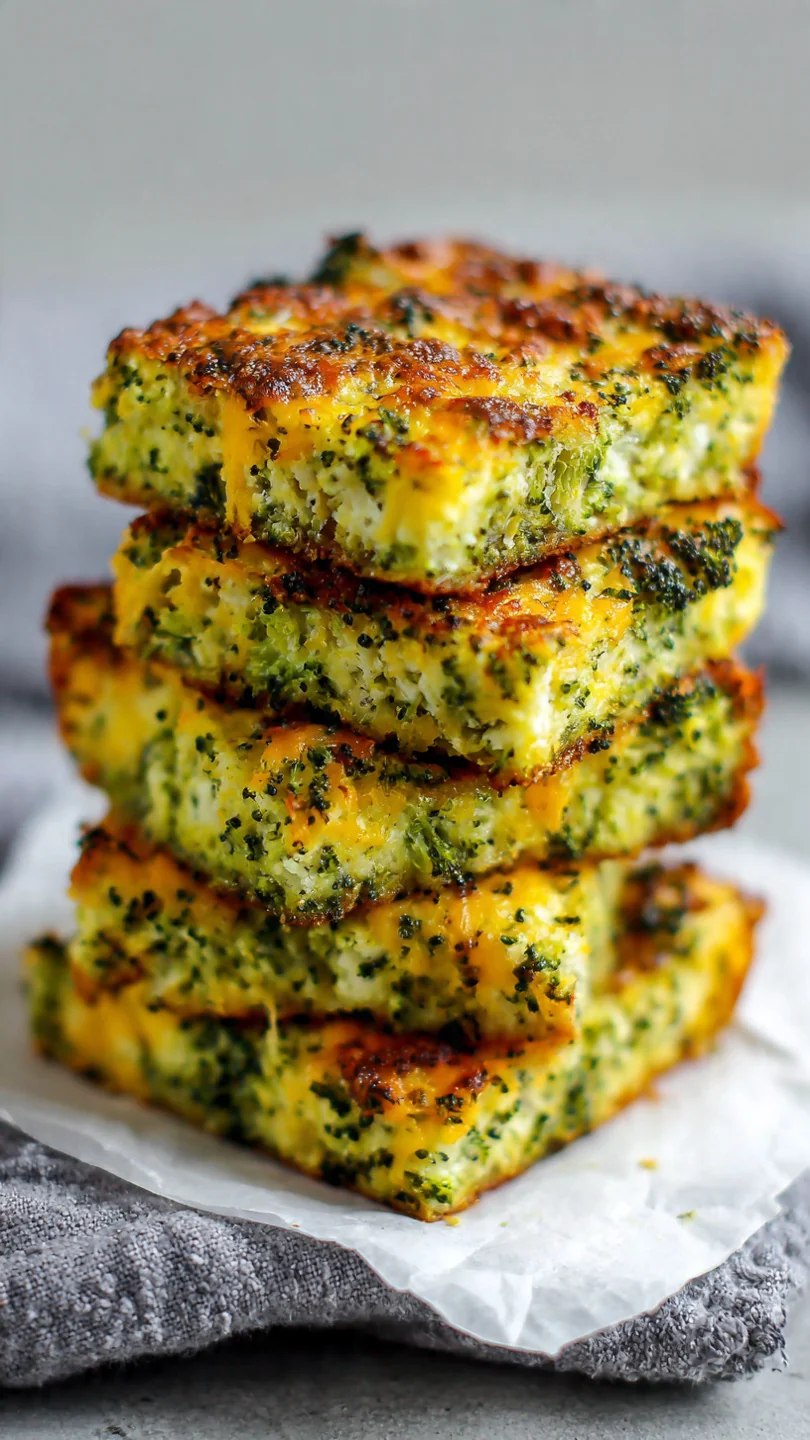
This Broccoli Cheddar Squares recipe is my perfected version—a savory, golden bite with a tender interior, a crisp cheesy top, and the vibrant flavor of fresh broccoli. It’s the ultimate bridge between healthy and indulgent, and it comes together with pantry staples in about 45 minutes. Whether you’re hosting a game day gathering, need a packable lunch component, or simply want a satisfying snack, these squares deliver on flavor, texture, and simplicity.
Let’s get baking.
This recipe is a staple in my repertoire for good reason. It’s been tested and refined to ensure success every single time.
- Crowd-Pleasing Versatility: Equally at home on a fancy brunch buffet, a kids’ party platter, or as a weeknight side dish.
- Make-Ahead Friendly: They taste fantastic warm, at room temperature, or reheated, making them perfect for planning ahead.
- Texture Perfection: The process of blanching and drying the broccoli ensures a tender bite without sogginess, while the batter bakes up light and fluffy with a crisp, cheesy crust.
- Simple Ingredients: No exotic components here—just fresh broccoli, cheese, eggs, flour, and common pantry seasonings.
- Easy to Customize: The base recipe is a blank canvas. Add cooked bacon, swap the cheese, or throw in some herbs to make it your own.
- Kid-Friendly Veggie Boost: It’s a deliciously stealthy way to get more vegetables into anyone’s diet, especially picky eaters.
Ingredients You’ll Need
- Let’s gather our ingredients. This is where simple components come together to create something greater than the sum of its parts. Using quality ingredients here makes a noticeable difference. For the best flavor and texture, I strongly recommend shredding your own cheddar cheese from a block. Pre-shredded cheese is coated to prevent clumping, which can also make it melt less smoothly.
You’ll need one medium head of broccoli, which yields about 4 cups of finely chopped florets. Don’t discard the stems! You can peel the tough outer layer and finely chop the tender core to use as well.
Sharp cheddar provides the best flavor punch, but a good medium cheddar works too. The garlic and onion powder build a savory foundation, and that tiny pinch of optional cayenne doesn’t add heat so much as it deepens the overall flavor profile. Trust me, it’s worth it.
[INGREDIENTIMAGEPLACEHOLDER]Kitchen Equipment Needed
You don’t need any specialty gear for this recipe. A standard 9×13 inch baking dish is essential for the right thickness. A large mixing bowl and a medium pot for blanching the broccoli are your main tools.
A box grater for the cheese and a good kitchen towel or a few layers of paper towels are critical for wicking moisture away from the broccoli. A whisk and a spatula round out the list. If you have a microplane, you could add a little lemon zest to the batter for a bright note, but it’s completely optional.
How to Make Broccoli Cheddar Squares Recipe
Step 1: Prep the Broccoli
Preheat your oven to 350°F (175°C) and grease your baking dish. Now, let’s tackle the broccoli. Bring a pot of well-salted water to a rolling boil.
While it heats, chop your broccoli florets quite finely—you want small, bite-sized pieces. Believe me, blanching is the secret step you shouldn’t skip. It sets the vibrant green color, tames the raw bite, and makes the broccoli tender.
Boil it for exactly 2 minutes, then drain and immediately shock it in cold water. The most important part? Wring it out thoroughly in a clean kitchen towel.
Removing this excess water is what guarantees your squares won’t be wet or soggy after baking.
Step 2: Combine Dry and Wet Mixes
In your large bowl, whisk together the flour, baking powder, garlic powder, onion powder, salt, pepper, and cayenne. In a separate bowl, whisk the eggs until they’re smooth and a bit frothy. This incorporates air, contributing to a lighter texture.
Whisk in the milk and the melted butter that has had a minute to cool. Tip from me: if the butter is too hot, it could start to cook the eggs, so let it sit off the heat for a minute after melting.
Step 3: Create the Batter
Pour the wet ingredients into the dry ingredients. Use a spatula to fold them together until just combined. A few small lumps are perfectly fine; overmixing can lead to toughness.
Now, fold in your very dry broccoli and 1 ½ cups of the shredded cheese. Mix until everything is evenly distributed. The batter will be thick and packed with green and cheesy goodness.
Step 4: Bake to Golden Perfection
Transfer the batter to your prepared dish, spreading it into a smooth, even layer. Take the remaining ½ cup of cheese and sprinkle it evenly over the entire surface. This top layer of cheese is what forms that irresistible, golden-brown, slightly crispy crust as it bakes.
Slide the dish onto the center rack of your preheated oven.
Step 5: Cool, Slice, and Serve
Bake for 28 to 32 minutes. You’re looking for a deeply golden brown top, edges that have pulled away slightly from the pan, and a toothpick inserted into the center that comes out clean. Once achieved, remove the pan and place it on a wire rack.
This is the hard part: let it cool for at least 15 minutes. This resting time allows the structure to set, which means you’ll get clean, sharp squares instead of a crumbly mess. Then, slice into portions, step back, and admire your work.
Serve them warm and watch them disappear.
A few chef-level insights will ensure your squares are flawless every time.
- The Squeeze is Key: After blanching, take the time to really squeeze the broccoli in a towel. You’ll be amazed at how much water comes out. This is the single most important step for perfect texture.
- Room Temperature Eggs: Using eggs straight from the fridge can cause the melted butter to solidify into little bits when mixed. Let your eggs sit out for 20-30 minutes, or place them in a bowl of warm water for 5 minutes to take the chill off.
- Don’t Overmix: Once you add the wet ingredients to the dry, mix just until the flour is incorporated. A slightly lumpy batter is ideal. Overworking the gluten in the flour will make the final product dense and tough.
- Test for Doneness: Ovens vary. Start checking at 28 minutes. The top should be uniformly golden, not pale, and the center should be fully set. If the top is browning too quickly, you can loosely tent it with foil for the last few minutes of baking.
- Sharp Knife for Clean Cuts: For picture-perfect squares, use a sharp chef’s knife and wipe it clean between cuts.
Recipe Variations
- The basic formula is wonderfully adaptable. Here are some of my favorite tested twists.
- Ham & Cheddar: Fold in 1 cup of finely diced cooked ham along with the broccoli for a heartier, protein-packed version.
- Everything Bagel Style: Replace the garlic and onion powder with 2 tablespoons of everything bagel seasoning mixed into the batter, and sprinkle a little more on top with the cheese.
- Gluten-Free: Substitute the all-purpose flour with an equal amount of a 1:1 gluten-free baking blend. The texture will be slightly more tender but still delicious.
- Sun-Dried Tomato & Feta: Use 1 cup of crumbled feta and 1 cup of cheddar. Add ⅓ cup of chopped, oil-packed sun-dried tomatoes (well-drained) for a Mediterranean flair.
- Spicy Southwest: Add 1 finely diced jalapeño (seeds removed for less heat), ½ cup of canned corn (drained), and swap the cheddar for pepper jack cheese.
- Crustless Quiche Style: For a lower-carb option, you can reduce the flour to ½ cup. The squares will be more custardy and need the full cooling time to set firmly.
What to Serve With This Recipe
These squares are the ultimate team player on any menu. For a brunch or lunch, pair them with a bright, simple green salad dressed with a lemony vinaigrette to cut through the richness. They’re a fantastic side dish for soup, especially a creamy tomato or roasted vegetable soup.
For a party appetizer spread, serve them alongside other finger foods like meatballs, a creamy dip, and fresh crudités. Don’t forget the dipping sauces! A side of ranch dressing, marinara sauce, or even a zesty sriracha mayo takes them to the next level.
Beverage-wise, they pair wonderfully with a crisp white wine, a light beer, or sparkling water with lemon.
Storage & Make-Ahead Instructions
- These squares store beautifully, which is a huge part of their appeal.
- Refrigeration: Once completely cooled, store squares in an airtight container in the refrigerator for up to 4 days.
- Freezing: Individually wrap cooled squares in plastic wrap and place them in a freezer bag. They freeze perfectly for up to 2 months. Thaw overnight in the fridge or reheat from frozen.
- Reheating: To restore the crisp top, reheat in a 350°F oven or toaster oven for 8-12 minutes (if thawed) or 15-20 minutes (if frozen), until heated through. The microwave will work in a pinch but will soften the texture.
- Make-Ahead: You can blanch and dry the broccoli, and shred the cheese, a day in advance. Store them separately in the fridge. The entire pan can also be baked, cooled, and refrigerated a day ahead, then reheated before serving.
Frequently Asked Questions
Q: Can I use frozen broccoli?
A: Yes, but you must thaw it completely and then squeeze it even more aggressively to remove all excess water. I still prefer fresh for its brighter flavor and texture.
Q: My squares are soggy in the middle. What happened?
A: This is almost always due to insufficiently dried broccoli or underbaking. Next time, squeeze the broccoli until it seems almost dry, and bake until a toothpick comes out completely clean.
Q: Can I make these in a muffin tin?
A: Absolutely! Grease a muffin tin well and fill cups about ⅔ full. Bake at the same temperature for 20-25 minutes.
This creates perfect single-serving “muffins.”
Q: What’s the best way to chop the broccoli?
A: I like to chop the florets into small, pea-sized pieces. This ensures every bite has broccoli and that it distributes evenly. You can also pulse it a few times in a food processor.
Q: Can I use a different type of cheese?
A: Of course! Gruyère, Monterey Jack, Gouda, or a Swiss blend would all be delicious. Just make sure it’s a good melting cheese.
Q: Are these good for meal prep?
A: They are excellent for meal prep! Portion them into containers for easy lunches or snacks all week. They reheat well.
Q: How do I know when they are done baking?
A: Look for three signs: a deep golden-brown top, the edges pulling away from the pan, and a clean toothpick test in the center. If you see wet batter on the toothpick, bake for another 3-5 minutes.
Q: Can I add other vegetables?
A: You can, but be cautious with high-moisture veggies like zucchini or mushrooms. They must be cooked and thoroughly dried first. Finely chopped, sautéed spinach (squeezed dry) or roasted red peppers (drained) are great additions.
Final Thoughts
After years in professional kitchens, I’ve learned that the most beloved recipes are often the simplest, most reliable ones. These Broccoli Cheddar Squares are exactly that—a no-fuss, incredibly satisfying dish that works for so many occasions. They embody the kind of practical, flavorful cooking I love: approachable enough for a beginner, yet with little professional touches (like blanching and thorough drying) that elevate the result.
I hope this recipe becomes a trusted favorite in your home, the one you turn to when you need something guaranteed to be a hit. Give it a try, and don’t forget to play with the variations to make it your own. If you do make them, I’d love to hear how it went!
Share your results or tag me online. Happy cooking

Broccoli Cheddar Squares
Equipment
- 9×13 inch baking dish
- Large mixing bowl
- Medium pot and colander
- Box grater (for cheese)
- Whisk and spatula
- Kitchen towels (for drying broccoli)
Ingredients
- 4 cups broccoli florets finely chopped (about 1 medium head)
- 2 cups sharp cheddar cheese shredded, divided (8 oz block recommended)
- 1 cup all-purpose flour spooned and leveled
- 1 cup whole milk or 2% milk
- 4 large eggs room temperature
- 1/3 cup unsalted butter melted and slightly cooled
- 1 tsp baking powder
- 1 tsp garlic powder
- 1/2 tsp onion powder
- 1/2 tsp salt plus more for broccoli water
- 1/4 tsp black pepper freshly ground
- 1/8 tsp cayenne pepper optional, for a hint of heat
Instructions
- Preheat your oven to 350°F (175°C). Grease a 9×13 inch baking dish with butter or non-stick spray. Bring a medium pot of salted water to a boil. Add the finely chopped broccoli florets and blanch for exactly 2 minutes. Immediately drain and rinse under cold water to stop the cooking. Squeeze the broccoli in a clean kitchen towel or paper towels to remove as much excess moisture as possible. This step is crucial for preventing soggy squares.
- In a large mixing bowl, whisk together the flour, baking powder, garlic powder, onion powder, salt, black pepper, and optional cayenne until well combined. In a separate medium bowl, whisk the eggs until smooth and frothy. Whisk in the milk and the melted, cooled butter until fully incorporated.
- Pour the wet egg mixture into the bowl with the dry flour mixture. Use a spatula to stir gently until just combined; a few small lumps are okay. Fold in the squeezed-dry broccoli and 1 1/2 cups of the shredded cheddar cheese. Mix until evenly distributed throughout the batter.
- Pour the batter into your prepared baking dish, using the spatula to spread it into an even layer. Sprinkle the remaining 1/2 cup of shredded cheddar evenly over the top. This creates that beautiful, golden, cheesy crust.
- Bake on the center rack for 28-32 minutes, or until the top is deeply golden brown, the edges are pulling away from the sides of the pan, and a toothpick inserted into the center comes out clean. Let the pan cool on a wire rack for at least 15 minutes before slicing into squares. This resting time allows the structure to set for clean cuts.