
There’s a particular kind of magic that happens when you combine creamy coconut milk with warm, toasted spices. It’s a smell that fills your kitchen with instant comfort and promises a deeply satisfying meal with minimal effort. This Chickpea Coconut Curry is my go-to solution for those busy weeknights when you crave something nourishing, flavorful, and fast.
It’s the culinary equivalent of a warm hug—creamy, gently spiced, and packed with hearty chickpeas, all coming together in one pot in about 30 minutes. Whether you’re cooking for a family or meal-prepping for the week, this recipe delivers restaurant-quality flavor with pantry-staple simplicity.
This curry earns a permanent spot in your dinner rotation for more reasons than just its speed. Here’s what makes it special:
- One-Pan Convenience: From sautéing aromatics to simmering the final sauce, everything happens in a single pot. That means more flavor development and far less cleanup.
- Pantry-Powered: The recipe is built around shelf-stable staples like canned chickpeas, tomatoes, and coconut milk. It’s the perfect “what’s in my cupboard?” dinner.
- Customizable Canvas: Start with this base recipe, then make it your own. Stir in spinach, add potatoes, or swap the chickpeas for lentils. I’ll share my favorite variations below.
- Meal-Prep Champion: The flavors improve overnight, making leftovers taste even better the next day. It freezes beautifully for future easy meals.
- Diet-Inclusive: Naturally vegan, gluten-free, and packed with plant-based protein, it’s a crowd-pleaser that accommodates various dietary needs without compromise.
- Big Flavor, Fast: By blooming the spices in oil, you extract maximum depth and aroma in minutes, bypassing the need for long, slow cooking.
Ingredients You’ll Need
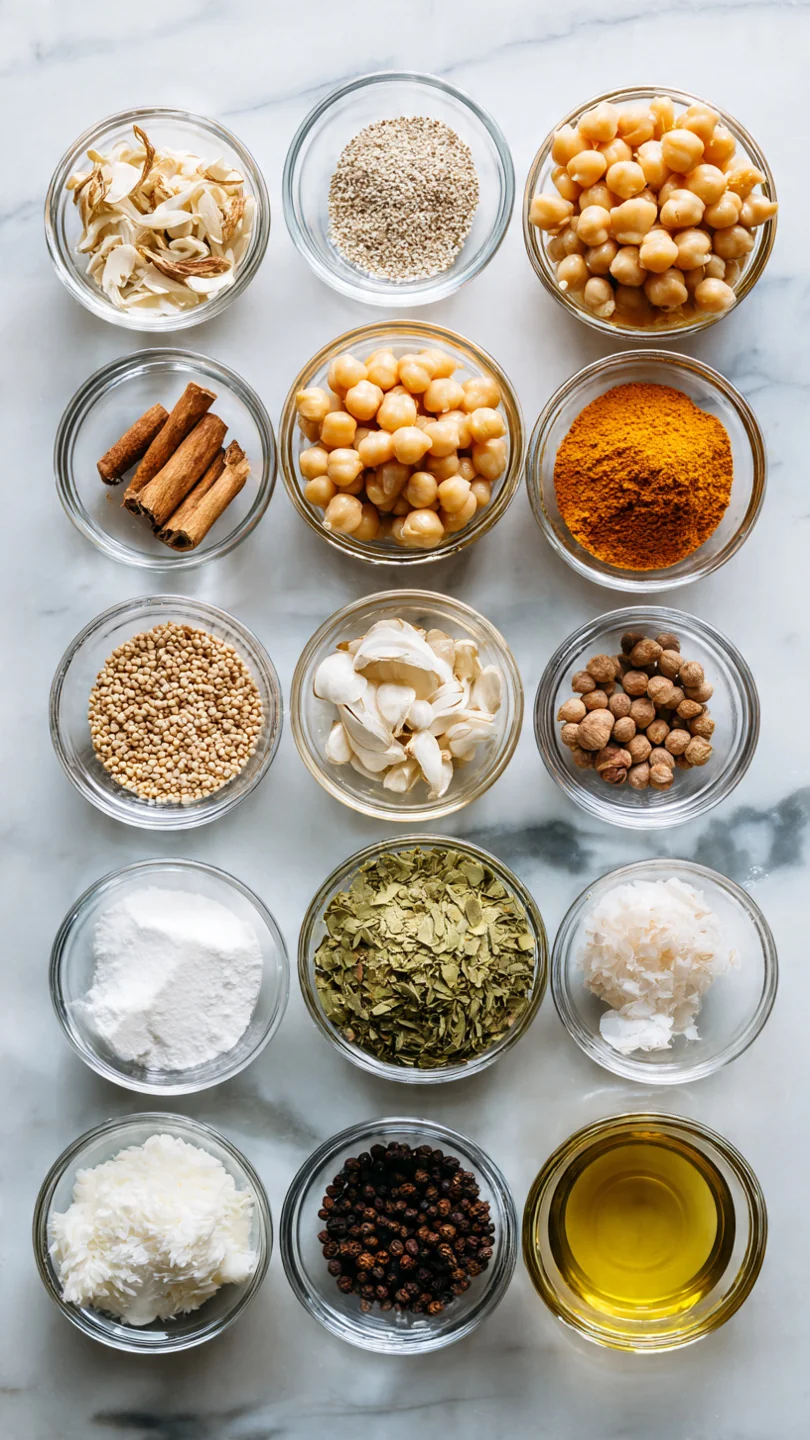
- Let’s gather our ingredients—this is where simple pantry staples transform into something truly special. The beauty of this curry lies in the synergy of a few key components: aromatics for depth, spices for warmth, and coconut milk for luxurious creaminess.
- Aromatics (Onion, Garlic, Ginger): This trio forms the flavor foundation. A yellow onion offers sweetness, while fresh garlic and ginger provide their distinctive pungent and zesty notes. Please use fresh ginger if you can; the jarred paste can sometimes have a muted flavor.
- Spices (Curry Powder, Turmeric, Cumin): A good-quality curry powder is your best friend here—it’s a complex blend that does a lot of the heavy lifting. Turmeric adds earthy notes and a gorgeous golden hue, while cumin brings a warm, nutty undertone.
- Canned Goods (Chickpeas, Tomatoes, Coconut Milk): The workhorses of the dish. Drain and rinse the chickpeas well to remove the starchy canning liquid. Use full-fat coconut milk for the richest, creamiest sauce; light coconut milk will make the curry taste thin and watery. The diced tomatoes add a touch of acidity and body.
- Liquids (Vegetable Broth): This helps achieve the perfect saucy consistency. Low-sodium broth lets you control the final salt level.
- Finishers (Lime Juice, Cilantro): Don’t skip these! The bright acidity of fresh lime juice added at the end lifts and balances the rich sauce. Fresh cilantro adds a pop of color and a refreshing herbal note.
Note: You’ll find the complete list of ingredients, along with their exact measurements, in the printable recipe card at the bottom of this post.
Kitchen Equipment Needed
You don’t need any special equipment to make this curry a success. A large, deep skillet or a 3 to 4-quart Dutch oven is essential—it needs enough surface area for sautéing and enough depth to hold all the simmering ingredients without bubbling over. A wooden spoon or sturdy spatula is perfect for stirring and scraping up the flavorful browned bits (the fond) from the bottom of the pan.
Of course, you’ll need a chef’s knife and cutting board for prepping your aromatics. That’s truly it. While a microplane makes grating ginger a breeze, the side of a spoon works just fine to scrape the skin off, and you can mince it with your knife.
How to Make Chickpea Coconut Curry Recipe
Step 1: Build Your Flavor Base
Heat the oil in your large skillet over medium heat. Add the diced onion and cook, stirring occasionally, for 5-6 minutes. You’re not looking for color here, just softness and translucency.
This gentle sweating draws out the onion’s natural sugars, creating a sweet, savory foundation that will carry the entire dish. Rushing this step can lead to uneven cooking or, worse, burnt bits that taste bitter.
Step 2: Wake Up the Aromatics
Add the minced garlic and grated ginger to the softened onions. Now, stir constantly for about 1 minute. Trust me, your nose will tell you when it’s ready.
The sharp, raw smell will mellow into a deeply inviting, fragrant aroma. This quick cook neutralizes the harsh enzymes in garlic and ginger, transforming them into sweet, complex flavor agents.
Step 3: Bloom the Spices
This is the most important technique in the recipe. Add all your dried spices—curry powder, turmeric, cumin, and cayenne—directly into the oil with the aromatics. Stir constantly for 30-60 seconds.
You’ll see the oil take on the color of the spices and the mixture will become incredibly fragrant. Blooming toasts the spices, releasing their essential oils and fat-soluble flavors, which results in a richer, more integrated taste and prevents a gritty texture in your finished sauce.
Step 4: Simmer to Perfection
Pour in the diced tomatoes, using their juices to help scrape up any delicious browned bits stuck to the pan. Add the chickpeas, coconut milk, and vegetable broth. Give everything a good stir, then bring it to a gentle simmer.
Once bubbling, reduce the heat to medium-low and let it cook uncovered for 12-15 minutes. This simmering time allows the flavors to marry and the sauce to reduce slightly to a creamy, coating consistency.
Step 5: Finish and Serve
Remove the curry from the heat. Now, stir in the fresh lime juice. This last-minute addition brightens all the deep, warm flavors you’ve built.
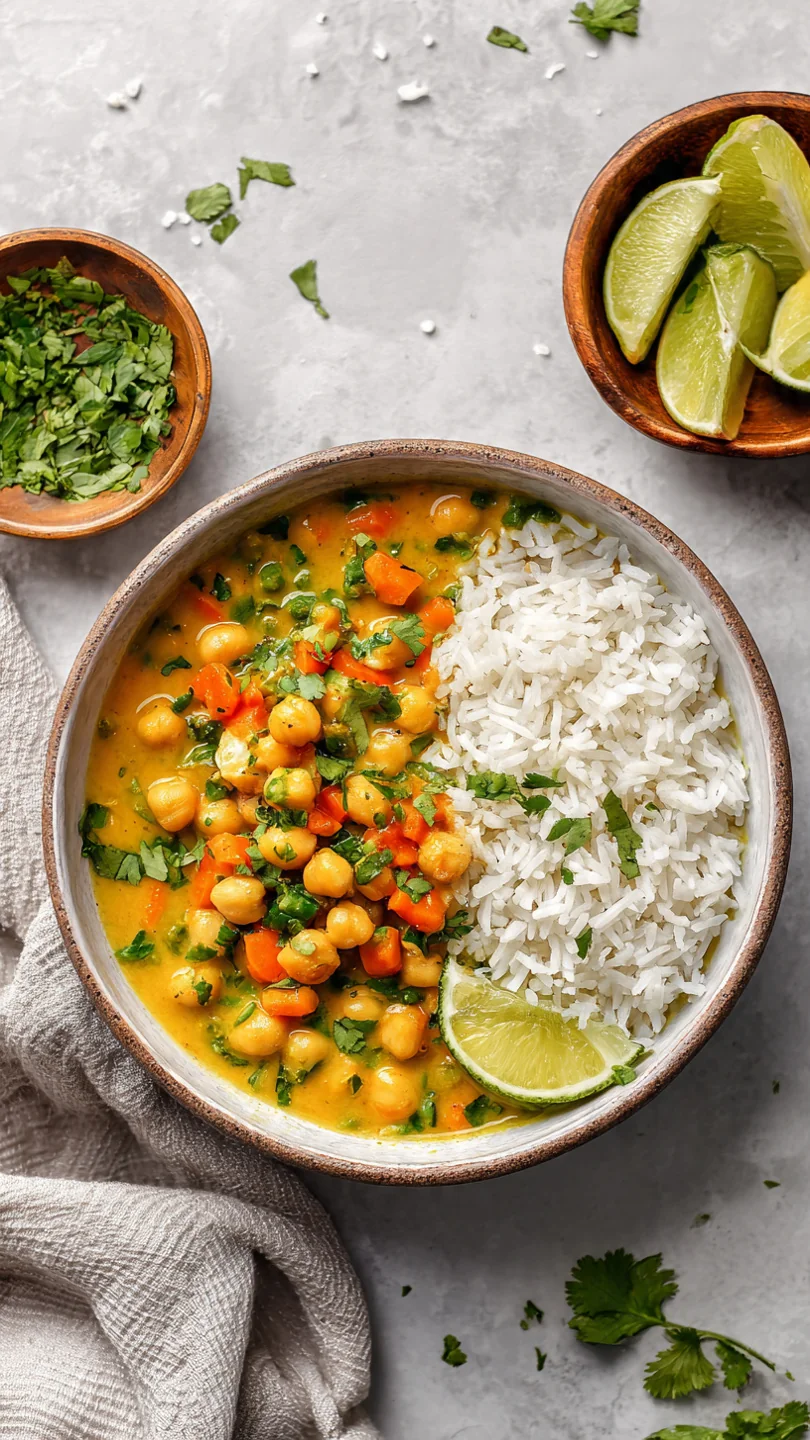
Taste and adjust the seasoning with more salt or a pinch of black pepper if needed. Tip from me: If the tomatoes taste a bit sharp, a tiny pinch of sugar can work wonders to round out the acidity. Ladle the curry over fluffy basmati rice or with warm naan, garnish with a generous handful of fresh cilantro, and dig in.
A few insights from my years in professional kitchens will help you master this recipe every single time.
- Spice Blooming is Non-Negotiable: Adding dried spices directly to liquid (like the coconut milk) is a common mistake. They will never fully hydrate or release their full flavor potential. Blooming them in oil first is the key to a deeply flavored, non-gritty curry.
- Control Your Simmer: A gentle, steady simmer is your goal once all ingredients are combined. A rolling boil can cause the coconut milk to separate or the tomatoes to become too acidic. If your stove runs hot, use a low heat setting and a lid slightly ajar.
- The Creaminess Test: The sauce is ready when it coats the back of a spoon. Run your finger through the sauce on the spoon; if the line holds without the sauce immediately rushing back, you’ve achieved the perfect consistency.
- Acid at the End: Always add citrus juice or vinegar at the very end of cooking, off the heat. Adding it too early causes the bright, volatile acids to cook off, leaving you with just sourness instead of that essential pop of freshness.
Recipe Variations & Customizations
- This recipe is a fantastic template. Once you’re comfortable with the base, try these tested variations to keep it exciting.
- Vegetable-Packed: Add 2 cups of chopped vegetables with the onions. Sweet potatoes, cauliflower florets, or bell peppers work beautifully. Just ensure they are cut small enough to become tender during the simmer.
- Spinach or Kale: Stir in 3-4 large handfuls of fresh baby spinach or chopped kale during the last 3 minutes of simmering. It will wilt perfectly into the hot curry.
- Protein Swap: For a different texture, replace one can of chickpeas with 1 cup of red or brown lentils (add an extra 1/2 cup of broth) or with a pound of peeled, deveined shrimp added in the last 5 minutes of cooking.
- Thai-Inspired: Swap the curry powder for 2 tbsp of red or green curry paste. Add a tablespoon of fish sauce (or soy sauce for vegan) and garnish with Thai basil.
- Creamy Cashew: For an ultra-rich version, blend 1/2 cup of raw cashews with the coconut milk until smooth before adding it to the pot. This adds incredible body and a subtle nutty flavor.
What to Serve With This Recipe
This curry is a complete meal when paired with the right accompaniments. For a classic presentation, serve it over a bed of fluffy basmati or jasmine rice. The rice soaks up the delicious sauce perfectly.
Warm, buttery naan or roti is another fantastic option for scooping. For a lighter meal, try it with quinoa or spooned over roasted cauliflower steaks. To round out the plate, a simple side salad with a lemon-tahini dressing or some quick-pickled red onions adds a refreshing, crunchy contrast.
It’s an ideal main dish for casual dinners, potlucks, or a comforting weekend lunch.
Storage & Make-Ahead Instructions
- This curry is arguably even better the next day as the flavors continue to meld.
- Refrigeration: Cool the curry completely, then transfer it to an airtight container. It will keep in the refrigerator for 4-5 days.
- Freezing: This curry freezes exceptionally well. Portion it into freezer-safe containers or bags, leaving some headspace for expansion. It will keep for up to 3 months. Thaw overnight in the refrigerator before reheating.
- Reheating: Gently reheat in a saucepan over medium-low heat, stirring occasionally, until hot throughout. If the sauce has thickened too much in the fridge, add a splash of water or broth to loosen it. You can also reheat single portions in the microwave, covered, stirring every 60 seconds.
- Make-Ahead: You can fully prepare the curry 1-2 days in advance. Store it in the fridge and gently reheat before serving. The garnishes (cilantro, lime juice) should always be added fresh.
Frequently Asked Questions
Q: Can I use light coconut milk?
A: I don’t recommend it. Full-fat coconut milk provides the necessary fat content to carry the flavors and create a luxuriously creamy, cohesive sauce. Light coconut milk can make the curry taste thin, watery, and sometimes even slightly grainy.
Q: My curry tastes bland. What happened?
A: The most likely culprit is underseasoning or under-toasted spices. Ensure you bloom the spices in oil until fragrant (Step 3) and don’t be shy with salt at the end. Acid is also crucial—the lime juice brightens everything.
Finally, using a fresh, high-quality curry powder makes a world of difference.
Q: How can I make this curry spicier?
A: You have a few options. Increase the cayenne pepper in the spice blend. Add 1-2 thinly sliced fresh Thai chilies or serrano peppers when you add the garlic and ginger.
Or, serve it with a side of chili oil or sriracha for individuals to adjust their own bowls.
Q: Is it okay to use dried chickpeas?
A: Absolutely, but it requires planning. You’ll need about 1 cup of dried chickpeas. Soak them overnight, then cook until completely tender (about 1-1.5 hours) before adding them to the curry in place of the canned ones.
Q: Can I add other vegetables like broccoli or zucchini?
A: Yes! Add sturdy vegetables like broccoli or potatoes with the onions so they have time to cook through. Softer vegetables like zucchini or peas should be added in the last 5-7 minutes of simmering to prevent them from turning to mush.
Q: Why did my coconut milk curry separate?
A: Separation usually occurs from cooking at too high a temperature or simmering too vigorously. Coconut milk should be heated gently. If it does separate, don’t worry—the flavor is still fine.
A vigorous whisk or a quick blitz with an immersion blender can often bring it back together.
Q: How do I know when the curry is done cooking?
A: It’s done when the sauce has thickened to your liking and the flavors taste harmonious—not raw or sharp. The chickpeas should be heated through and tender. The total simmer time of 12-15 minutes is usually perfect.
Final Thoughts
This Easy Chickpea Coconut Curry is more than just a recipe; it’s a reliable template for a delicious, nourishing, and stress-free dinner. It embodies what I love most about cooking: transforming a handful of simple ingredients into something greater than the sum of its parts. The process of blooming spices, the aroma that fills your kitchen, and the satisfaction of a creamy, flavorful bowl ready in 30 minutes—it’s a small act of everyday magic.
I encourage you to make this recipe your own. Start with this trusted base, then play with the vegetables, proteins, and spice levels that suit your taste. It’s forgiving, flexible, and consistently delicious.
Once you try it, I’d love to hear how it turned out for you. Leave a comment or rating below, and if you share your creation on social media, tag me so I can see your masterpiece! For more tested, weeknight-friendly recipes that bring professional techniques into your home kitchen, be sure to explore the other recipes on the site.
Happy cooking
Easy Chickpea Coconut Curry
Equipment
- Large deep skillet or Dutch oven (3-4 quart capacity)
- Wooden spoon or spatula
- Chef’s knife and cutting board
- Can opener
- Measuring spoons and cups
Ingredients
- 1 tbsp Coconut oil or neutral oil For sautéing
- 1 large Yellow onion Finely diced
- 4 cloves Garlic Minced
- 1 tbsp Fresh ginger Grated or finely minced
- 1 tbsp Curry powder Use a good-quality blend
- 1 tsp Ground turmeric
- 1 tsp Ground cumin
- 1/4 tsp Cayenne pepper Optional, for heat
- 2 15-oz cans Chickpeas Drained and rinsed
- 1 14-oz can Diced tomatoes With their juices
- 1 14-oz can Full-fat coconut milk Shake well before opening
- 1 cup Vegetable broth Low-sodium recommended
- 1 tsp Salt Plus more to taste
- 1/2 tsp Black pepper Freshly ground
- 1 tbsp Fresh lime juice From about 1/2 a lime
- 1/4 cup Fresh cilantro Chopped, for garnish
Instructions
- Heat the coconut oil in a large, deep skillet or Dutch oven over medium heat. Add the diced onion and cook, stirring occasionally, for 5-6 minutes until softened and translucent. This gentle cooking builds a sweet, savory base for the curry without any bitterness.
- Add the minced garlic and grated ginger to the softened onions. Cook for 1 minute, stirring constantly, until very fragrant. Believe me, you don’t want to rush this step—toasting the aromatics unlocks their essential oils and deepens the flavor foundation of the entire dish.
- Add the curry powder, turmeric, cumin, and cayenne (if using) to the pan. Stir constantly for 30-60 seconds to toast the spices. You’ll know it’s ready when the mixture becomes incredibly fragrant and the spices darken slightly. This bloomed spice paste is the secret to a rich, non-gritty curry sauce.
- Pour in the diced tomatoes with their juices, scraping up any browned bits from the bottom of the pan. Add the drained chickpeas, coconut milk, and vegetable broth. Stir well to combine. Bring the mixture to a gentle simmer, then reduce heat to medium-low.
- Let the curry simmer uncovered for 12-15 minutes, stirring occasionally. The sauce will thicken slightly and the flavors will meld beautifully. Tip from me: Taste and adjust seasoning with more salt or a pinch of sugar if the tomatoes are too acidic. Stir in the fresh lime juice just before serving.
- Serve the curry hot over basmati rice or with naan bread. Garnish generously with fresh chopped cilantro. Step back and admire your creation—a restaurant-quality, nourishing meal made in your own kitchen in under 30 minutes.