

There’s nothing quite like the smell of fresh ham and cheese pinwheels wafting through the kitchen! I remember the first time I made these tasty little appetizers – it was for my daughter’s birthday party and I was a bit nervous about getting them just right. But as soon as I pulled that first batch out of the oven, golden brown and oozing with melty cheese, I knew I had a winner on my hands. For more recipes like this, check out irresistible ham and cheese sliders recipe perfect for parties. For more recipes like this, check out crockpot french onion meatloaf and melted swiss cheese. For more recipes like this, check out baked zucchini with tomatoes and gouda cheese. For another great variation, check out easy ham and pickle appetizer rolls recipe. If you love this recipe, you’ll also enjoy one pot cheesy pasta and ham recipe. My friend at homemade macaroni and cheese has a similar recipe that you might enjoy. For more inspiration, I recommend checking out instant pot macaroni and cheese. For more inspiration, I recommend checking out blue cheese dressing.
Since then, ham and cheese pinwheels have become one of my go-to recipes for everything from casual get-togethers to holiday gatherings. They’re always a crowd-pleaser, and I love how easy they are to customize with different fillings and flavors. Plus, you can make them ahead of time and just pop ’em in the oven when you’re ready to serve. Talk about a hostess’s dream come true!
Now, I know some folks might be intimidated by the idea of working with puff pastry (I sure was at first!), but trust me – it’s not nearly as complicated as it seems. With a few simple tips and tricks, you’ll be whipping up these ham and cheese pinwheels like a pro in no time. So let’s dive in and get rollin’!
Why You’ll Love This Recipe
If you’re looking for a quick and easy appetizer that’s sure to impress, these ham and cheese pinwheels are just the ticket. I’ve found that they’re perfect for everything from game day snacks to elegant cocktail parties.
The combination of savory ham, gooey cheese, and flaky puff pastry is pretty much irresistible in my book. And with just a handful of simple ingredients, you can whip up a big batch of these tasty bites in no time flat. Trust me, once you try ’em, you’ll be hooked on ham and cheese pinwheels just like I am!
Ingredients List
Alright, let’s talk ingredients! Here’s what you’ll need to make a batch of delicious ham and cheese pinwheels:
- 2 sheets frozen puff pastry, thawed (I prefer Pepperidge Farm brand for the best flavor and texture)
- 1/2 pound thinly sliced deli ham (Black Forest or honey ham work great)
- 1 cup shredded cheddar cheese (I like to use a mix of sharp and mild for balanced flavor)
- 1/2 cup grated Parmesan cheese (for a nutty, salty kick)
- 1 large egg, beaten (this will help seal the pinwheels and give them a nice sheen)
- 1 tablespoon Dijon mustard (regular yellow mustard works too if that’s what you have on hand)
- 1 teaspoon dried thyme (or 1 tablespoon fresh if you’ve got it!)
- 1/4 teaspoon garlic powder (for a subtle savory note)
Now, I know some recipes call for making your own dough from scratch, but I’m all about keeping things simple. Store-bought puff pastry is a total lifesaver in my kitchen – it bakes up beautifully every time and saves me a ton of effort. Just be sure to thaw it according to the package directions so it’s pliable and easy to work with.
As for the ham and cheese, feel free to mix things up based on your preferences. I usually go for a classic combo of Black Forest ham and sharp cheddar, but Swiss cheese and honey ham are tasty options too. And don’t be shy with the seasonings! A little Dijon mustard, thyme, and garlic powder go a long way in amping up the flavor of these ham and cheese pinwheels.
Variations
One of the things I love most about this ham and cheese pinwheel recipe is how easy it is to customize. Here are a few of my favorite variations:
- Pesto and Provolone: Spread a thin layer of basil pesto on the puff pastry and top with sliced provolone cheese and ham. The bright, herby flavor of the pesto really makes these pinwheels pop!
- Jalapeño Popper: Mix some diced jalapeños and cream cheese into the cheddar for a spicy kick. I tried this once and my husband couldn’t stop raving about them.
- Everything Bagel: Brush the puff pastry with a mix of poppy seeds, sesame seeds, dried garlic, and dried onion before rolling up the ham and cheese. It’s like a hand-held everything bagel!
- Pizza-Style: Spread some marinara sauce on the pastry and sprinkle with mozzarella, Parmesan, and sliced pepperoni along with the ham. My kids always ask for these “pizza rolls.”
- Caramelized Onion: Sauté some sliced onions until they’re golden and tender, then spread them on the pastry before adding the other fillings. The sweet, mellow flavor is amazing with ham and cheese.
- Apple and Brie: For a fun fall twist, try spreading some fig jam on the pastry and topping it with thinly sliced apples, brie cheese, and Black Forest ham. It’s an unexpected combo that totally works!
Honestly, the possibilities are pretty much endless when it comes to these ham and cheese pinwheels. Don’t be afraid to get creative and try out different flavor combinations based on what you have on hand. Experimenting is half the fun!
Servings and Timing
This recipe makes about 20-24 ham and cheese pinwheels, depending on how thick you slice them. In my experience, that’s enough to serve 6-8 people as an appetizer.
As for timing, here’s a breakdown of what to expect:
- Prep Time: 20 minutes
- Cook Time: 15-20 minutes
- Total Time: 35-40 minutes
Keep in mind that the puff pastry will need to thaw for about 30-40 minutes before you can work with it. I usually take it out of the freezer right when I start prepping my other ingredients so it’s ready to go when I need it.
Step-by-Step Instructions
Alright, let’s get down to business! Here’s how to make a batch of irresistible ham and cheese pinwheels:

Step 1: Prep the Pastry
Unfold one sheet of thawed puff pastry on a lightly floured surface. Gently roll it out into a 10×12-inch rectangle, then transfer it to a baking sheet lined with parchment paper. Repeat with the second sheet of pastry.
Step 2: Layer the Fillings
Brush each sheet of pastry with a thin layer of Dijon mustard, leaving a 1/2-inch border around the edges. Sprinkle the cheddar, Parmesan, thyme, and garlic powder evenly over the mustard. Arrange the ham slices on top, overlapping them slightly so they cover the entire surface.
Step 3: Roll and Slice
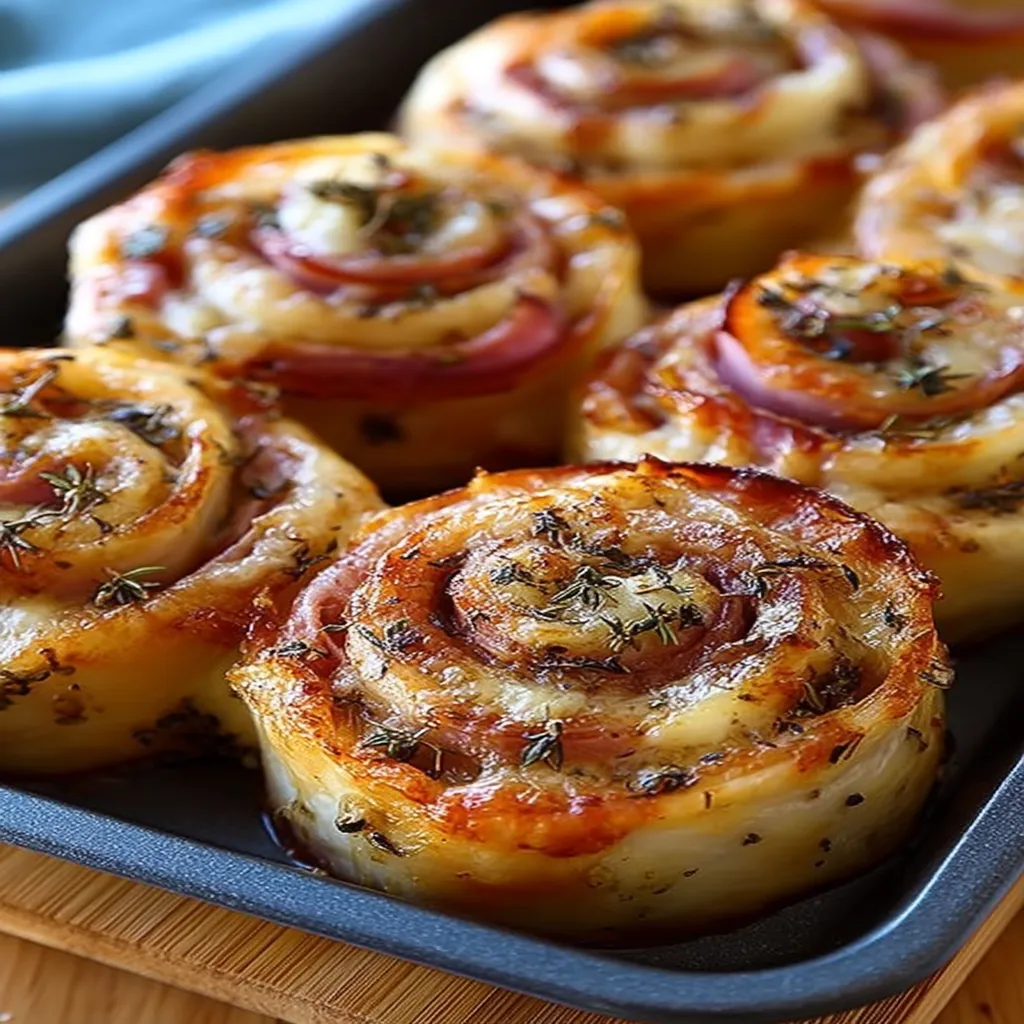
Starting with one of the long sides, roll the pastry up tightly like a jelly roll. Pinch the seam to seal it, then brush the entire log with the beaten egg. Use a sharp knife to slice the log into 1-inch pieces, discarding the ends. Arrange the pinwheels on the baking sheet, cut-side up.
Step 4: Chill and Bake
Pop the baking sheet in the fridge for about 15 minutes to let the pinwheels firm up. This will help them hold their shape better as they bake. Meanwhile, preheat your oven to 400°F (200°C).
When you’re ready to bake, brush the pinwheels with any remaining beaten egg (this will give them a nice golden sheen). Bake for 15-20 minutes, until the pastry is puffed and golden brown. Let them cool for a few minutes before serving.
And there you have it – perfectly flaky, cheesy ham and cheese pinwheels! I like to serve these warm out of the oven, but they’re also great at room temperature if you want to make them ahead of time. Just store them in an airtight container and reheat for a few minutes before serving.
One quick tip: if you find that your pinwheels are unrolling as you slice them, try popping the log in the freezer for 10 minutes to firm it up before cutting. Works like a charm!
Nutritional Information
Now, I’ll be the first to admit that ham and cheese pinwheels aren’t exactly health food. But hey, everything in moderation, right? Here’s a breakdown of the nutritional info per serving (based on 8 servings per recipe):
- Calories: 310
- Fat: 21g
- Saturated Fat: 8g
- Cholesterol: 45mg
- Sodium: 520mg
- Carbohydrates: 22g
- Fiber: 1g
- Sugar: 1g
- Protein: 11g
Obviously, these numbers can vary a bit depending on the specific ingredients you use. But overall, I’d say ham and cheese pinwheels are more of a “sometimes snack” than an everyday staple. Moderation is key!
Healthier Alternatives
If you’re looking to lighten things up a bit, there are definitely some tweaks you can make to this ham and cheese pinwheel recipe. Here are a few ideas:
- Whole Wheat Pastry: Swap out the regular puff pastry for a whole wheat version to add some extra fiber. I’ve tried this before and honestly couldn’t tell much difference in taste or texture.
- Low-Fat Cheese: Use reduced-fat cheddar or Swiss cheese instead of the full-fat varieties. You can also cut back on the total amount of cheese used to save some calories.
- Veggie Boost: Add some finely chopped veggies like spinach, bell peppers, or sun-dried tomatoes to the filling for an extra nutritional punch. It’s an easy way to sneak in some vitamins and minerals!
- Turkey Ham: Replace the regular deli ham with lower-sodium turkey ham to cut back on the salt content. Just be sure to check the labels carefully, as some brands can still be pretty high in sodium.
At the end of the day, ham and cheese pinwheels are meant to be a fun, tasty treat. So don’t stress too much about making them “healthy” – just enjoy them in moderation as part of a balanced diet. That’s my philosophy, anyway!
Serving Suggestions
Half the fun of making ham and cheese pinwheels is figuring out creative ways to serve them! Here are a few of my favorite ideas:
- Game Day Spread: Arrange the pinwheels on a platter with some cold beer and other finger foods like chips and dip, veggies and hummus, or chicken wings. It’s the perfect spread for watching the big game with friends!
- Brunch Buffet: Serve the pinwheels alongside other brunch favorites like quiche, fruit salad, and mimosas. I love doing this for Mother’s Day or Easter gatherings.
- Cocktail Party: Pair the pinwheels with a selection of wine or craft cocktails for a fancy party vibe. You can even make them mini-sized for easier snacking.
- Kids’ Party: At my last birthday party for my daughter, I made a double batch of these ham and cheese pinwheels and served them with veggie sticks, fruit skewers, and lemonade. The kiddos devoured them!
No matter how you serve ’em up, I guarantee these ham and cheese pinwheels will be a hit. They’re just so darn cute and popping with flavor – what’s not to love?
Common Mistakes to Avoid
Take it from someone who’s made her fair share of ham and cheese pinwheel fails – there are a few key things to keep in mind when making this recipe. Here are some common mistakes to avoid:
- Not Thawing the Pastry: Trust me on this one – trying to work with frozen puff pastry is a recipe for disaster. Make sure you give it plenty of time to thaw in the fridge before rolling it out.
- Overstuffing the Pinwheels: It might be tempting to load up on the fillings, but resist the urge! If you add too much ham and cheese, your pinwheels will be hard to roll up and could burst open in the oven. A thin, even layer is best.
- Slicing Too Thick: For the most evenly cooked pinwheels, aim to slice them about 1-inch thick. Any thicker and the centers might stay doughy while the edges get too brown.
- Skipping the Egg Wash: I learned the hard way that brushing the pastry with beaten egg is crucial for getting that gorgeous golden color. Don’t skip this step!
- Underbaking: Puff pastry should be a deep golden brown and flaky when it’s fully cooked. If you take the pinwheels out too early, they’ll be pale and soggy in the middle. Give them the full 15-20 minutes to ensure they’re baked through.
By avoiding these common pitfalls, you’ll be well on your way to ham and cheese pinwheel perfection. And if at first you don’t succeed – hey, that’s what the second batch is for!
Storing Tips
If you’re lucky enough to have leftover ham and cheese pinwheels (a rare occurrence in my house!), storing them properly is key to maintaining their flavor and texture. Here’s what I recommend:
- Refrigerator: Store the cooled pinwheels in an airtight container in the fridge for up to 3 days. To reheat, arrange them on a baking sheet and pop them in a 325°F (160°C) oven for 5-10 minutes until warmed through.
- Freezer: Believe it or not, these pinwheels freeze beautifully! Just arrange the cooled pinwheels on a baking sheet and freeze until solid, then transfer to a freezer bag or container. They’ll keep for up to 2 months. To reheat, bake straight from frozen at 325°F (160°C) for 10-15 minutes.
Personally, I think ham and cheese pinwheels are best served fresh out of the oven. But it’s always nice to have some on hand in the fridge or freezer for quick and easy snacking!
FAQs
Can I use crescent roll dough instead of puff pastry?
Technically yes, but I wouldn’t recommend it. Crescent roll dough is much thinner and softer than puff pastry, so your pinwheels will have a different texture and may not hold together as well. Stick with puff pastry for the best results!
What’s the best way to reheat ham and cheese pinwheels?
As I mentioned in the storing tips, the best way to reheat these pinwheels is in the oven. Just pop them on a baking sheet and bake at 325°F (160°C) until warmed through – about 5-10 minutes for refrigerated pinwheels, or 10-15 minutes for frozen ones. You can also microwave them in a pinch, but the pastry won’t be as crisp and flaky.
Can I make ham and cheese pinwheels ahead of time?
Absolutely! In fact, I often make these a day in advance when I’m prepping for a party. Just follow the recipe up until the slicing step, then arrange the unbaked pinwheels on a baking sheet, cover tightly with plastic wrap, and refrigerate overnight. When you’re ready to serve, just brush with egg wash and bake as directed.
Easy peasy!
How do I keep my pinwheels from unrolling?
The key is to roll the pastry up tightly, then pinch the seam firmly to seal it. If you find that your pinwheels are still unrolling, try popping the log in the freezer for 10-15 minutes before slicing – this will help it firm up and hold its shape better. And be sure to arrange the sliced pinwheels seam-side down on the baking sheet for extra