How to Cook a Chuck Roast – Master the Perfect Roast

Sharing is caring!

Introduction

Indeed, mastering the art of braising chuck beef can transform your culinary experiences. This guide delves into the essentials of choosing, preparing, and cooking a chuck roast that’s not only succulent but also flavorsome. Let’s dive in and uncover the secrets to a perfect chuck roast that will have your guests coming back for seconds!

Overview of Chuck Roast

Certainly, understanding the chuck roast is crucial before we fire up the stove. Typically, this cut comes from the shoulder area of the cow, known for its rich marbling and robust beef flavor. Moreover, it’s one of the more economical cuts, making it a popular choice for family dinners and special occasions alike.

Choosing the Right Cut

Firstly, selecting the perfect chuck roast can make or break your dish. Here are some quick tips:

  • Opt for a piece with abundant marbling; this fat weaves through the meat and melts during cooking, ensuring the roast stays moist and tender.
  • Consider the size of your roast; a larger cut ensures leftovers for sandwiches or stews.

Bone-in vs. Boneless

Secondly, the choice between bone-in and boneless can influence the flavor and cooking method:

  • A bone-in chuck roast enriches the broth with its flavors, enhancing the overall taste and juiciness of the meat.
  • Boneless cuts are easier to handle and carve but might lack some depth of flavor compared to their bone-in counterparts.

Preparation of Meat and Tools

Furthermore, getting your chuck roast ready for the oven involves a few key steps:

  • Always bring your meat to room temperature before cooking to ensure it cooks evenly.
  • Season generously with salt and pepper, and don’t shy away from your favorite spice blends to give it an extra kick.

Necessary Kitchen Tools

Moreover, having the right equipment can make the process smoother:

  • A heavy-duty Dutch oven is ideal for braising, as it retains heat well and keeps the moisture locked in.
  • Ensure you have a sharp knife and a sturdy chopping board for prep work.

This initial part sets the stage for a delicious, tender chuck roast by focusing on the proper selection and preparation techniques. Stay tuned as we dive deeper into the cooking process in the next section!

Selecting the Chuck Roast

Choosing the Right Cut

Indeed, the journey to a perfect chuck roast begins at the meat counter. Opting for the right cut is pivotal:

  • Look for a roast with a good amount of marbling. This fat interspersed within the muscle adds flavor and moisture as it cooks down.
  • Assess the color of the meat—it should be a rich, deep red with fat that is creamy white.

Differences between Bone-in and Boneless Chuck Roast

Additionally, choosing between bone-in and boneless affects the outcome of your dish:

  • A bone-in chuck roast generally offers more flavor because the bones contribute depth to the broth that forms as it cooks. This type also tends to retain moisture better, resulting in a juicier roast.
  • Boneless chuck roast, while lacking the bones, provides a more uniform shape for easier slicing and might cook a bit quicker due to the absence of bone.

Tips on Marbling and Size

Furthermore, paying attention to marbling and size is crucial:

  • Select a roast with visible fat veins running through it. This fat will render during cooking, enveloping the meat in rich flavors.
  • Consider the size based on the number of servings needed. A good rule of thumb is about half a pound per person, but if you love leftovers, a bit more won’t hurt.

Navigating these choices will ensure your chuck roast is not only tasty but also beautifully presented, setting you up for the next steps in cooking. Let’s move forward and delve into the preparation methods to maximize the potential of your selected cut.

Preparation Steps

Preparation of Meat and Tools

Indeed, proper preparation is key to unlocking the full potential of your chuck roast. Here’s how to get started:

  • Begin by trimming any excess fat from the roast, leaving enough to enhance flavor and moisture during cooking.
  • Season the meat generously. A simple rub of salt, pepper, and your choice of herbs like thyme or rosemary works wonders. For a bolder flavor, consider a dry rub that includes garlic powder and paprika.

Necessary Kitchen Tools

Moreover, having the right tools on hand is essential for a successful cooking experience:

  • A Dutch oven is indispensable for braising, known for its ability to maintain even heat and lock in moisture.
  • Meat tongs are helpful for safely turning the roast during the searing process.
  • A sharp chef’s knife will make trimming and slicing the roast much easier.

Initial Meat Preparation Steps

Furthermore, the initial preparation of your chuck roast involves a few critical actions:

  • Allow the roast to sit at room temperature for about 30 minutes before cooking. This step helps in achieving more even cooking.
  • Sear the meat on all sides in a hot Dutch oven with a bit of oil until a golden crust forms. This not only improves texture but also seals in flavors.

These preparation steps are foundational, ensuring that your chuck roast is seasoned beautifully and ready to undergo the slow cooking process that will make it tender and delectable. Next, we’ll explore the various cooking techniques to perfectly braise your prepared chuck roast.

Cooking Techniques

Braising the Chuck Roast

Certainly, braising is a technique that transforms the tough chuck roast into a tender, flavorful dish. Here’s how to do it right:

  • Once your chuck roast is seared and set aside, it’s time to start the braising process. Begin by deglazing your Dutch oven with a splash of broth or water, scraping up any browned bits from the bottom of the pot.

Detailed Steps for Searing the Meat

Moreover, searing the meat properly sets the stage for a delicious braise:

  • Heat a few tablespoons of oil in the Dutch oven over medium-high heat. Once hot, place the chuck roast in the pot. Sear each side until it develops a rich, brown crust, usually about 3-4 minutes per side. This step locks in flavors and enhances the final dish’s savory depth.

Guidelines for Creating a Moist Environment

Furthermore, creating the right environment for braising is critical:

  • After searing, add enough liquid to come up halfway up the sides of the roast. This could be a mix of stock and water, which not only adds moisture but also flavor.
  • Introduce aromatic vegetables like onions, carrots, and celery around the roast, which will break down and enrich the braising liquid.

Cooking Temperatures and Times for Tenderness

Additionally, managing the cooking temperature and time ensures tenderness:

  • Cover the Dutch oven with a tight-fitting lid to seal in the steam and maintain an even cooking environment.
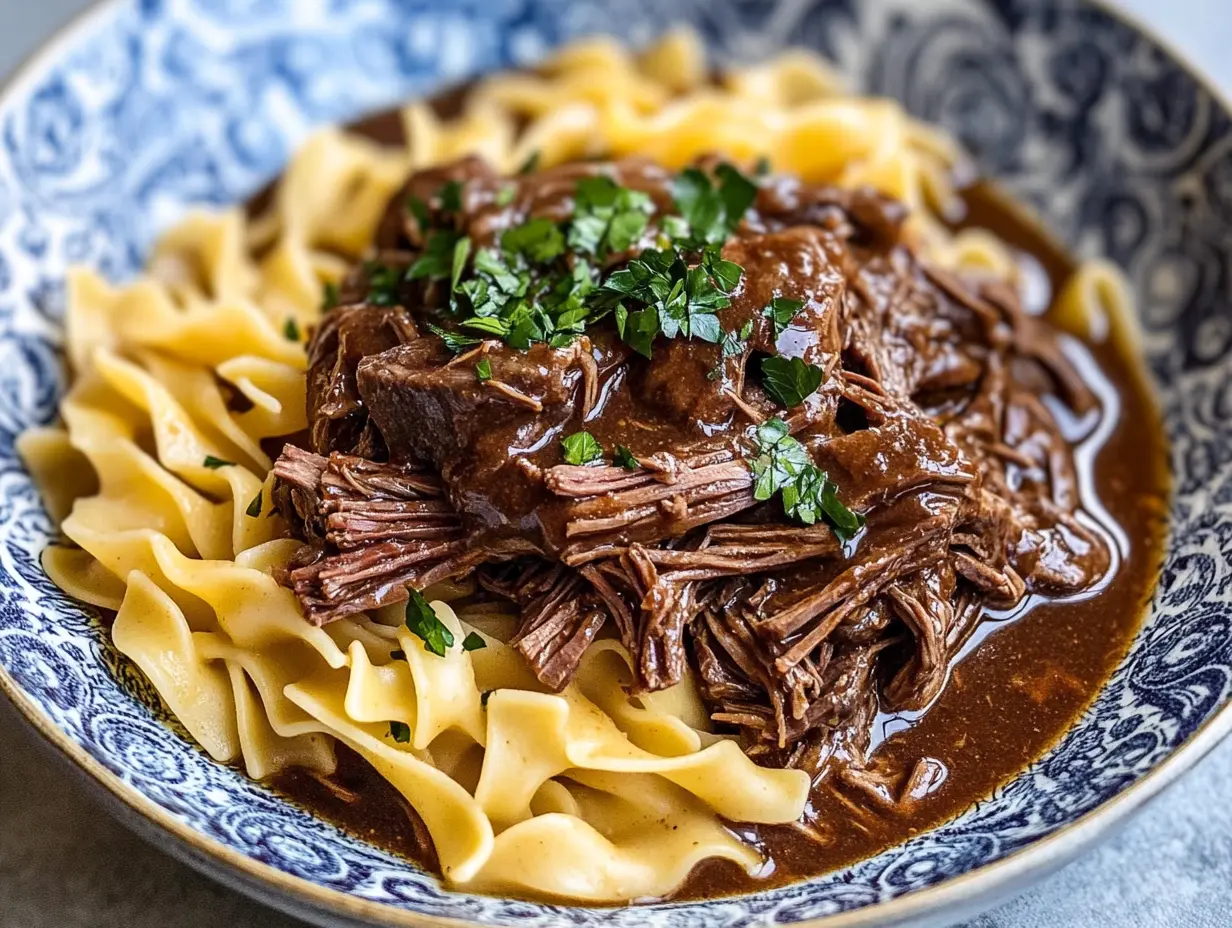
  • Place the pot in a preheated oven set to a low temperature, around 325°F. Slow-cook the roast for about 3-4 hours, checking for tenderness. The meat should be fork-tender and almost falling apart when it’s done.

Employing these techniques will ensure your chuck roast is perfectly braised, maximizing both flavor and texture. As we continue, we’ll look into how to complement this main dish with suitable flavors and additional cooking tips.

Flavor Enhancements

Using Aromatics and Spices

Certainly, aromatics and spices play pivotal roles in elevating the flavor profile of your chuck roast. Here’s how to incorporate these elements effectively:

  • Start by sautéing onions and garlic in the same Dutch oven used for searing the roast. This base not only adds a rich flavor but also infuses the meat and broth with a delightful aroma.

Selection of Aromatics for Flavor Depth

Moreover, choosing the right aromatics is crucial:

  • Onions and garlic are essentials, providing a sweet and savory foundation.
  • Add bay leaves for their subtle, herbal notes that complement the robust flavors of the meat.
  • Carrots and celery can also be introduced for additional sweetness and earthiness, enhancing the overall complexity of the dish.

Spice Blend Recommendations and Their Impacts on the Dish

Furthermore, selecting the right spices can transform your chuck roast:

  • Consider a classic blend of salt, pepper, and thyme for a traditional flavor.
  • For a unique twist, mix in spices like smoked paprika, cumin, and a touch of cinnamon. These not only add warmth and depth but also a hint of unexpected flavor that pairs wonderfully with the beef.
  • Always season generously, ensuring the spices are well distributed over and around the roast before it goes into the oven.

Incorporating these aromatics and spices not only boosts the taste but also creates an enticing aroma that fills your kitchen. As the roast slowly cooks, these flavors meld together, creating a succulent and aromatic main course. Up next, we’ll dive into how to craft the perfect gravy from the pan drippings to further enhance your dining experience.

Making the Gravy

Gravy Preparation

Certainly, making gravy from the pan juices is an excellent way to capture all the robust flavors of your braised chuck roast. Here’s a step-by-step guide to ensure it turns out perfectly:

  • Once your chuck roast is tender and resting, pour the remaining juices and bits from the Dutch oven through a strainer into a saucepan, discarding the solids.

Step-by-Step Guide to Making Gravy from Pan Juices

Moreover, follow these steps to create your gravy:

  • Place the strained juices on the stove over medium heat and bring to a simmer. If the liquid is less than desired, you can add a bit more broth to enhance the volume.
  • Skim off any excess fat from the top to ensure a smoother gravy.

Adjusting Thickness and Flavor with a Cornstarch Slurry

Furthermore, achieving the perfect gravy consistency and flavor is crucial:

  • In a small bowl, mix cornstarch with an equal part of water to create a slurry.
  • Gradually whisk this mixture into the simmering juices. Continue to cook and stir until the gravy thickens to your liking.
  • Taste and adjust the seasoning with salt and pepper. If the gravy needs more depth, a splash of Worcestershire sauce or a pinch of sugar can balance the flavors.

These steps will help you craft a delicious gravy that complements the rich taste of your chuck roast, enhancing the overall dining experience. Next, we’ll explore ideal side dishes and how to present your beautifully braised chuck roast for the ultimate meal.

Side Dishes and Accompaniments

Complementary Sides

Certainly, choosing the right side dishes can enhance the enjoyment of your chuck roast, creating a well-rounded meal. Here are some classic options that pair beautifully:

  • Mashed Potatoes: A creamy, buttery mound of mashed potatoes is the perfect vessel for soaking up the rich gravy of the chuck roast. For an extra touch of luxury, mix in some roasted garlic or a sprinkle of chives.
  • Roasted Vegetables: Consider a medley of carrots, parsnips, and Brussels sprouts, roasted until caramelized and tender. These not only add color and variety to your plate but also complement the deep flavors of the meat with their natural sweetness.
  • Yellow Rice: Infused with turmeric and perhaps a pinch of saffron, yellow rice offers a fragrant and slightly earthy component that stands up well to the hearty chuck roast.

Importance of Pairing to Enhance the Main Dish

Moreover, the importance of pairing the right sides cannot be overstated:

  • Each side dish should contribute to the meal by either contrasting with or enhancing the main flavors of the roast. The creaminess of mashed potatoes, the sweetness of roasted vegetables, and the aromatic presence of yellow rice each play a role in balancing the dish’s flavor profile.
  • Think about texture as well; the softness of the potatoes and the slight crunch of the vegetables provide a pleasing contrast to the tenderness of the meat.

Selecting these sides will not only complement the flavors of your chuck roast but also turn a simple meal into a feast, making each bite a delightful experience. With your roast perfectly cooked and your sides thoughtfully chosen, you’re ready to present a dish that’s sure to impress.

Final Presentation and Serving

Serving Suggestions

Indeed, the final presentation of your chuck roast can greatly enhance the dining experience. Here’s how to serve it with style:

  • Plating Techniques: After resting the meat, slice it against the grain to ensure each piece is tender and easy to chew. Arrange the slices neatly on a large platter, surrounded by your side dishes.
  • Enhancing Visual Appeal: Drizzle some of the rich gravy directly over the meat and perhaps sprinkle a little parsley or thyme for a touch of color. This not only adds visual interest but also signals the flavors to expect.

Serving Temperature and Techniques

Moreover, serving your chuck roast properly is crucial for the best experience:

  • Serve hot, ideally straight from the oven to the table. Keeping the meat warm not only enhances its flavors but also maintains the tenderness and juiciness of the roast.
  • Use a warmed serving platter and cover the roast loosely with foil if there’s any delay in serving to keep it from cooling down too quickly.

Employing these presentation and serving techniques will ensure that your chuck roast is as appealing to the eye as it is to the palate, making your meal memorable for all who partake.

FAQs

Which Cooking Method is Best for a Chuck Roast?

Indeed, braising is considered the best method for cooking a chuck roast. This technique involves cooking the roast slowly in a covered pot with a small amount of liquid, allowing the tough fibers of the meat to break down over time, resulting in a tender and flavorful dish.

How Many Hours Do You Cook a Chuck Roast?

Moreover, the cooking time for a chuck roast generally depends on the weight of the roast and the cooking temperature. Typically, you should plan for about 2 to 3 hours for a 3 to 4-pound roast when braising at 325°F. Always check for tenderness rather than strictly adhering to the clock.

Does Chuck Roast Get More Tender the Longer You Cook It?

Furthermore, chuck roast does indeed become more tender the longer it’s cooked, as the long, slow cooking process allows the connective tissues to break down. However, it is possible to overcook it, which can lead to dryness. The key is to maintain enough moisture in the pot and to cook it just until it reaches the desired tenderness.

Should You Cook Chuck Roast at 325 or 350?

Cooking a chuck roast at 325°F is generally recommended over 350°F. The lower temperature allows for a more gentle cooking process, reducing the risk of drying out the meat and ensuring it becomes perfectly tender without overcooking. If you’re short on time, 350°F can be used, but careful monitoring is necessary to avoid toughening the meat.

Read More :

What is a good substitute for lasagna pasta?

Lingcod Recipes: Top Dishes and Cooking Tips


Leave a Comment