

Y’know, the first time I tried making Indian Onion Bhaji at home, I was a complete mess in the kitchen. I’d just moved into my first apartment, barely knew how to chop an onion without crying buckets, and thought I could whip up these crispy, golden fritters like the ones from my favorite Indian takeaway. Spoiler alert: my first batch was a soggy disaster, but man, did I learn a thing or two! For more recipes like this, check out crockpot french onion meatloaf and melted swiss cheese. For more recipes like this, check out crockpot french onion meatloaf and melted swiss cheese. For more recipes like this, check out creamy gruyere and caramelized onion scalloped potatoes. My friend at stovetop potato and onion sidedish recipe has a similar recipe that you might enjoy. For more inspiration, I recommend checking out homemade bacon and onion pizza no sauce. My friend at avocado green onion chicken salad has a similar recipe that you might enjoy. If you love this recipe, you’ll also enjoy baked onion rings recipe. For another great variation, check out caramelized onion jam.
Now, after countless tries, I’ve got Indian Onion Bhaji down to an art, and I’m beyond excited to share this recipe with you.
There’s something magical about Indian Onion Bhaji, isn’t there? It’s like a hug in snack form, with those caramelized onions wrapped in a spiced, gram flour batter that fries up to perfection.
My family goes wild for these, especially my brother, who swears they’re better than any restaurant version (bless his heart for the ego boost). So, let’s dive into making this Indian Onion Bhaji recipe your new go-to for cozy nights or impressing friends at a dinner party.
I promise, even if you’ve never made Indian Onion Bhaji before, I’ve got your back with tips and tricks from my own kitchen flops and wins. Stick with me, and you’ll be frying up these beauties like a pro in no time!
Why You’ll Love This Recipe
I’ve found that Indian Onion Bhaji is one of those recipes that just wins everyone over, no matter their taste buds. There’s this unbeatable combo of crispy edges, soft oniony centers, and a kick of spices that makes you keep reaching for “just one more.” In my kitchen, these disappear faster than I can fry ‘em, and that’s saying something!
Plus, making Indian Onion Bhaji at home is surprisingly easy once you get the hang of it. You don’t need fancy equipment or hard-to-find ingredients, and I’ll walk you through every step to avoid the mushy mess I made on my first go. Trust me, the smell alone while they’re sizzling in the pan is worth the effort!
Ingredients List
Alright, let’s talk about what you’ll need to whip up a batch of Indian Onion Bhaji that’ll have everyone begging for seconds. I’m super picky about using fresh stuff here because, in my experience, it makes all the difference in flavor. I usually buy my onions and spices from a local market for that extra punch, but your regular grocery store works just fine too.
Here’s the breakdown for a batch of Indian Onion Bhaji that serves about 4-6 as a snack or side:
- 2 large onions (about 500g), thinly sliced for that perfect texture
- 1 cup (120g) gram flour (besan), sifted to avoid lumps
- 1 teaspoon cumin seeds, for a warm, earthy vibe
- 1 teaspoon ground coriander, because it’s non-negotiable for authentic taste
- 1/2 teaspoon turmeric powder, for color and a subtle depth
- 1/2 teaspoon red chili powder, adjust if you’re not into heat
- 1 teaspoon salt, or to taste, for balancing flavors
- 1-2 green chilies, finely chopped, optional but I love the kick
- 2 tablespoons fresh cilantro, chopped, for a burst of freshness
- Water (about 1/4-1/3 cup), just enough to make a thick batter
- Oil for deep frying, I prefer vegetable or canola for a neutral taste
I’ll be real with you, the gram flour is the star for getting that signature Indian Onion Bhaji crunch, so don’t swap it for regular flour. If you’ve got a fave spice blend, feel free to tweak things a bit, but this mix is my go-to after years of tinkering. And hey, slicing those onions thin is key, or you’ll end up with chunky, undercooked bits (been there, hated that).
Variations
One thing I adore about Indian Onion Bhaji is how versatile it can be. I’ve played around with this recipe more times than I can count, especially when I’ve got picky eaters or random pantry leftovers to use up. Here are some twists on the classic Indian Onion Bhaji that I’ve tried and loved, so you can mix it up too.
- Spicy Kick: Toss in an extra teaspoon of red chili powder or a pinch of cayenne if you’re a heat lover like me. I tried this once for a game night, and my friends couldn’t stop raving (or chugging water)!
- Veggie Mix: Add shredded carrots or finely chopped spinach to the batter for a pop of color and nutrition.
- Garlic Lover’s Dream: Mix in a minced garlic clove or two for a bold twist; it’s heavenly with a yogurt dip.
- Herby Bliss: Swap cilantro for fresh mint or add both if you’re feeling fancy. My kids always ask for this version!
- Cheesy Surprise: Fold in a handful of grated cheddar before frying for an ooey-gooey bite (total guilty pleasure).
- Seed Sensation: Sprinkle in some nigella seeds or fennel seeds for a nutty, aromatic flair.
- Gluten-Free Check: Double-check your gram flour is certified gluten-free if that’s a concern; works just as well.
- Less Onion, More Crunch: Cut back on onion and add shredded potato for a hash-brown-ish Indian Onion Bhaji vibe.
Honestly, half the fun is experimenting, so don’t be shy about making this Indian Onion Bhaji your own. What’ve you got in your fridge to throw in?
Servings and Timing
Let’s get into the nitty-gritty of how much time and how many folks you can feed with this Indian Onion Bhaji recipe. In my experience, timing can vary a smidge based on how fast you slice onions or heat your oil, but this is a pretty quick dish overall. Here’s what I usually clock for making Indian Onion Bhaji:
- Prep Time: 15 minutes
- Cook Time: 20 minutes
- Total Time: 35 minutes
- Servings: 4-6 portions as a snack or side
I’ve found this makes enough for a small gathering, but if I’m cooking for a crowd, I just double up. You’ll be done in no time, I swear!
Step-by-Step Instructions
Alright, let’s roll up our sleeves and make some killer Indian Onion Bhaji together. I’m gonna walk you through this like we’re side by side in my kitchen, sharing a cup of chai. Follow along, and don’t stress if it’s not perfect on the first try—I’ve burned a few batches myself!
Step 1: Slice and Prep the Onions
First things first, grab those onions and slice ‘em thin as you can without losing a finger (I’m only half-joking). I use a sharp knife and go for almost see-through slices because thicker ones don’t cook evenly. Pop them in a big bowl, sprinkle a pinch of salt, and give ‘em a good squish with your hands to release their juices. That’s my little trick for extra flavor in Indian Onion Bhaji.
Step 2: Mix the Batter
Now, add your gram flour, cumin seeds, coriander, turmeric, chili powder, and the rest of the salt to the onions. Toss in the chopped chilies and cilantro if you’re using ‘em. Slowly drizzle in water, mixing with your hands or a spoon until you’ve got a thick, gloopy batter that clings to the onions. I’ve learned to go easy on the water for Indian Onion Bhaji—too much, and you’re frying soup!
Step 3: Heat the Oil
Get a deep pan or wok and pour in enough oil to fry—about 2-3 inches deep. Heat it over medium until it’s shimmery but not smoking (test with a tiny batter drop; it should sizzle right away). I’ve botched Indian Onion Bhaji with oil that’s too cold, so patience here pays off.
Step 4: Fry the Bhajis
Scoop up a small handful of the batter—don’t worry about perfect shapes—and gently drop it into the hot oil. Fry 3-4 at a time so you don’t crowd the pan, flipping ‘em after a couple of minutes until they’re golden and crispy all over. This is where the magic of Indian Onion Bhaji happens, and the smell? Outta this world!
Step 5: Drain and Serve
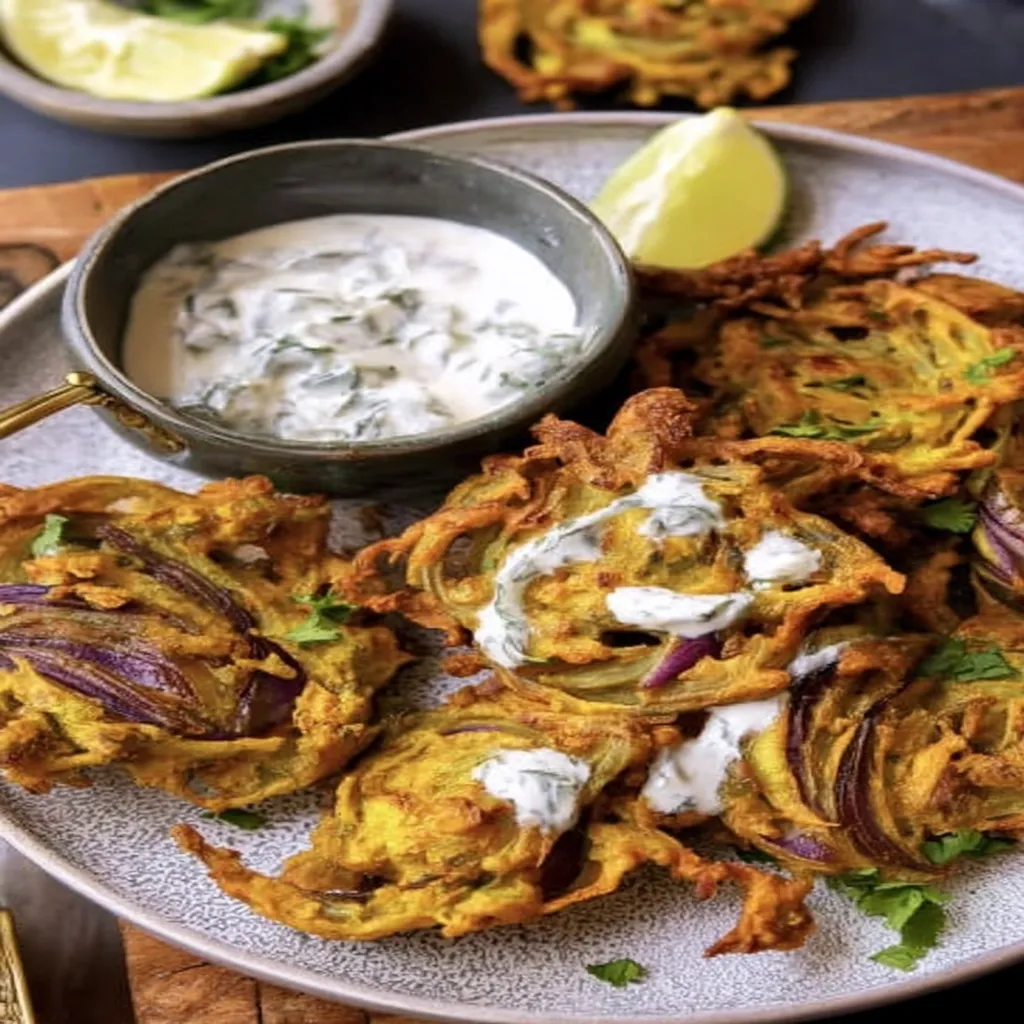
Use a slotted spoon to fish out your Indian Onion Bhaji, letting them drain on paper towels to soak up extra oil. I always sneak a bite straight from the pan (don’t tell!). Serve ‘em hot with a dip, and watch them vanish.
Nutritional Information
I’m not gonna lie, Indian Onion Bhaji isn’t exactly diet food, but it’s worth every indulgent bite in my book. I’ve crunched the numbers for you per serving (assuming 6 portions), though frying oil can tweak these a bit. Here’s the lowdown on Indian Onion Bhaji nutrition:
- Calories: 200 per serving
- Fat: 12g
- Protein: 5g
- Carbohydrates: 18g
- Sodium: 400mg
I don’t stress too much over this since Indian Onion Bhaji is a treat, not an everyday thing. Enjoy it guilt-free!
Healthier Alternatives
If you’re looking to lighten up Indian Onion Bhaji, I’ve got some swaps I’ve tried when I’m watching my waistline. These keep the flavor but cut back on some of the heavy stuff. Here’s how I tweak my Indian Onion Bhaji for a healthier spin:
- Air Fryer Option: Skip deep frying and use an air fryer at 375°F for 10-12 minutes, flipping halfway. It’s not quite as crispy, but close enough.
- Less Oil: Shallow fry with just a couple of tablespoons of oil if you’re cutting fat. I’ve done this and it works decently.
- Baked Version: Bake at 400°F on a greased tray for 15-20 minutes, though texture-wise, it’s more like an onion patty.
- Spice Over Salt: Cut sodium by reducing salt and boosting spices like cumin or chili for Indian Onion Bhaji flavor.
These tweaks help me enjoy Indian Onion Bhaji without overdoing it. Give ‘em a shot!
Serving Suggestions
I love serving Indian Onion Bhaji in all sorts of ways depending on the vibe of the meal. At my last family get-together, these were the star of the show, and I’ve got some go-to pairings that never fail. Check out these ideas for Indian Onion Bhaji:
- As an Appetizer: Serve with a tangy tamarind chutney or mint yogurt dip for dipping.
- With Main Dishes: Pair alongside a creamy butter chicken or dal for a full Indian feast.
- Snack Attack: Just grab a few Indian Onion Bhaji with a cup of masala chai on a rainy day—pure bliss.
- Party Pleaser: Stack ‘em on a platter with lemon wedges for a crowd-friendly finger food.
Honestly, you can’t go wrong however you serve Indian Onion Bhaji. What’s your fave combo?
Common Mistakes to Avoid
I’ve made my fair share of blunders with Indian Onion Bhaji over the years, so let me save you the headache with some pitfalls to dodge. Trust me on this one, I learned the hard way! Here are the big no-nos for Indian Onion Bhaji:
- Too Much Water: A soggy batter won’t crisp up; add water bit by bit until it’s just sticky enough.
- Cold Oil: If the oil’s not hot, you’ll get greasy, sad bhajis—I’ve ruined batches this way.
- Overcrowding: Frying too many at once drops the oil temp and makes ‘em stick together. Guilty as charged!
- Thick Onion Slices: Big chunks don’t cook through, leaving raw onion in your Indian Onion Bhaji—yuck.
Keep these in mind, and you’ll be golden. We’ve all been there, right?
Storing Tips
If by some miracle you’ve got leftovers of Indian Onion Bhaji, I’ve found they keep pretty well with the right care. In my experience, they’re best fresh, but here’s how to store Indian Onion Bhaji for later:
- Refrigerator: Store in an airtight container for 2-3 days; reheat in an oven to revive crispiness.
- Freezer: Freeze cooked bhajis for up to a month; thaw and reheat at 350°F for 10 minutes.
- Reheating Tip: Avoid the microwave—it’ll turn your Indian Onion Bhaji into a rubbery mess.
I usually make extra just to have some stashed away. They’re a lifesaver for quick snacks!

Frequently Asked Questions
I get a bunch of questions about making Indian Onion Bhaji, so I’ve rounded up the most common ones I hear. Here are my answers, straight from my kitchen to yours!
Can I make Indian Onion Bhaji ahead of time?
Totally! Prep the batter a few hours ahead and store it in the fridge. Just fry ‘em up fresh when you’re ready to eat for the best crunch.
What if I don’t have gram flour?
Hmm, you can use chickpea flour since it’s the same thing, but regular flour won’t give you that classic Indian Onion Bhaji texture. Hunt for besan at an Indian store or online!
Can I bake instead of fry?
Yup, I’ve baked ‘em at 400°F for about 15-20 minutes. They won’t be as crispy, but it’s a solid option if you’re avoiding oil.
How do I keep them crispy?
Drain ‘em well on paper towels right after frying, and don’t cover ‘em while hot—they’ll steam and soften. Learned that one the hard way!
Are they gluten-free?
They are if your gram flour is certified gluten-free. Double-check the label just to be safe.
What oil is best for frying?
I stick to vegetable or canola for a neutral taste. Peanut oil works too if you’ve got it on hand.
Can I add other veggies?
Absolutely, I’ve thrown in shredded potato or carrots before. Just keep the ratio balanced so the batter holds together.
How spicy is Indian Onion Bhaji?
That’s up to you! Adjust the chili powder or skip the green chilies if you’re not into heat—my kids prefer it mild.
Conclusion
So there you have it, my tried-and-true guide to making Indian Onion Bhaji at home. I hope you’re as pumped as I am to fry up a batch of these crispy, spiced goodies and share ‘em with your crew. Whether it’s your first time or you’re a pro at Indian Onion Bhaji, I’d love to hear how it goes—drop me a comment with your twists or triumphs!