
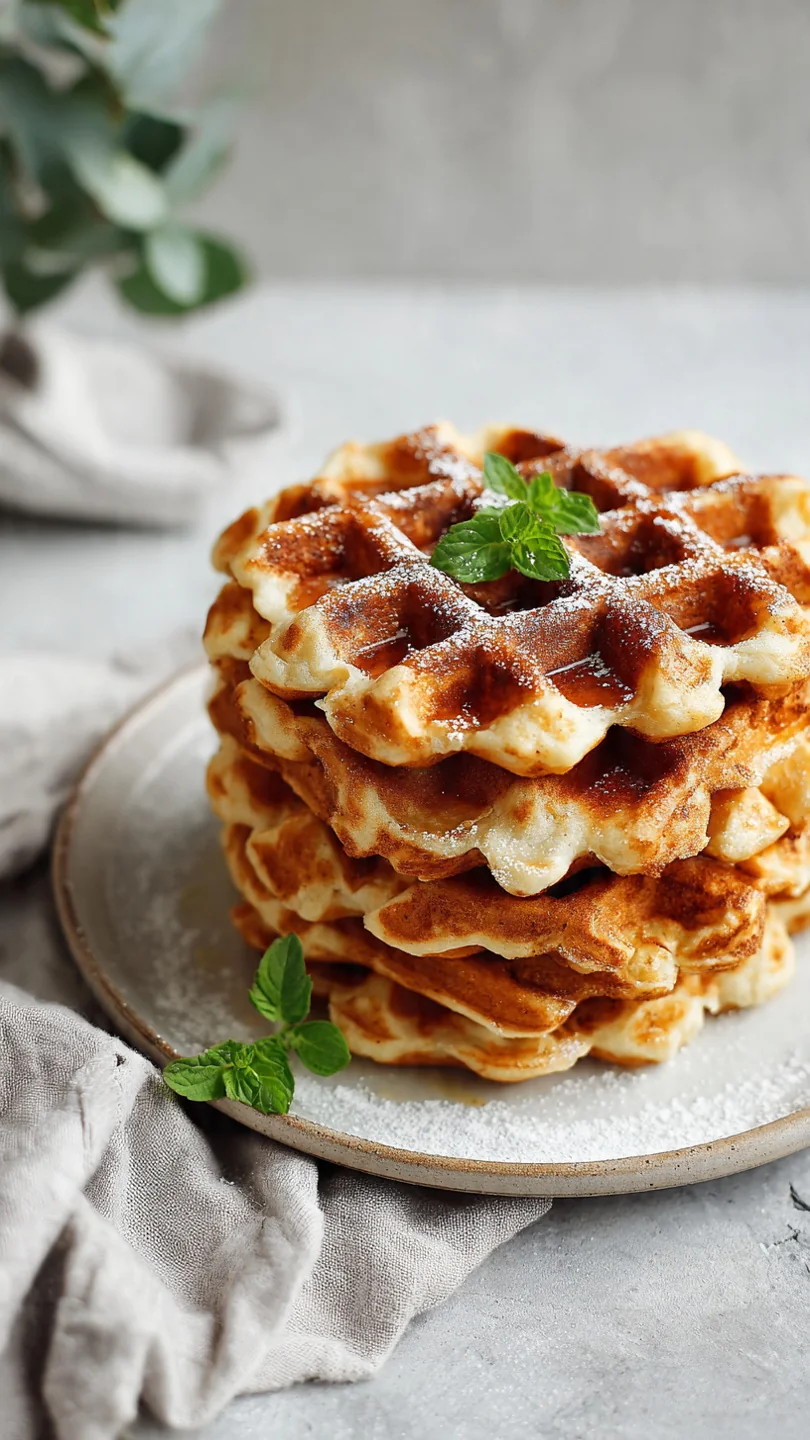
There’s a particular satisfaction that comes from a perfectly made waffle—the audible crunch as you cut through it, the steam rising from its fluffy interior, and that first bite that somehow feels both indulgent and wholesome. For years on a low-carb diet, that experience felt out of reach, relegated to memory. That’s why I spent weeks in my test kitchen perfecting this almond flour base.
The goal was simple: a waffle so good you wouldn’t guess it’s keto. The result is this recipe, which delivers a seriously crispy exterior and a tender, bread-like crumb using just a handful of pantry staples. It’s the weekend breakfast treat you’ve been missing, now back on the menu.
- Authentic Waffle Texture: Achieves that classic contrast of a crisp, golden shell and a soft, fluffy interior, defying the dense reputation of many grain-free recipes.
- 5-Ingredient Simplicity: Built on a core of almond flour, eggs, and butter, this recipe comes together with minimal fuss and maximum reward.
- Meal-Prep Friendly: These waffles freeze and reheat beautifully, making a healthy, grab-and-go breakfast possible any day of the week.
- Endlessly Customizable: Acts as a perfect neutral canvas for both sweet and savory toppings, from berries and syrup to fried eggs and avocado.
- Blood Sugar Friendly: With just 5g of net carbs per serving, this recipe allows you to enjoy a beloved comfort food without the carb crash.
Ingredients You’ll Need
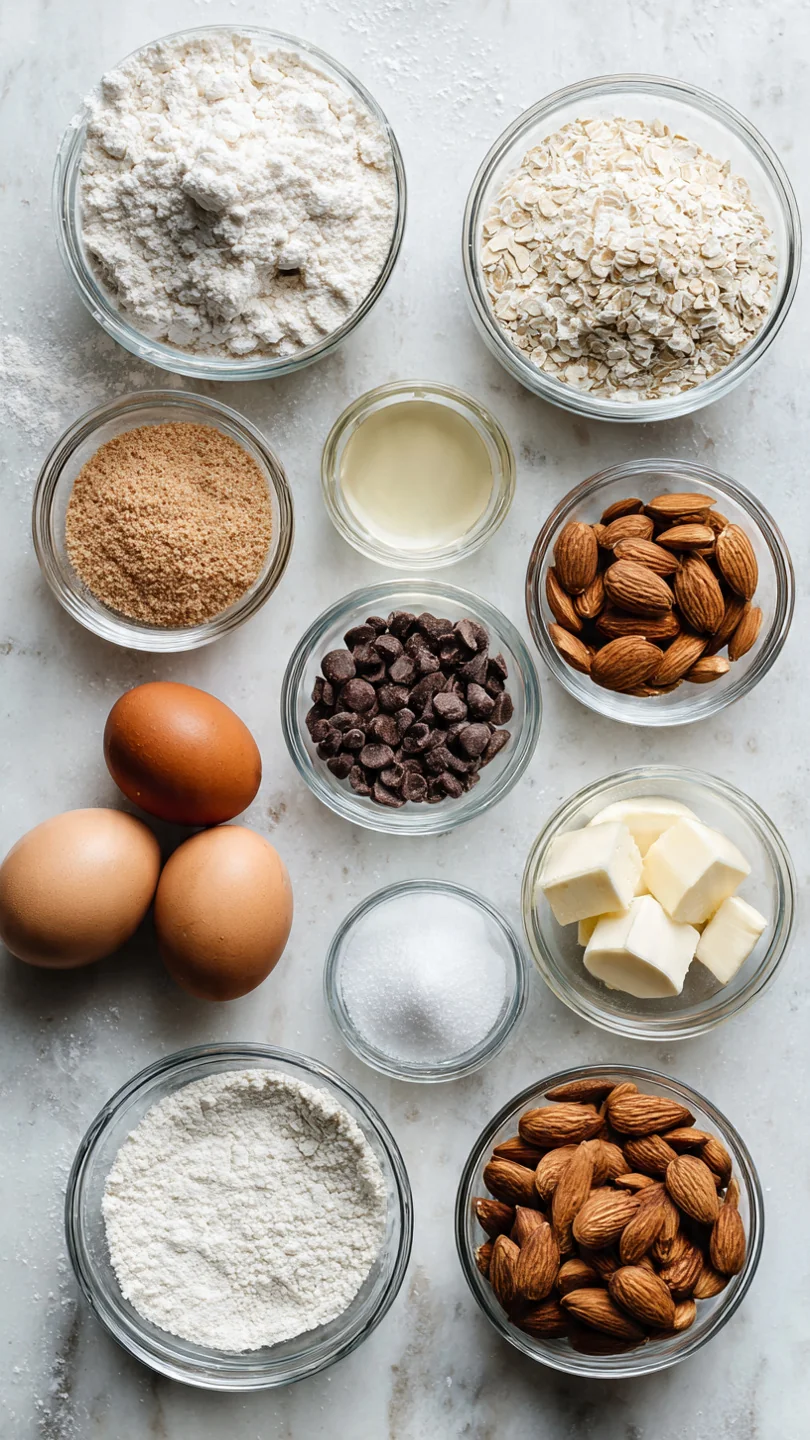
Let’s gather our ingredients—this short list is the key to waffle success. Using the right components in the right way makes all the difference between a good keto waffle and a great one.
- Blanched Almond Flour: This is non-negotiable. You need fine, blanched almond flour, not almond meal. The blanched variety (made from skinless almonds) gives a finer, more neutral texture and color, which is essential for that classic waffle look and feel. I reliably use brands like Bob’s Red Mill or Blue Diamond.
- Eggs: They are the primary leavening agent and binder here, providing structure and lift. Room-temperature eggs incorporate more easily for a smoother batter.
- Unsalted Butter: Melted butter adds rich flavor and contributes to the beautiful golden-brown color and crisp edges. Make sure it’s cooled slightly so it doesn’t cook the eggs when mixed.
- Unsweetened Almond Milk: A splash of liquid ensures the batter is the right consistency. Any unsweetened nut milk or even heavy cream (for extra richness) works.
- Baking Powder: This is our chemical leavener for that essential rise and airy texture. Ensure yours is fresh for the best lift.
- Vanilla Extract & Salt: These flavor enhancers are crucial. Pure vanilla adds warmth, while salt balances and heightens all the other flavors.
Note: You’ll find the complete list of ingredients, along with their exact measurements, in the printable recipe card at the bottom of this post.
Kitchen Equipment Needed
You don’t need any specialty gear beyond a standard waffle iron. A Belgian-style waffle iron will give you deeper pockets, but a classic one works perfectly. A wire cooling rack is my secret weapon for keeping waffles crisp; placing them directly on a plate creates steam that makes the bottom soggy.
Have two mixing bowls, a whisk, and a spatula ready. No stand mixer needed—this is a simple hand-mixed batter.
How to Make Keto Waffles Recipe
Step 1: Combine the Dry Ingredients
Preheat your waffle iron to medium-high heat—a hot iron is critical for that initial crisp. In a large bowl, whisk together the almond flour, baking powder, and salt. Take a moment to break up any lumps in the almond flour.
This isn’t just mixing; you’re ensuring the leavener is evenly distributed, which guarantees consistent rise and texture in every bite. A few extra seconds here prevents dense spots later.
Step 2: Whisk the Wet Ingredients
In a separate bowl, crack in the eggs and whisk them vigorously for a good 30 seconds until they’re frothy and uniform. This incorporates air, which helps with lift. Now, whisk in the melted (but not hot) butter, almond milk, and vanilla.
Tip from me: adding the butter last while whisking constantly helps create a stable emulsion, leading to a smoother, more cohesive batter.
Step 3: Mix the Batter and Let it Rest
Pour the wet ingredients into the dry ingredients. Using a spatula, gently fold everything together until just combined. Believe me, you want to stop mixing the moment you no longer see dry flour.
Overmixing develops the proteins in the almond flour and can lead to toughness. A few small lumps are absolutely fine. Now, let the batter sit for 3-4 minutes.
This rest period allows the almond flour to fully absorb the liquid, thickening the batter for waffles that hold their shape.
Step 4: Cook to Golden Perfection
Lightly grease the hot waffle iron with oil or non-stick spray. Spoon the batter onto the center—about 1/3 cup for a classic iron or 1/2 cup for a Belgian one. Close the lid and do not open it for at least 4 minutes.
The steam will initially be vigorous, then gradually subside. Cook until the steam is nearly gone and the waffle is a deep, golden brown. This visual and auditory cue is more reliable than any timer.
Step 5: Cool and Serve Immediately
Carefully lift the waffle out with a fork. This is the most important pro tip: immediately transfer it to a wire cooling rack. This allows air to circulate all around, preventing condensation and sogginess.
If you’re making a batch, you can keep them warm and crisp in a single layer on the rack in a 200°F oven. Serve right away with your favorite toppings and enjoy that first glorious, crunchy bite.
- Batter Consistency is Key: The batter should be thick but pourable, similar to a traditional pancake batter. If it seems too thick after resting, add a tablespoon more almond milk. If too thin, add a tablespoon of almond flour.
- The No-Peek Rule: Opening the waffle iron too early can cause it to stick and tear. Trust the process and wait for the steam to dramatically reduce.
- For Maximum Crisp: For an extra-crispy exterior, brush the top of the cooked waffle with a little melted butter and pop it under a broiler for 60-90 seconds, watching it closely.
- Test for Doneness: A perfectly cooked waffle will release easily from the iron. If you meet resistance, it likely needs another 30-60 seconds of cooking.
- Greasing the Iron: Even if your iron is non-stick, a light brush of oil or avocado oil spray on both plates for the first waffle ensures perfect release and contributes to browning.
Recipe Variations
- Chocolate Chip: Fold 1/3 cup of sugar-free chocolate chips into the batter before cooking for a decadent treat.
- Savory Herb & Cheese: Omit the vanilla. Add 1/2 cup of shredded cheddar cheese, 1 tablespoon of chopped chives, and 1/4 teaspoon of garlic powder to the batter. Perfect topped with a fried egg.
- Lemon Poppy Seed: Add the zest of one lemon and 1 tablespoon of poppy seeds to the dry ingredients. The bright citrus flavor is fantastic with berries.
- Pumpkin Spice: Replace 2 tablespoons of the almond milk with canned pumpkin puree and add 1 teaspoon of pumpkin pie spice to the dry mix.
- Coconut Flour Blend: For a nut-free option, you can replace 1/4 cup of the almond flour with 2 tablespoons of coconut flour. Note: coconut flour absorbs more liquid, so you may need to add an extra egg or a bit more milk.
- Protein Boost: Add 1-2 scoops of unflavored or vanilla collagen peptides or whey protein isolate. You may need an extra splash of almond milk to maintain the right consistency.
What to Serve With This Recipe
These waffles are incredibly versatile. For a classic sweet breakfast, top with a pat of grass-fed butter, a drizzle of sugar-free maple syrup, a dollop of whipped cream, and a handful of fresh raspberries or blueberries. For a more decadent brunch, try them with a keto-friendly berry compote or a scoop of low-carb ice cream.
On the savory side, they are phenomenal as a base for eggs Benedict (with a Hollandaise made with avocado oil) or simply topped with crispy bacon, avocado slices, and a sprinkle of everything bagel seasoning. Pair with a cup of black coffee, unsweetened tea, or a creamy keto latte.
Storage & Make-Ahead Instructions
- Refrigeration: Cool waffles completely on a wire rack. Store in an airtight container or resealable bag in the refrigerator for up to 4 days.
- Freezing: This is the best method for meal prep. Place cooled waffles in a single layer on a baking sheet and freeze until solid (about 1 hour). Then transfer them to a freezer-safe bag, squeezing out excess air. They will keep for up to 3 months.
- Reheating for Best Results: To restore crispiness, never use a microwave alone. Reheat frozen or refrigerated waffles directly in a toaster, toaster oven, or air fryer at 350°F for 3-5 minutes, until hot and crisp. You can also warm them in a 375°F oven on a baking sheet for 5-8 minutes.
Frequently Asked Questions
Q: Can I make this batter the night before?
A: I don’t recommend it. The baking powder will begin to activate once wet, and the batter may become too thick and lose its leavening power by morning. For make-ahead ease, cook and freeze the waffles instead.
Q: My waffles are sticking to the iron. What did I do wrong?
A: This usually means one of three things: your iron wasn’t fully preheated, it wasn’t greased adequately (even non-stick irons need it for the first waffle), or you tried to open it too early before the waffle had set. Ensure it’s hot, greased, and be patient.
Q: Can I use coconut flour instead of almond flour?
A: Not in a 1:1 swap. Coconut flour is vastly more absorbent. For a coconut flour version, you’d need to use about 1/3 cup and increase the egg count significantly, which is a different recipe entirely.
Q: Why are my waffles soggy?
A: The most common culprit is stacking them hot on a plate, where steam gets trapped. Always cool them on a wire rack. Also, ensure you’re cooking them long enough—the steam should have almost completely stopped escaping.
Q: Are these waffles dairy-free?
A: They can be! Simply replace the melted butter with an equal amount of melted coconut oil or avocado oil. The flavor will be slightly different but still delicious.
Q: How do I calculate the net carbs?
A: Net carbs are total carbohydrates minus fiber and sugar alcohols. For this recipe: 10g total carbs – 5g fiber = 5g net carbs per serving.
Q: Can I make pancakes with this batter?
A: Absolutely! The batter works perfectly for pancakes. Simply cook on a preheated, greased griddle or skillet over medium heat for 2-3 minutes per side.
Final Thoughts
After countless tests, this recipe stands out as the one that consistently delivers everything I want in a keto waffle: simplicity, reliability, and that irreplaceable texture. It proves that eating low-carb doesn’t mean sacrificing the joy of a truly satisfying breakfast. The technique of letting the batter rest and cooling on a rack are small steps that make a monumental difference in your final result.
I encourage you to try this recipe as written first to experience that perfect crisp-to-fluff ratio. Then, have fun with the variations—turn them into a savory lunch or a chocolatey dessert. This recipe is a foundational tool in your low-carb kitchen.
When you make them, I’d love to hear how it went! Share your creations and tag me, or leave a comment below with your favorite topping combination. Happy cooking, and enjoy every crunchy, delicious bite

Crispy Keto Almond Flour Waffles
Equipment
- Waffle iron (Belgian or classic style)
- Two mixing bowls
- Whisk
- Spatula
- Wire cooling rack
Ingredients
- 2 cups blanched almond flour Fine grind, not almond meal
- 4 large eggs room temperature
- 1/3 cup unsalted butter melted and slightly cooled
- 1/3 cup unsweetened almond milk or any low-carb milk
- 2 tsp baking powder aluminum-free
- 1 tsp vanilla extract pure
- 1/4 tsp salt
Instructions
- Preheat your waffle iron to medium-high heat. In a large mixing bowl, whisk together the almond flour, baking powder, and salt until well combined and any lumps are broken up. This dry mix is the foundation for your waffle’s structure.
- In a separate bowl, whisk the eggs vigorously for about 30 seconds until frothy. Add the melted (but not hot) butter, almond milk, and vanilla extract, and whisk until fully emulsified. The mixture should be smooth and uniform.
- Pour the wet ingredients into the dry ingredients. Using a spatula, gently fold the batter together until just combined. Trust me, overmixing is the enemy of tender waffles—a few small lumps are perfectly fine. Let the batter rest for 3-4 minutes; this allows the almond flour to hydrate and thicken slightly.
- Lightly grease your preheated waffle iron with oil or non-stick spray. Spoon about 1/3 to 1/2 cup of batter (depending on your iron’s size) onto the center. Close the lid and cook for 4-5 minutes, or until the steam significantly subsides and the waffle is deeply golden brown and crisp. Resist the urge to peek too early!
- Carefully remove the waffle with a fork. Place it directly on a wire rack instead of a plate—this prevents the bottom from getting soggy from trapped steam. Repeat with the remaining batter. Serve immediately with your favorite keto-friendly toppings.