
Why You’ll Love This Recipe
- No-Bake Convenience: Perfect for hot summer days when you don’t want to turn on the oven.
- Refreshing Flavor: The tangy lemon filling provides a refreshing burst of flavor that’s perfect for any occasion.
- Easy to Make: Simple ingredients and straightforward instructions make this a great recipe for all skill levels.
- Customizable: Easily adaptable to different dietary needs and flavor preferences.
- Quick Prep: Spend less time in the kitchen and more time enjoying your dessert.
- Kid-Friendly: A sweet treat that kids and adults alike will love.
Ingredients & Preparation Notes
- Graham Cracker Crumbs: Use finely crushed crumbs for a smooth crust. You can crush your own or buy pre-crushed crumbs.
- Granulated Sugar: Adds sweetness to the crust, balancing the tartness of the filling.
- Unsalted Butter: Melted butter binds the crust together. Unsalted is preferred to control the salt level.
- Sweetened Condensed Milk: Provides sweetness and a creamy texture to the filling. Ensure you use full-fat for the best results.
- Fresh Lemon Juice: Freshly squeezed is best for the brightest flavor. Bottled juice can be used in a pinch but may not be as vibrant.
- Lemon Zest: Adds an extra layer of lemon flavor. Use a microplane for the finest zest.
- Heavy Whipping Cream: For a light and fluffy topping. Ensure it’s cold for the best whipping results.
- Powdered Sugar: Stabilizes and sweetens the whipped cream.
Substitution Options:
- For a gluten-free crust, use crushed gluten-free cookies or almond flour.
- If you prefer a lighter filling, you can use low-fat sweetened condensed milk, but the texture may be slightly less creamy.
Professional Tips & Techniques
- Crust Firmness: Chilling the crust before adding the filling helps it set properly and prevents it from becoming soggy.
- Filling Thickness: The lemon juice reacts with the milk to create a thick, custard-like consistency. Ensure you whisk until smooth for the best texture.
- Whipped Cream Stability: Chill your mixing bowl and beaters before whipping the cream to help it hold its shape longer.
- Lemon Zest Impact: Adding zest to both the filling and as a garnish enhances the lemon flavor without making the pie too tart.
- Avoid Over-Mixing: When combining the filling ingredients, mix just until combined to prevent air bubbles that can affect the texture.
Recipe Variations
- Lime Pie: Substitute lime juice and zest for the lemon to create a key lime pie variation.
- Coconut Lemon Pie: Add 1/2 cup of shredded coconut to the crust and 1/4 cup to the filling for a tropical twist.
- Berries and Lemon: Top the pie with fresh berries like raspberries or blueberries for added color and flavor.
- Lemon Meringue: Replace the whipped cream topping with a meringue topping for a classic lemon meringue pie look.
- Vegan Version: Use coconut condensed milk and coconut cream for a dairy-free, vegan-friendly option.
- Chocolate Crust: Use chocolate cookie crumbs instead of graham crackers for a chocolate-lemon combination.
- Mini Pies: Make individual mini pies using a muffin tin for a fun and portable dessert option.
- Citrus Blend: Mix lemon juice with orange or grapefruit juice for a more complex citrus flavor.
Serving Suggestions
- Summer Gatherings: Serve chilled at barbecues or picnics for a refreshing end to a meal.
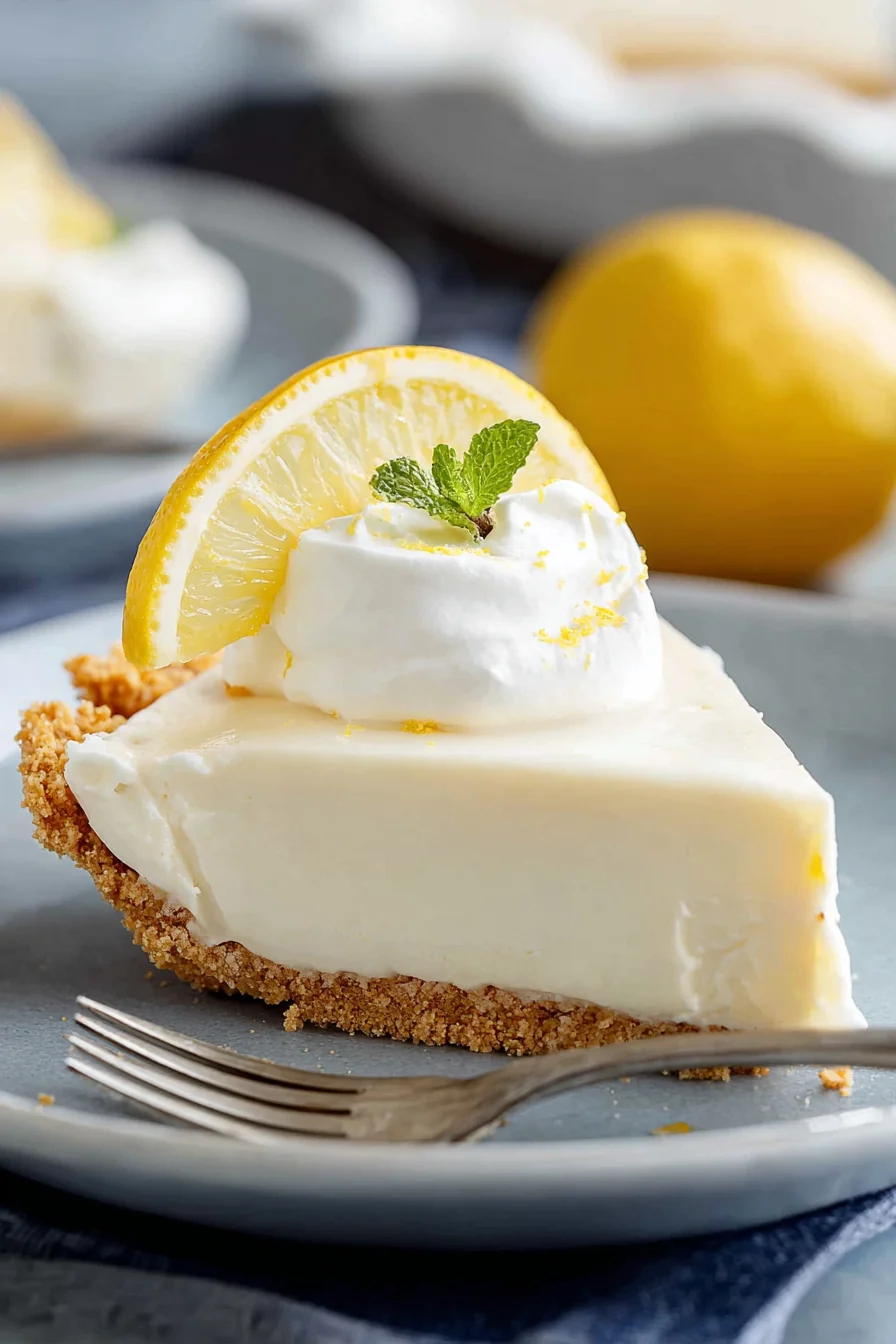
- Elegant Dessert: Garnish with a sprig of mint and a thin lemon slice for an elegant presentation at dinner parties.
- Brunch Treat: Pair with a light brunch for a sweet finish to your meal.
- Side Dish Pairings: Serve alongside fresh fruit salad or a light sorbet to complement the lemon flavor.
- Presentation Tips: Use a piping bag to create decorative swirls of whipped cream on top of the pie.
- Beverage Pairing: Enjoy with a cup of tea or a glass of sparkling water with lemon for a refreshing combination.
Storage & Make-Ahead Tips
- Refrigeration: Store the pie covered in the refrigerator for up to 3-4 days.
- Make-Ahead: Prepare the pie up to 24 hours in advance. Add the whipped cream topping just before serving for the freshest taste.
- Freezing: You can freeze the pie without the whipped cream topping for up to 1 month. Thaw in the refrigerator before serving.
- Reheating: Not applicable, as this is a no-bake dessert. Serve chilled for the best texture.
Frequently Asked Questions
Q: Can I make this ahead of time?
Yes, you can prepare the pie up to 24 hours in advance. Add the whipped cream topping just before serving for the best results.
Q: Can I use bottled lemon juice?
While fresh lemon juice is preferred for the best flavor, bottled lemon juice can be used in a pinch. The flavor may be slightly less vibrant.
Q: How do I prevent the crust from becoming soggy?
Chill the crust for at least 30 minutes before adding the filling. This helps it set and prevents it from absorbing too much moisture.
Q: Can I use a different type of crust?
Yes, you can use a pre-made graham cracker crust or experiment with different types of cookies or even a nut-based crust for a different flavor profile.
Q: What can I do if my filling doesn’t set properly?
Ensure you use enough lemon juice, as it reacts with the milk to thicken the filling. If it’s still too soft, you can add a teaspoon of gelatin dissolved in water to help it set.
Q: Can I make this pie dairy-free?
Yes, you can use coconut condensed milk and coconut cream to make a dairy-free version of this pie.
Q: How do I store leftovers?
Store any leftover pie covered in the refrigerator for up to 3-4 days. The whipped cream may start to deflate after a day or two.
Q: Can I freeze this pie?
Yes, you can freeze the pie without the whipped cream topping for up to 1 month. Thaw in the refrigerator before serving and add fresh whipped cream.
Conclusion
This No Bake Lemon Pie is the perfect dessert for any occasion, offering a refreshing and tangy flavor without the need for an oven. Its simplicity and delicious taste make it a go-to recipe for busy cooks and dessert lovers alike. Give it a try and share your experience on social media, or leave a comment below with your favorite variations.
Enjoy this delightful pie chilled, and savor every bite of its creamy, lemony goodness!
No Bake Lemon Pie
Equipment
- 9-inch pie dish
- Mixing bowls
- Whisk
- Spatula
- Electric mixer or whisk for whipping cream
Ingredients
- 1 1/2 cups graham cracker crumbs Finely crushed
- 1/3 cup granulated sugar
- 6 tablespoons unsalted butter Melted
- 2 cans sweetened condensed milk 14 oz each
- 3/4 cup fresh lemon juice About 4-5 large lemons
- 1 tablespoon lemon zest Finely grated
- 1 cup heavy whipping cream For topping
- 2 tablespoons powdered sugar For whipped cream
Instructions
- In a medium bowl, combine graham cracker crumbs and granulated sugar. Stir in melted butter until the mixture is well combined and resembles wet sand. Press the mixture firmly into the bottom and up the sides of a 9-inch pie dish. Chill in the refrigerator for at least 30 minutes to set.
- In a large bowl, whisk together sweetened condensed milk, fresh lemon juice, and lemon zest until smooth and thickened. Pour the filling into the chilled crust and smooth the top with a spatula. Refrigerate for at least 3 hours or until set.
- Before serving, whip heavy whipping cream with powdered sugar until stiff peaks form. Spread or pipe the whipped cream over the pie. Garnish with additional lemon zest if desired.