
There’s something undeniably special about a homemade chocolate truffle. That moment when a rich, velvety center gives way to a burst of deep, complex flavor is pure culinary magic. When that flavor is the sophisticated, aromatic note of coffee, the experience becomes truly unforgettable.
These coffee truffles are my go-to when I need an impressive dessert that’s deceptively simple to make. They require no baking, just a few quality ingredients, and a bit of patience. The result is a batch of intensely chocolatey, coffee-infused bites with a melt-in-your-mouth texture that rivals any high-end confectionery.
Whether you’re wrapping them up for a heartfelt gift or setting them out for a dinner party, they promise to delight.
This recipe is designed for success and satisfaction, combining professional techniques with home-kitchen simplicity.
- No-Bake Simplicity: The entire process happens on the stovetop and in the fridge, making it perfect for warm weather or when you don’t want to turn on the oven.
- Sophisticated Flavor: The combination of high-quality dark chocolate and bold espresso creates a depth of flavor that feels luxurious and grown-up.
- Perfect for Gifting: Homemade candies show incredible care. These truffles, packed in a little box or tin, make a personalized and impressive present for any occasion.
- Make-Ahead Friendly: You can prepare the ganache base days in advance, and the finished truffles keep beautifully, taking the stress out of entertaining.
- Endlessly Customizable: Once you master the basic ganache, the coating and flavor variations are limitless, allowing you to get creative.
- Minimal Equipment: You likely have everything you need already—a bowl, a pot, and a whisk are the true heroes here.
Ingredients You’ll Need
- Let’s gather our ingredients. This short list is all about quality. Since there are so few components, each one plays a starring role in the final taste and texture. Choosing the best you can find will make a noticeable difference in your luxurious homemade truffles.
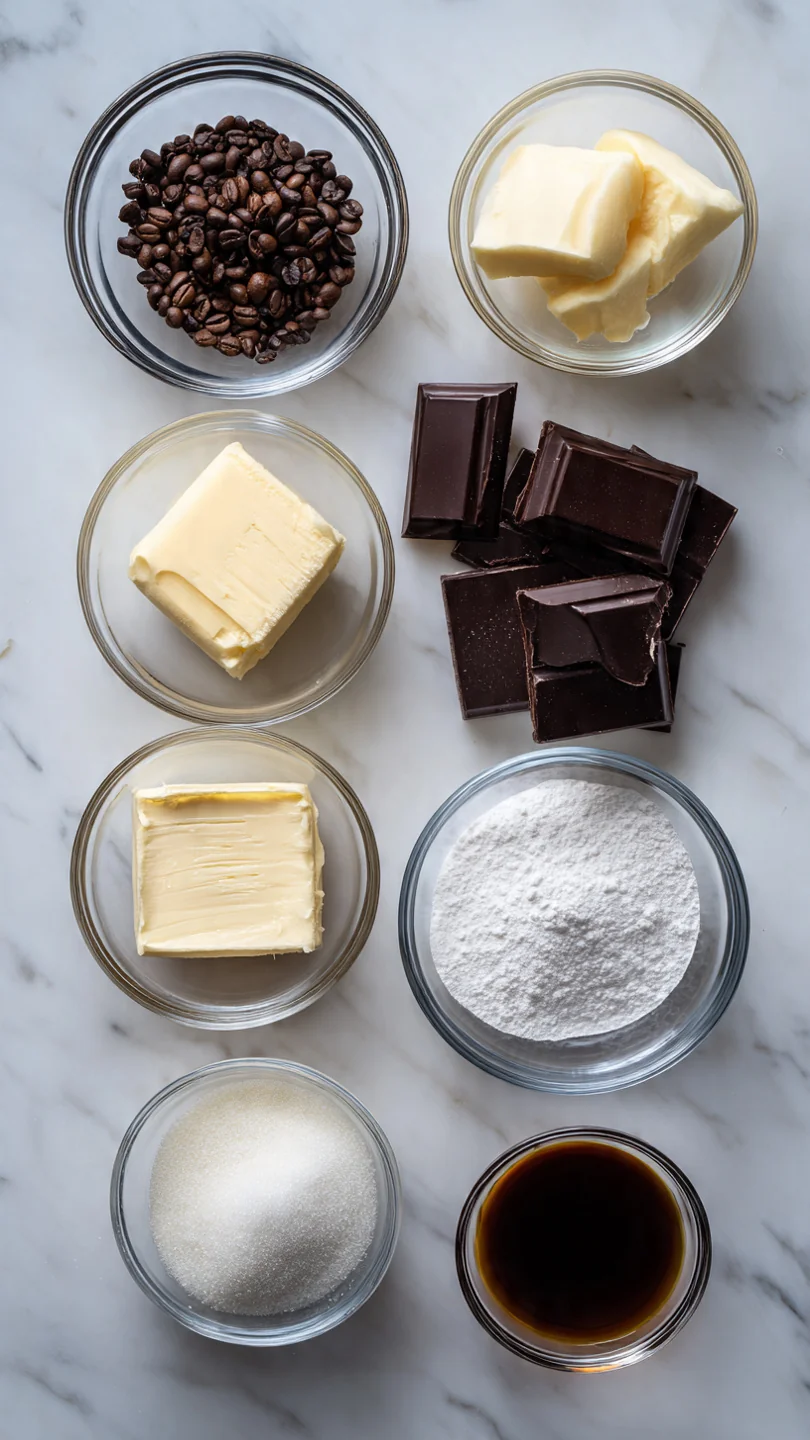
- High-Quality Dark Chocolate (8 oz): This is the foundation. Use a bar you enjoy eating on its own, chopped fine for even melting. I recommend a 60-70% cacao content for the ideal balance of bitterness and sweetness.
- Heavy Cream (1/2 cup): Also called double cream or whipping cream. Its high fat content is essential for creating a stable, silky-smooth ganache that sets up properly.
- Instant Espresso Powder (2 tsp): This is my secret weapon for intense coffee flavor without adding moisture. It dissolves seamlessly into the hot cream. Finely ground espresso beans are a great alternative.
- Pure Vanilla Extract (1 tsp): A classic flavor enhancer that rounds out the sharp notes of both the chocolate and coffee.
- Fine Sea Salt (1/4 tsp): Never underestimate salt in dessert. It amplifies all the other flavors and prevents the truffles from tasting one-dimensional.
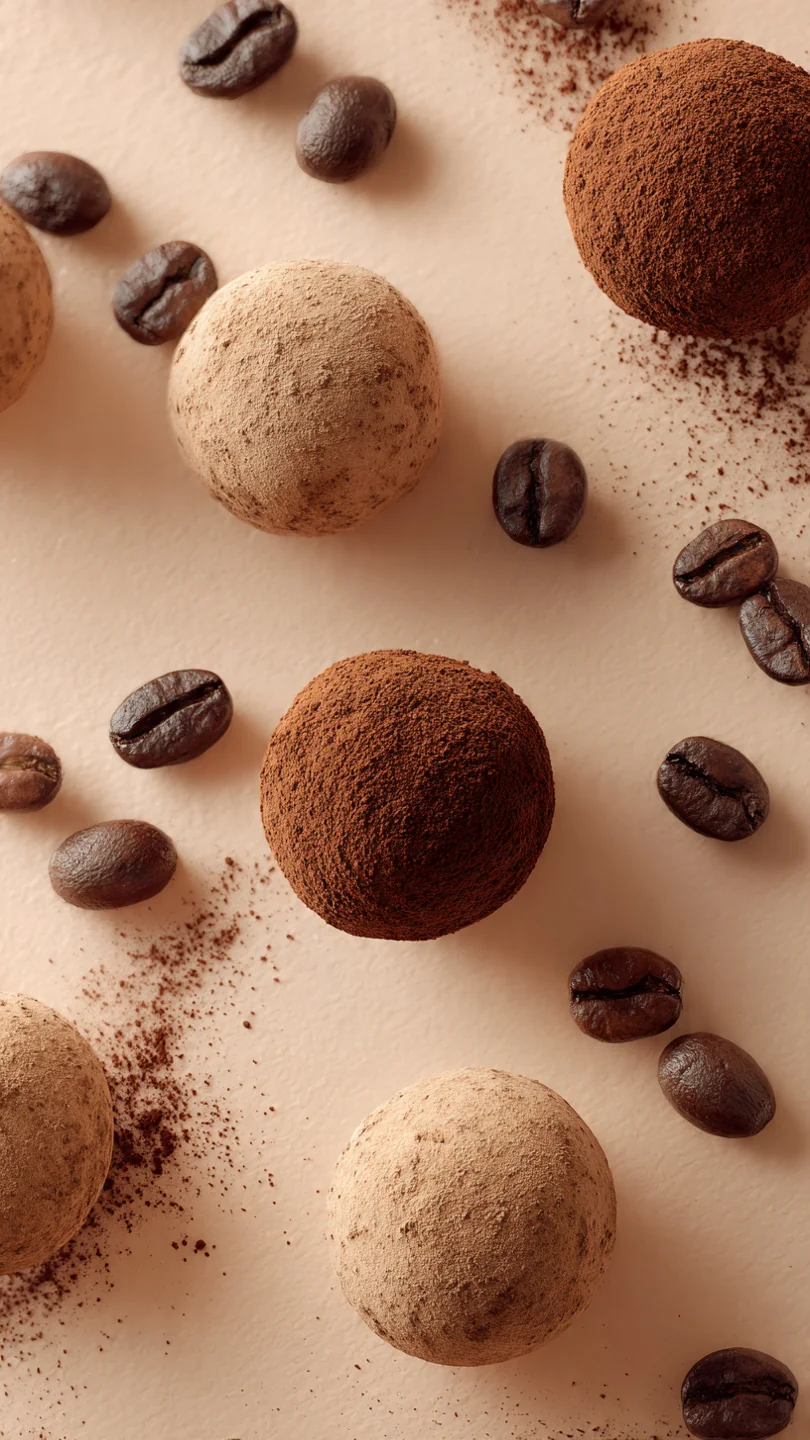
- Dutch-Process Cocoa Powder (1/2 cup): For the classic, elegant finish. Dutch-process cocoa is less acidic and has a darker color, giving a professional-looking dusting.
Note: You’ll find the complete list of ingredients, along with their exact measurements, in the printable recipe card at the bottom of this post.
Kitchen Equipment Needed
You don’t need any specialty gadgets for this recipe. The key is having the right-sized tools to make the process smooth.
- Medium Heatproof Bowl: For melting the chocolate with the hot cream. Glass or stainless steel works perfectly.
- Small Saucepan: To heat the cream and espresso powder.
- Whisk: A small balloon whisk is ideal for gently emulsifying the ganache without incorporating too much air.
- Small Cookie Scoop or Teaspoon: For portioning the ganache evenly. A #60 scoop (about 1 tablespoon) is the perfect size.
- Parchment Paper & Baking Sheet: The parchment prevents sticking and makes cleanup effortless. A quarter-sheet pan is a great size.
- Shallow Bowl: For rolling the truffles in cocoa powder.
How to Make Coffee Truffles Recipe
Step 1: Infuse the Cream
This first step builds the flavor foundation. In your small saucepan, combine the heavy cream and instant espresso powder. Heat this over medium heat, stirring constantly with a whisk or spoon.
You’re looking for the mixture to just reach a simmer—small bubbles will form around the edges. The goal is to fully dissolve the espresso powder and infuse the cream with its rich flavor without boiling it, which could affect the fat content. The moment it simmers, take it off the heat.
Trust me, this gentle infusion makes all the difference compared to just mixing powder into the ganache later.
Step 2: Create the Ganache
Place your finely chopped chocolate in the heatproof bowl. Immediately pour the hot espresso cream over the chocolate. Add the vanilla extract and salt right on top.
Now, walk away. Let this mixture sit undisturbed for a full 3 minutes. This allows the heat from the cream to slowly and gently melt the chocolate from the outside in.
After the time is up, start whisking gently from the center of the bowl, slowly working your way outwards. You’ll see it transform into a smooth, shiny, and unified mixture. This is your ganache.
If you find a few stubborn bits of chocolate, a brief 10-second stint over a double boiler will melt them right in.
Step 3: Chill to Perfection
Here’s where patience is key. To get a ganache firm enough to roll, it needs a proper chill. Cover the bowl tightly with plastic wrap, pressing the wrap directly onto the surface of the ganache.
This creates a seal and prevents a rubbery skin from forming. Refrigerate for 1.5 to 2 hours. The ganache is ready when it’s firm to the touch but still slightly pliable, like a very stiff buttercream.
Tip from me: You can chill it overnight if needed, but let it sit at room temperature for 15 minutes before scooping if it’s rock hard.
Step 4: Scoop and Roll
Line your baking sheet with parchment paper. Using your scoop or teaspoon, portion out the ganache. I find working with about a tablespoon at a time is perfect.
Now, with clean, dry, and cool hands, quickly roll each portion into a ball. The heat from your hands will soften the ganache, so work swiftly. If the mixture becomes too sticky, simply pop the baking sheet with the balls and the remaining ganache back into the fridge for 10 minutes to firm up.
Don’t worry about perfect spheres yet; we’ll shape them again in the coating.
Step 5: Coat and Finish
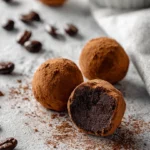
Place your Dutch-process cocoa powder in a shallow bowl. Take each ganache ball and roll it in the cocoa, applying gentle pressure to create a nice round shape and a even, matte coating. Transfer the finished truffle back to the parchment-lined sheet.
For an extra-professional, clean look, you can give them a second, lighter roll in cocoa powder just before serving. Believe me, this final touch makes them look like they came from a boutique chocolatier. Step back and admire your beautiful, homemade creations.
A few insights from years in professional kitchens can elevate your truffles from good to exceptional.
- Chocolate Quality is Paramount: Since chocolate is the main ingredient, its flavor dictates the final product. A bar with a clean ingredient list (cocoa mass, sugar, cocoa butter, maybe vanilla) is ideal.
- The “Cold Hands” Trick: If your hands run warm, run them under cold water and dry them thoroughly before rolling. This prevents the ganache from melting and becoming messy.
- Troubleshooting a “Split” Ganache: If your cream was too hot or you whisked too vigorously, the fat can separate. Don’t panic. Add a teaspoon of room-temperature cream and whisk gently; it should come back together.
- For Perfectly Round Truffles: After the initial chill, use a bench scraper or knife to score the set ganache into portions before scooping. This ensures more uniform sizes.
- Flavor Development: These truffles taste even better the next day. The flavors have time to meld and deepen, so making them ahead is actually advantageous.
Recipe Variations
- The basic coffee ganache is a fantastic canvas. Once you’re comfortable, try these delicious twists.
- Mocha Nut Crunch: Roll the formed truffles in finely chopped toasted hazelnuts or almonds instead of cocoa for a delightful crunch and nutty flavor.
- Dark Chocolate Shell: After the initial cocoa coating, dip the chilled truffles in melted dark chocolate for a crisp, professional shell. Let set on parchment paper.
- Spiced Coffee: Add a pinch of cinnamon, cardamom, or even a tiny bit of cayenne pepper to the hot cream for a warm, spiced undertone.
- Salted Caramel Swirl: Before chilling the ganache, swirl in 2 tablespoons of thick salted caramel sauce for pockets of gooey sweetness.
- Vegan Adaptation: Use full-fat coconut cream and a high-quality vegan dark chocolate bar. The result will be slightly different but wonderfully rich.
- Orange Espresso: Add the zest of one orange to the cream as it heats, then strain it out before pouring over the chocolate for a bright, citrusy note.
- Irish Cream: Replace 1 tablespoon of the heavy cream with Irish cream liqueur for an adult-only, boozy variation.
What to Serve With This Recipe
Coffee truffles are versatile. They can be the star of a dessert platter or a sophisticated ending to a meal.
For a dedicated dessert course, serve 2-3 truffles per person alongside a small glass of dessert wine like a Port or a Muscat. The sweetness complements the dark chocolate beautifully. After a dinner party, present them on a shared platter with other small bites like shortbread cookies or dried fruit.
They are also the perfect accompaniment to an after-dinner coffee or espresso—echoing the flavors in the cup. For a holiday gathering, mix them with other homemade candies like peppermint bark or nut clusters for a stunning and giftable assortment.
Storage & Make-Ahead Instructions
- Proper storage ensures your truffles stay fresh and delicious.
- Refrigerator Storage: Store truffles in a single layer in an airtight container separated by parchment paper. They will keep for up to 2 weeks in the refrigerator.
- Freezing for Longevity: For longer storage, freeze the uncoated ganache balls on a parchment-lined sheet until solid, then transfer to a freezer bag. They can be frozen for up to 3 months. Thaw in the refrigerator overnight, then roll in cocoa powder before serving.
- Serving Temperature: Truffles are best served at a cool room temperature. Remove them from the refrigerator 15-20 minutes before serving to allow the chocolate to soften slightly for the best melt-in-your-mouth texture.
- Avoiding Moisture: Always ensure the truffles and your hands are dry when handling. Any moisture will cause the cocoa powder coating to become blotchy.
- Make-Ahead Strategy: The ganache can be made and refrigerated up to 3 days before you need to roll and coat the truffles. This makes party prep incredibly easy.
Frequently Asked Questions
Q: Can I use brewed coffee instead of espresso powder?
A: I don’t recommend it. Liquid coffee adds extra moisture which can prevent the ganache from setting properly and make the texture grainy. Espresso powder provides concentrated flavor without the water.
Q: My ganache is too soft to roll, even after chilling. What happened?
A: This usually means the cream-to-chocolate ratio was off, potentially from measuring inaccuracies, or the chocolate didn’t fully melt. You can rescue it by gently reheating the mixture over a double boiler and adding a bit more finely chopped chocolate (an extra ounce), stirring until melted, then chilling again.
Q: How can I get a thicker cocoa coating?
A: For a more substantial coating, roll the truffle once, place it back on the sheet, and chill for 10 minutes. Then, give it a second roll in fresh cocoa powder. This double-coating method creates a perfect, dry exterior.
Q: Can I use milk chocolate or white chocolate?
A: Absolutely, but adjust your expectations. Milk chocolate will make a sweeter, softer ganache. White chocolate is very delicate and can seize easily; use a lower cream ratio (about 1/3 cup cream to 8 oz white chocolate) and be extra careful not to overheat.
Q: Why is my ganache grainy?
A: Graininess often occurs if the chocolate was overheated or if cold cream was added to melting chocolate, causing it to seize. Always pour hot cream over room-temperature chopped chocolate and let it sit before whisking.
Q: How far in advance can I make these for a gift?
A: They are an excellent make-ahead gift. Prepared and stored properly in the fridge, they will be at their best for up to one week. Package them in a cool place.
Q: What’s the best way to package these as gifts?
A: Use mini paper candy cups and place them in a small decorative box or tin. Separate layers with parchment paper. Keep them refrigerated until just before gifting, and include a note suggesting they be stored in the fridge.
Final Thoughts
Mastering the simple art of the chocolate truffle is one of the most rewarding skills in home confectionery. This coffee truffle recipe gives you a classic, foolproof foundation that delivers impressive results every time. The process is meditative, the ingredients are minimal, and the payoff—a rich, sophisticated treat made with your own hands—is immense.
I encourage you to make a batch, share them with someone you care about, and savor the compliments. Once you see how easy it is, you’ll find yourself dreaming up your own flavor variations. Don’t forget to rate the recipe below and let me know how your truffles turned out.
Happy cooking!
Coffee Truffles
Equipment
- Medium heatproof bowl
- Small saucepan
- Whisk
- Small cookie scoop or teaspoon
- Parchment paper
- Baking sheet
Ingredients
- 8 oz high-quality dark chocolate chopped (60-70% cacao works best)
- 1/2 cup heavy cream
- 2 tsp instant espresso powder or finely ground espresso beans
- 1 tsp pure vanilla extract
- 1/4 tsp fine sea salt
- 1/2 cup Dutch-process cocoa powder for rolling
Instructions
- Place the chopped dark chocolate in a medium heatproof bowl. In a small saucepan, combine the heavy cream and instant espresso powder. Heat over medium heat, stirring constantly, until the mixture just begins to simmer and the espresso powder is fully dissolved. Immediately pour the hot cream over the chocolate, add the vanilla and salt, and let it sit undisturbed for 3 minutes.
- After 3 minutes, begin whisking the mixture gently from the center outward until it becomes a smooth, glossy, and homogenous ganache. This is the most critical step—trust me, a patient whisk yields the silkiest texture. If a few chocolate bits remain, you can place the bowl over a pot of barely simmering water for 10-15 seconds to melt them, then whisk again.
- Cover the bowl with plastic wrap, pressing it directly onto the surface of the ganache to prevent a skin from forming. Refrigerate for 1.5 to 2 hours, or until the mixture is firm enough to scoop and roll. It should hold its shape but still be pliable, like a stiff frosting. Tip from me: Don’t rush this chilling time, or the truffles will be too soft to handle.
- Using a small cookie scoop or a teaspoon, portion the chilled ganache. Working quickly with clean, cool hands, roll each portion into a smooth, round ball. Place the formed balls on a parchment-lined baking sheet. If the ganache becomes too soft and sticky, pop the baking sheet and the bowl back into the fridge for 10 minutes to firm up.
- Place the cocoa powder in a shallow bowl. Roll each truffle ball in the cocoa powder until fully coated, then gently shake off any excess. Transfer the finished truffles back to the parchment-lined sheet. For the cleanest look, you can roll them a second time just before serving. Believe me, that double coating gives a professional finish.