
There’s a quiet magic that happens when a simple root vegetable meets high heat and good fat. Parsnips, often overlooked next to carrots and potatoes, possess a unique, nutty sweetness that intensifies beautifully in the oven. When tossed in a savory garlic butter glaze, they transform into a side dish that steals the show—crispy on the outside, tender and almost creamy within, with a flavor that’s both comforting and sophisticated.
Whether you’re looking to elevate a weeknight dinner or add a standout element to your holiday table, these Garlic Butter Roasted Parsnips deliver with minimal effort and maximum reward.
- One-Pan Simplicity: Everything comes together on a single baking sheet, meaning less cleanup and more time enjoying your meal.
- Big Flavor, Fast: With just a handful of pantry staples, you create a deeply savory, caramelized, and sweet side dish in under 40 minutes.
- Texture Perfection: The high-heat roasting method guarantees those coveted crispy, golden-brown edges with a fork-tender interior.
- Diet-Flexible: This recipe is naturally gluten-free and vegetarian, and it’s easy to adapt for vegan or dairy-free diets with one simple swap.
- Crowd-Pleasing Versatility: Its balanced sweet-savory profile pairs wonderfully with almost any main course, from a simple roast chicken to a holiday ham.
- Cost-Effective: Parsnips are an affordable vegetable, making this an impressive yet budget-friendly side dish.
Ingredients You’ll Need
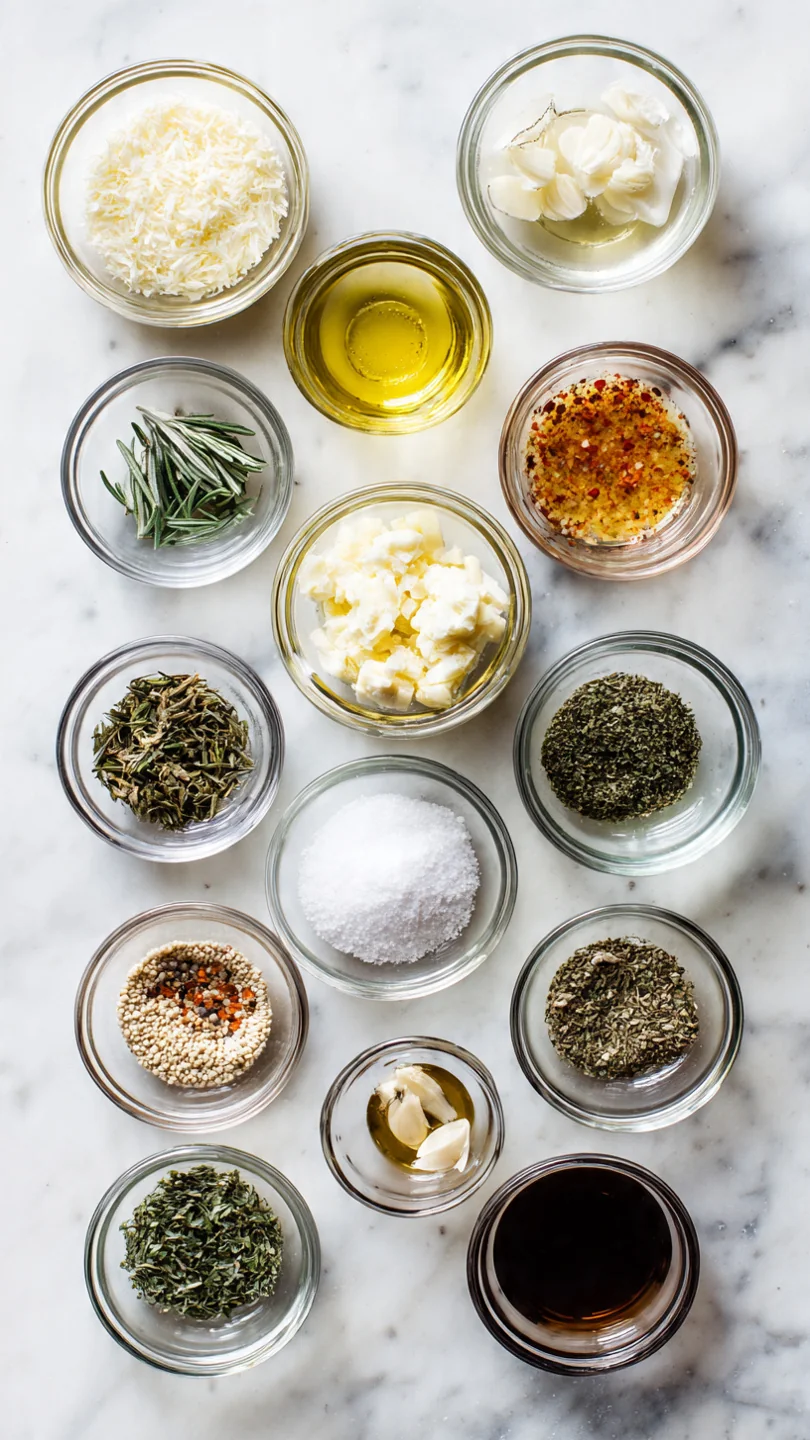
Let’s gather our ingredients—this is where simple pantry staples create something truly special. The beauty of this recipe lies in the quality of these few components. For the best flavor, seek out fresh parsnips that are firm, not limp, and relatively similar in size for even cooking.
The garlic should be fresh and plump, not sprouting. While dried thyme works in a pinch, fresh thyme adds a brighter, more aromatic note. The butter is our flavor vehicle; using a good-quality unsalted variety allows you to control the seasoning perfectly.
- Parsnips: 2 lbs, peeled and cut into batons. Look for medium-sized parsnips, as very large ones can have a woody, fibrous core that should be trimmed out.
- Unsalted Butter: 4 tbsp, melted. This coats the parsnips, promotes browning, and carries the garlic flavor.
- Garlic: 4 cloves, minced. Fresh is non-negotiable here for the best aromatic punch.
- Fresh Thyme: 1 tbsp leaves. The earthy, slightly floral notes complement the parsnips’ sweetness.
- Kosher Salt: 1 tsp. Its coarse grains adhere well and season evenly.
- Black Pepper: 1/2 tsp, freshly ground.
- Fresh Parsley: 1 tbsp, chopped, for a pop of color and fresh flavor as a garnish (optional).
Note: You’ll find the complete list of ingredients, along with their exact measurements, in the printable recipe card at the bottom of this post.
Kitchen Equipment Needed
You don’t need any fancy gadgets for this recipe. A large, rimmed baking sheet (like a half-sheet pan) is essential—the rim prevents any butter from dripping into your oven, and the large surface area allows for proper spacing. A sharp chef’s knife and cutting board make prepping the parsnips safe and easy.
A large mixing bowl is perfect for tossing everything together. While not mandatory, a microplane or garlic press makes mincing the garlic quick and consistent. If you want to guarantee extra-crispy results, a wire cooling rack that fits inside your baking sheet can elevate the parsnips for better air circulation, though it’s not required for success.
How to Make Garlic Butter Roasted Parsnips Recipe
Step 1: Prep the Oven and Parsnips
Start by preheating your oven to a robust 425°F (220°C). This high temperature is your secret weapon—it quickly evaporates surface moisture on the parsnips, leading to caramelization instead of steaming. While it heats, peel your parsnips.
Believe me, taking the time to cut them into uniform 3-inch batons, about a half-inch thick, is the single most important prep step. Even pieces mean everything finishes roasting at the same time, so you won’t have a mix of burnt and undercooked vegetables.
Step 2: Create the Garlic Butter Glaze
In a large bowl, combine the melted butter, minced garlic, thyme leaves, kosher salt, and black pepper. Give it a good whisk until it’s fragrant and homogenous. Tip from me: Let this mixture sit for 3-5 minutes while you finish prepping the pan.
This brief rest allows the raw garlic flavor to mellow and infuse directly into the butter, creating a more rounded and deeply savory base that will coat every inch of your parsnips.
Step 3: Coat the Parsnips Thoroughly
Now, add all your parsnip batons to the bowl with the glorious garlic butter. This is where you get hands-on. Use your hands or a large spoon to toss and fold the parsnips until every single surface is glistening and coated.
Trust me, a thorough toss here is non-negotiable. That buttery layer is what will fry against the hot pan, creating those irresistible crispy, flavorful edges we’re after.
Step 4: Roast to Golden Perfection
Arrange the parsnips in a single, uncrowded layer on your rimmed baking sheet. If they’re touching or piled up, they’ll steam. Use a second sheet if you need to—proper spacing is critical for caramelization.
Slide the pan into the center of your hot oven and let the magic happen. Set your timer for 15 minutes.
Step 5: Flip, Finish, and Serve
When the timer goes off, pull the sheet out (close the oven door to retain heat!). You should already see some browning. Use a thin spatula to flip and stir the parsnips, redistributing them for even cooking.
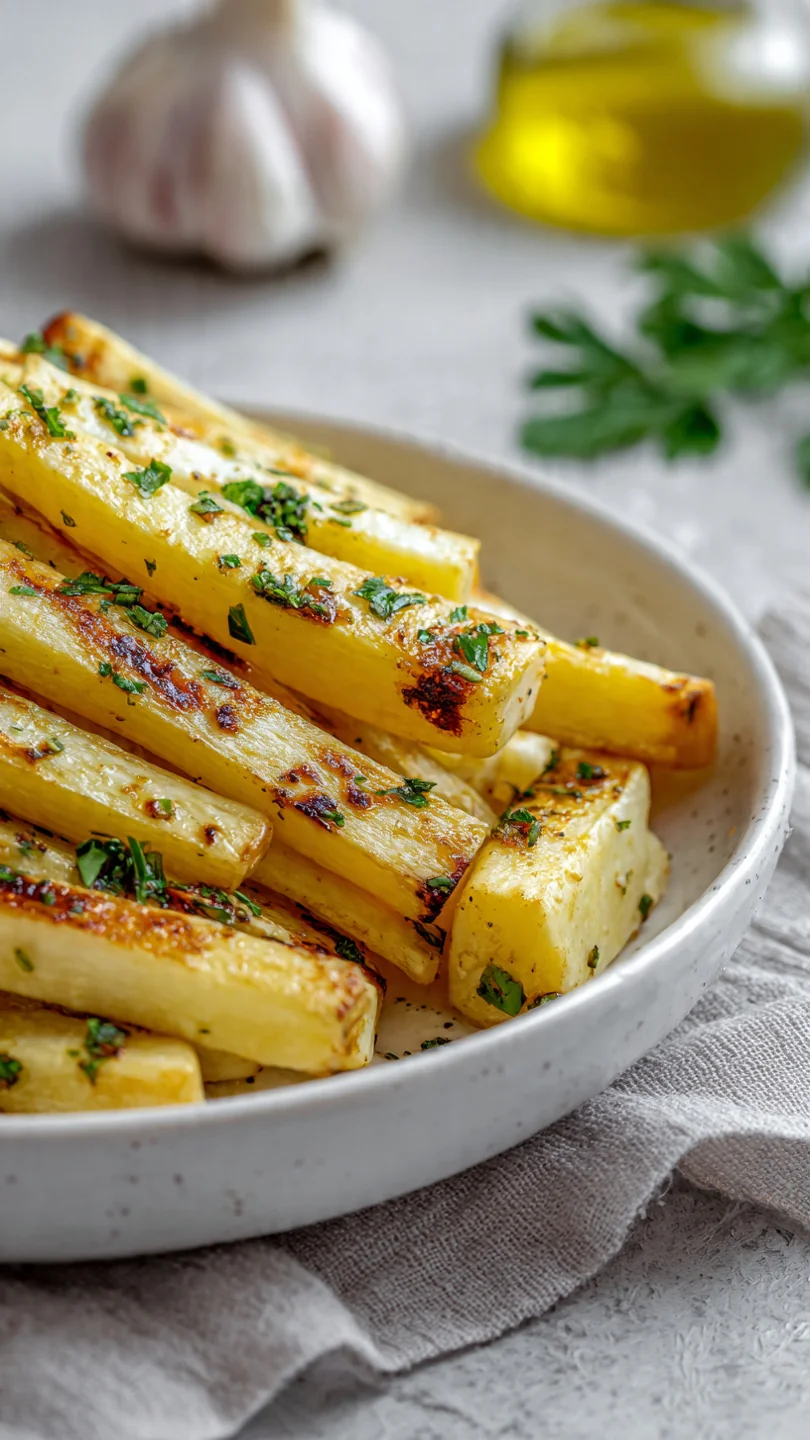
Return them to the oven for another 10-15 minutes. They’re done when they are tender all the way through when pierced with a fork and adorned with deep golden brown spots. Transfer them to a serving dish, garnish with fresh parsley for a bright finish, and serve immediately while they’re hot and crispy.
- Choosing Parsnips: Select parsnips that are firm, smooth, and no larger than the width of a golf ball. Oversized parsnips often have a large, tough, woody core that should be cut out after peeling.
- The Single Layer Rule: This is the most common mistake I see. Crowding the pan creates steam, which leads to soggy parsnips. If your pan is too small, use two. The vegetables should have a little breathing room.
- High Heat is Key: Don’t be tempted to lower the oven temperature, even if you see some smoke from the butter. 425°F ensures rapid caramelization of the natural sugars in the parsnips, creating complex flavor and ideal texture.
- Don’t Skimp on Fat: The butter is not just for flavor; it’s a necessary medium for heat transfer and browning. Reducing it can lead to dry, unevenly cooked results.
- Testing for Doneness: The best test is to pierce the thickest piece with the tip of a knife or a fork. It should slide in with almost no resistance. The exterior should be slightly crispy and caramelized.
Recipe Variations & Customizations
- Herb & Citrus: Add the zest of one lemon or orange to the garlic butter mixture. Finish with a squeeze of fresh juice after roasting for a bright, vibrant twist.
- Spicy Honey Glaze: Whisk 1 tablespoon of honey and ½ teaspoon of crushed red pepper flakes into the melted butter before tossing. The sweet heat is incredible.
- Vegan/Dairy-Free: Substitute the butter with an equal amount of high-heat oil, such as avocado oil or refined coconut oil. The flavor profile will be slightly different but still delicious.
- Parmesan-Herb Crust: During the last 5 minutes of roasting, sprinkle the parsnips with ¼ cup of finely grated Parmesan cheese and return to the oven until melted and crispy.
- Root Vegetable Medley: Combine parsnips with carrots, sweet potatoes, or rutabagas cut to a similar size. Adjust roasting time slightly as needed.
- Maple & Rosemary: Replace the thyme with 1 tsp of finely chopped fresh rosemary and add 1 tbsp of pure maple syrup to the butter glaze for a fall-inspired flavor.
- Everything Bagel Seasoning: For a fun, savory finish, sprinkle roasted parsnips with a teaspoon of everything bagel seasoning just before serving.
What to Serve With This Recipe
These parsnips are the ultimate versatile side. Their sweet and savory profile makes them a perfect partner for simply roasted or grilled proteins. Think herb-roasted chicken, pork tenderloin with a mustard sauce, or a juicy steak.
For a vegetarian feast, they are spectacular alongside a creamy mushroom risotto or a lentil loaf. During the holidays, they can hold their own on a table next to roast turkey, glazed ham, or beef Wellington. For a complete weeknight plate, pair them with a simple green salad dressed with a sharp vinaigrette to cut through the richness.
Beverage-wise, a crisp, unoaked Chardonnay or a malty amber ale complements the caramelized flavors beautifully.
Storage & Make-Ahead Instructions
- Refrigeration: Store leftovers in an airtight container in the refrigerator for up to 4 days. The texture will soften but the flavor remains excellent.
- Reheating: To restore crispiness, reheat in a 375°F oven or air fryer for 5-10 minutes until hot. Avoid the microwave, as it will make them soggy.
- Freezing: I do not recommend freezing cooked roasted parsnips, as the texture becomes unpleasantly mushy and watery upon thawing.
- Make-Ahead Prep: You can peel and cut the parsnips 1 day in advance. Store them submerged in cold water in the refrigerator to prevent browning. Drain and pat them completely dry before tossing with the butter and roasting.
Frequently Asked Questions
Q: Can I use olive oil instead of butter?
A: Absolutely. The flavor will be different—more savory and less rich—but it works well. Use a good extra-virgin olive oil for the best taste.
The roasting temperature is safe for EVOO in this context due to the short cook time and presence of the vegetables.
Q: How do I know when the parsnips are done roasting?
A: They should be easily pierced with a fork or the tip of a knife all the way through, and the exteriors should have noticeable caramelized, golden-brown spots. The total time is usually 25-30 minutes at 425°F.
Q: My parsnips are burning on the bottom before they’re tender. What happened?
A: This usually means your oven rack is too low (too close to the heating element) or your baking sheet is too thin/dark. Next time, try placing the rack in the center position and using a lighter-colored, heavy-duty sheet pan. You can also line the pan with parchment paper for a slight buffer.
Q: Do I have to peel the parsnips?
A: Yes, I strongly recommend it. The skin can be tough, bitter, and sometimes fibrous. Peeling ensures a tender, pleasant texture and allows the butter and seasonings to adhere directly to the flesh.
Q: Can I prepare this dish ahead of time for a dinner party?
A: You can prep the parsnips and make the garlic butter mixture a few hours ahead. Keep them separate in the fridge. Let the butter come back to a liquid state, then toss and roast just before serving for the best texture.
Q: What’s the difference between a parsnip and a white carrot?
A: While they look similar, parsnips have a distinct, sweeter, and more nutty flavor, especially when cooked. They are also typically starchier. They are not interchangeable with carrots in recipes expecting a similar texture.
Q: Are parsnips good for you?
A: Yes! They are an excellent source of fiber, vitamin C, vitamin K, and folate. They also contain antioxidants and have a lower glycemic index than potatoes.
Final Thoughts
This Garlic Butter Roasted Parsnips recipe exemplifies my cooking philosophy: let quality ingredients shine with a simple, reliable technique. It takes a vegetable that might be unfamiliar to some and turns it into an undeniable star of the dinner table. The process is straightforward, the results are consistently impressive, and the flavor—that perfect harmony of savory garlic, rich butter, and the parsnip’s inherent sweetness—is deeply satisfying.
I’ve served these at casual family suppers and elegant holiday meals, and they are always met with enthusiasm and requests for the recipe.
I encourage you to give this method a try. Pay attention to the details—the uniform cutting, the thorough coating, the single layer on the pan—and you will be rewarded with a side dish that might just become a new favorite. Once you taste that crispy, caramelized edge, you’ll understand the magic.
I’d love to hear how it turns out for you. Share your results, your variations, or any questions in the comments below. Happy roasting
Garlic Butter Roasted Parsnips
Equipment
- Large rimmed baking sheet
- Chef’s knife and cutting board
- Large mixing bowl
- Microplane or garlic press (optional but helpful)
Ingredients
- 2 lbs parsnips peeled and cut into 3-inch batons
- 4 tbsp unsalted butter melted
- 4 cloves garlic minced
- 1 tbsp fresh thyme leaves or 1 tsp dried thyme
- 1 tsp kosher salt plus more to taste
- 1/2 tsp black pepper freshly ground
- 1 tbsp fresh parsley chopped, for garnish (optional)
Instructions
- Preheat your oven to 425°F (220°C). This high heat is crucial for achieving caramelization without steaming the vegetables. While the oven heats, peel the parsnips and cut them into uniform 3-inch long batons, about ½-inch thick. Try to make them as even as possible so they cook at the same rate.
- In a large bowl, combine the melted butter, minced garlic, thyme, kosher salt, and black pepper. Whisk it together until it’s fragrant and well-combined. Tip from me: Letting this mixture sit for a minute helps the garlic flavor infuse into the butter, creating a more complex base for roasting.
- Add the parsnip batons to the bowl with the garlic butter. Use your hands or a large spoon to toss everything together, making sure each piece is thoroughly and evenly coated. This step is key—don’t rush it. Every surface needs that buttery layer to crisp up beautifully in the oven.
- Arrange the coated parsnips in a single layer on a large, rimmed baking sheet. Trust me, crowding is the enemy of crispiness. If the pieces are touching, they’ll steam instead of roast. Use two sheets if necessary. Slide the pan into the preheated oven.
- Roast for 25-30 minutes, stopping halfway through to flip and stir the parsnips with a spatula. You’re looking for deep golden brown spots and tender flesh that yields easily to a fork. The edges should be slightly crispy. Once done, transfer to a serving platter, garnish with fresh parsley if using, and serve immediately.