
Why You’ll Love This Recipe
- Gluten-Free Delight: Perfect for those with gluten sensitivities or looking for a healthier alternative.
- Nutrient-Rich: Oat flour is packed with fiber, protein, and essential vitamins.
- Easy to Make: Simple ingredients and straightforward steps make this a beginner-friendly recipe.
- Versatile: Enjoy as a snack, toast for breakfast, or use for sandwiches.
- Customizable: Easily adapt the recipe to fit various dietary preferences, including vegan and dairy-free.
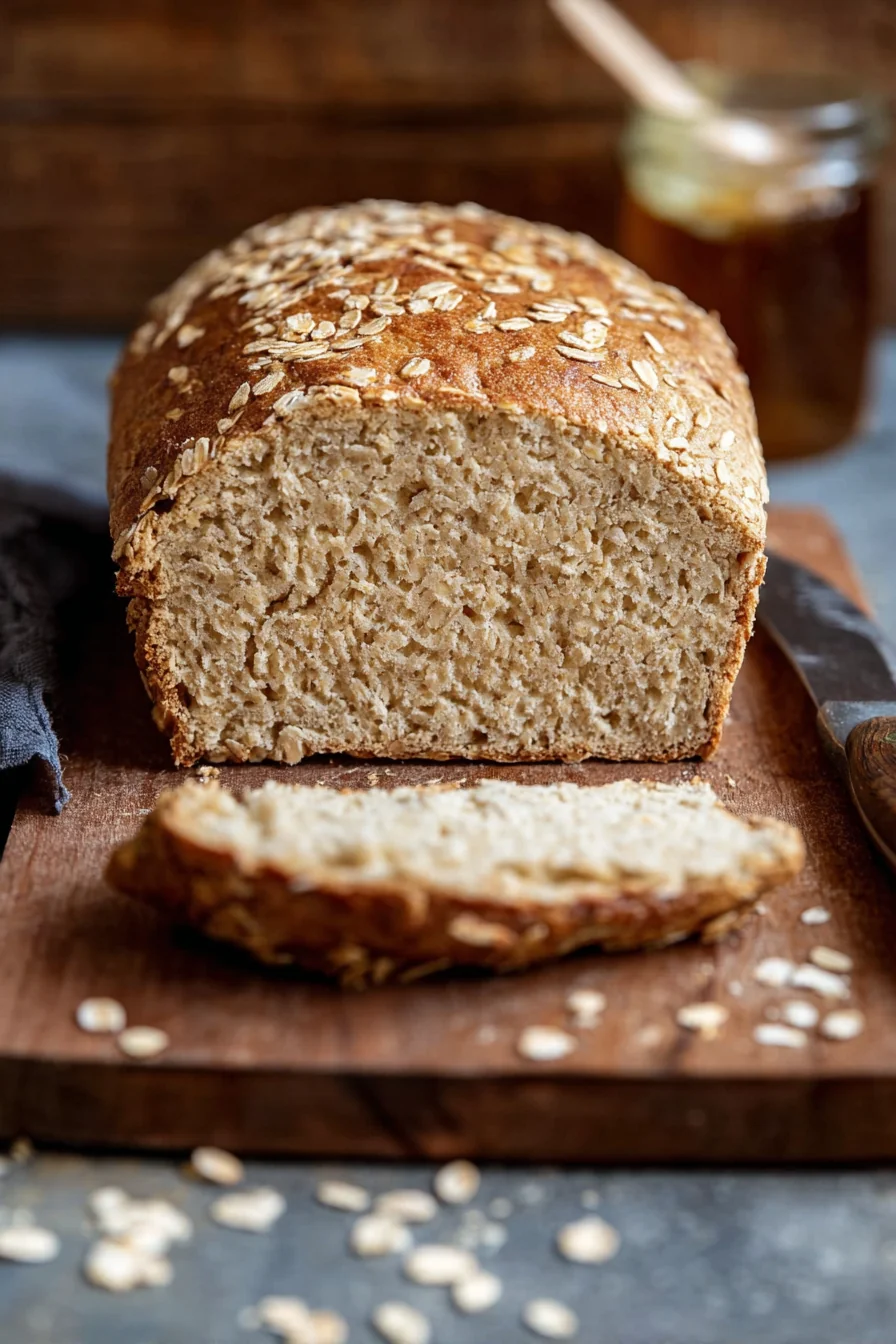
- Delicious Texture: The bread has a soft, moist crumb with a satisfying chewiness.
Ingredients & Preparation Notes
- Oat Flour: Choose certified gluten-free oat flour if needed. It’s best to use freshly ground oat flour for the best flavor and texture.
- Almond Milk: Unsweetened almond milk works well, but you can substitute with any non-dairy milk or regular milk.
- Honey: Adds a touch of sweetness. Maple syrup is a great vegan alternative.
- Baking Powder and Baking Soda: These leavening agents help the bread rise and achieve a light texture.
- Salt: Enhances the overall flavor of the bread.
- Eggs: Provide structure and moisture. For a vegan version, use flax eggs (1 tbsp ground flaxseed + 3 tbsp water per egg).
- Olive Oil: Contributes to the moistness of the bread. Melted coconut oil is a good substitute.
When selecting ingredients, opt for high-quality oat flour and fresh baking agents for the best results. If you’re new to baking with oat flour, start with a small batch to get a feel for its unique properties.
Professional Tips & Techniques
- Temperature Control: Preheat your oven accurately to ensure even baking. A consistent 350°F (175°C) is ideal for this bread.
- Mixing Method: Combine wet and dry ingredients separately before mixing. Stir gently to avoid overmixing, which can lead to a dense loaf.
- Baking Time: Check the bread at 45 minutes. If it’s not done, continue baking in 5-minute increments until a toothpick comes out clean.
- Cooling: Allow the bread to cool in the pan for 10 minutes before transferring to a wire rack. This helps it set properly without becoming soggy.
- Visual Cues: The bread is done when it’s golden brown on top and sounds hollow when tapped on the bottom.
Recipe Variations
- Vegan Option: Replace honey with maple syrup and use flax eggs instead of regular eggs.
- Herb Infusion: Add 1 tablespoon of chopped fresh herbs like rosemary or thyme for a savory twist.
- Seeded Bread: Mix in 1/4 cup of your favorite seeds (sunflower, pumpkin, or chia) for added texture and nutrition.
- Sweet Variation: Incorporate 1/2 cup of dried fruit and 1 teaspoon of cinnamon for a sweeter bread.
- Cheese Bread: Stir in 1/2 cup of grated cheese (cheddar or parmesan) for a rich, savory flavor.
- Nutty Bread: Add 1/4 cup of chopped nuts (walnuts or almonds) for extra crunch and flavor.
- Whole Grain Boost: Substitute half of the oat flour with whole wheat flour for a heartier texture.
- Spiced Bread: Mix in 1 teaspoon of your favorite spice blend (like pumpkin pie spice) for a warm, aromatic bread.
Serving Suggestions
- Breakfast: Toast slices and spread with your favorite nut butter or jam for a quick and nutritious breakfast.
- Sandwiches: Use as a base for sandwiches, pairing well with both sweet and savory fillings.
- Snack: Enjoy slices plain or with a smear of avocado for a healthy snack.
- Side Dish: Serve alongside soups or salads for a complete meal.
- Presentation: Slice the bread and arrange on a wooden board with a variety of spreads and toppings for a rustic presentation.
- Pairing: Pair with a cup of tea or coffee for a cozy treat.
Storage & Make-Ahead Tips
- Room Temperature: Store in an airtight container at room temperature for up to 3 days.
- Refrigeration: For longer storage, keep in the refrigerator for up to a week.
- Freezing: Slice the bread and freeze individual portions. Toast directly from frozen for convenience.
- Make-Ahead: This bread can be made ahead and stored in the freezer for up to 3 months. Thaw slices as needed.
- Reheating: To refresh, wrap slices in foil and warm in a 350°F (175°C) oven for 10 minutes.
Frequently Asked Questions
Q: Can I make this bread ahead of time?
Yes, you can make this bread ahead of time. It stores well in the freezer and can be thawed and toasted as needed.
Q: Is oat flour bread gluten-free?
Yes, if you use certified gluten-free oat flour, this bread is gluten-free.
Q: Can I substitute oat flour with another flour?
While oat flour gives this bread its unique texture and flavor, you can experiment with almond flour or a gluten-free blend, though results may vary.
Q: How do I know when the bread is done baking?
The bread is done when it’s golden brown on top, and a toothpick inserted into the center comes out clean.
Q: Can I make this recipe vegan?
Yes, use flax eggs and maple syrup instead of regular eggs and honey for a vegan version.
Q: What can I add to make the bread more flavorful?
You can add herbs, spices, seeds, nuts, or cheese to customize the flavor to your liking.
Q: How long does oat flour bread last?
At room temperature, it lasts up to 3 days. In the refrigerator, it can last up to a week, and in the freezer, up to 3 months.
Q: Can I use this bread for sandwiches?
Absolutely, its texture holds up well for sandwiches, making it a versatile choice.
Conclusion
This oat flour bread recipe is a fantastic addition to any home baker’s repertoire. It’s easy to make, delicious, and packed with nutrients, making it a perfect choice for gluten-free diets or anyone looking to enjoy a healthier bread option. Give it a try and see how versatile and satisfying it can be.
Don’t forget to share your results on social media and let us know how you enjoyed this gluten-free delight. Happy baking!
Oat Flour Bread
Equipment
- 9x5-inch loaf pan
- Large mixing bowls
- Whisk
- Spatula
- Toothpick
Ingredients
- 2 cups oat flour Certified gluten-free if needed
- 1 cup almond milk Unsweetened
- 2 tbsp honey Or maple syrup for vegan option
- 1 tsp baking powder
- 1/2 tsp baking soda
- 1/2 tsp salt
- 2 large eggs Or flax eggs for vegan option
- 2 tbsp olive oil Or melted coconut oil
Instructions
- Preheat your oven to 350°F (175°C). Grease a 9x5 inch loaf pan with a bit of olive oil.
- In a large bowl, whisk together the oat flour, baking powder, baking soda, and salt until well combined.
- In a separate bowl, mix the almond milk, honey, eggs, and olive oil until smooth.
- Pour the wet ingredients into the dry ingredients and stir until just combined. Be careful not to overmix.
- Pour the batter into the prepared loaf pan and smooth the top with a spatula.
- Bake for 45-50 minutes, or until a toothpick inserted into the center comes out clean.
- Allow the bread to cool in the pan for 10 minutes, then transfer to a wire rack to cool completely before slicing.